Sunday, November 24, 2024

Have A Sweet Holiday-Coffee and Cards with Celeste and Deb


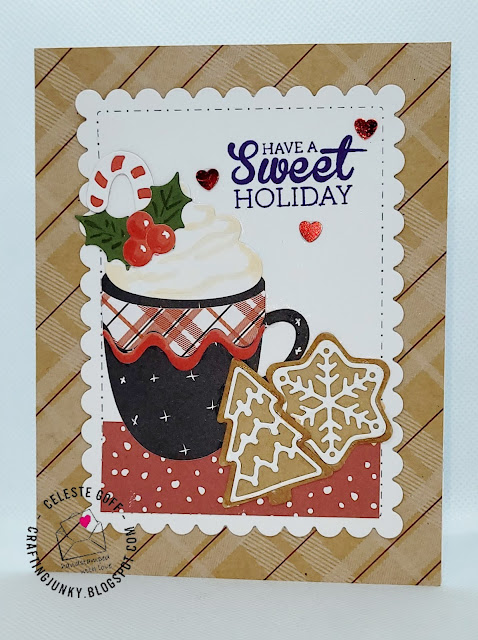
This month Debra and I are using this fun holiday photo as our inspiration. I created my holiday card by layering some plaid patterned paper from the American Crafts Hot Cocoa 6x6 paper pad onto my A2 card base. I die cut a focal panel using white cardstock and a Gina Marie Designs scalloped edge rectangle die. I layered another piece of patterned paper from the same paper pad at the bottom of the focal panel to look like a tablecloth. I die cut the focal elements using Momenta's Christmas Mug die set and a mix of cardstock and more papers from the same paper pad. I adhered them onto the focal panel using liquid glue. I stamped the sentiment from Avocado Arts Gingerbread Goodness stamp set at the right upper corner. To finish off the card, I did some shading on the whipped cream using a Copic marker and added a few shimmery red heart sequins around the sentiment. 

While I was crafting, I opted to sip on a delicious mug of Barissimo's Tiramisu coffee. It's positively delicious! Now, be sure to stop by Debra's blog and see how she was inspired this month by our inspiration photo

Thursday, November 21, 2024

Fall For Autumn Leaves


My card today was created for the latest Color Throwdown card challenge. I started by embossing a panel of kraft cardstock using the Lisa Horton Knitted embossing folder and mounted the panel directly onto my white A2 card base. I die cut a white panel using a stitched scallop edge rectangle die from Gina Marie Designs, and stamped the focal image from Newton's Nook Designs Falling For You stamp set. I popped that panel up off of the card using thin foam tape. I stamped the pumpkin image twice and several of the leaves. I colored them using my alcohol markers and then adhered them to the panel. Such a cute and easy card! Thank you for stopping by my blog today. I hope you have a wonderful day!


Sunday, November 17, 2024

Joy


Hello, happy Sunday! I hope everyone had a wonderful weekend. Today's card was created for the latest Just Us Girls card challenge. I created this card by layering some basic black cardstock onto my white A2 card base. Then, using piece of patterned paper from The Paper Studio's Vintage Christmas 6x6 paper pack, I created a frame that I popped up off of the card base using thin foam tape. I then die cut the word Joy using Echo Park's Santa Claus Lane Wreath Of Joy die and red and green cardstocks. I adhered all of the elements to the card, and finished it all off with red gem stickers from Honey Bee Stamps Harvest Festival sticker pack and white gel pen details. Thank you for stopping today, and if you like my card, be sure to leave a comment. I appreciate and read them all!

Tuesday, November 5, 2024

Wishing You A Merry Christmas


It's a very rainy day here in Southeast Missouri, and I had the good luck to have the day off from work. I can't think of anything better to do on a rainy day than get crafty! I had a tag in my stash from a very old paper pad (so old that I forgot who made it), and I thought it would be fun to finally use for the latest Sketch Saturday card challenge. I started with patterned paper from The Paper Studio's Vintage Christmas 6x6 paper pad. I broke up the patterned papers with some beautiful black and white ribbon I picked up at Hobby Lobby for 99 cents. I adhered some of the gingham patterned paper to the top of the tag, and then cut it down smaller using an MFT pierced edge tag die. I used a hole punch and some twine and extra ribbon to add a nice bow to the top of the tag, and then popped it up off of the card base. Using the My Art C Holiday Sayings stamp and die set I created the wreath and the deer. I popped the wreath up using thin foam dots and then adhered the center flat to the tag. I added the deer to the right of the wreath and added a few black sparkling gems that I had in my stash for a finishing touch. Thank you for stopping by my blog! 

Sunday, November 3, 2024

Thinking Of You


Hello, and happy Sunday! My card today was created for the latest Color Throwdown card challenge. I created my card by layering a square panel of kraft cardstock onto my ivory A2 card base. I then cut a small square panel using more ivory cardstock and embossed it using a Spellbinders embossing folder. I adhered it to the kraft panel and added some fun kraft colored twine almost to the top. I die cut 3 maple leaves using the stitched detail leaf dies from Jillian Vance, one in terra cotta and the other two in mustard. I popped them up off of the focal panel using foam squares. I stamped the sentiment from Stampabilities Card Phrases stamp set using Gina K ink in warm cocoa below the focal panel. I finished this card off with some pretty mustard colored gems from Honey Bee Stamps Harvest Festival gem sticker pack. I love how clean and simple this card turned out. Thank you for stopping by my blog this evening!


Saturday, November 2, 2024

Let It Snow-Send A Smile 4 Kids


Good morning, and welcome to the November Send A Smile 4 Kids card challenge! This month we are celebrating Holidays. I created my card by stamping the adorable penguin and trees from My Favorite Things Snow Globe Singles stamp set onto white cardstock. I colored them and die cut them images using coordinating dies. Using the Snow Globe die set I die cut the elements for the snow globe using light blue, teal, and black cardstock from my stash. I embossed the sentiment on the bottom of the snow globe using the snow globe singles stamp set, Versamark ink, and Ranger detail white embossing powder. I die cut a piece of snowflake patterned paper from My Mind's Eye Sweater Weather using a stitched rectangle die from Paper Rose, adhered some black twine from Spellbinders at the top, and adhered it to a postage panel I die cut from black cardstock using a Gina Marie postage edge rectangle die. I adhered that panel to my white A2 card base and adhered the snow globe at the center. I finished off this adorable winter card using some Nuvo Crystal Drops in white blizzard to the trees and the penguin's hat. Thank you for stopping by my blog today. Now be sure to head over the Send A Smile 4 Kids blog and see what fun everyone else has created this month!