Sunday, December 18, 2022

Sending You Love And Joy-Coffee And Cards With Celeste And Deb


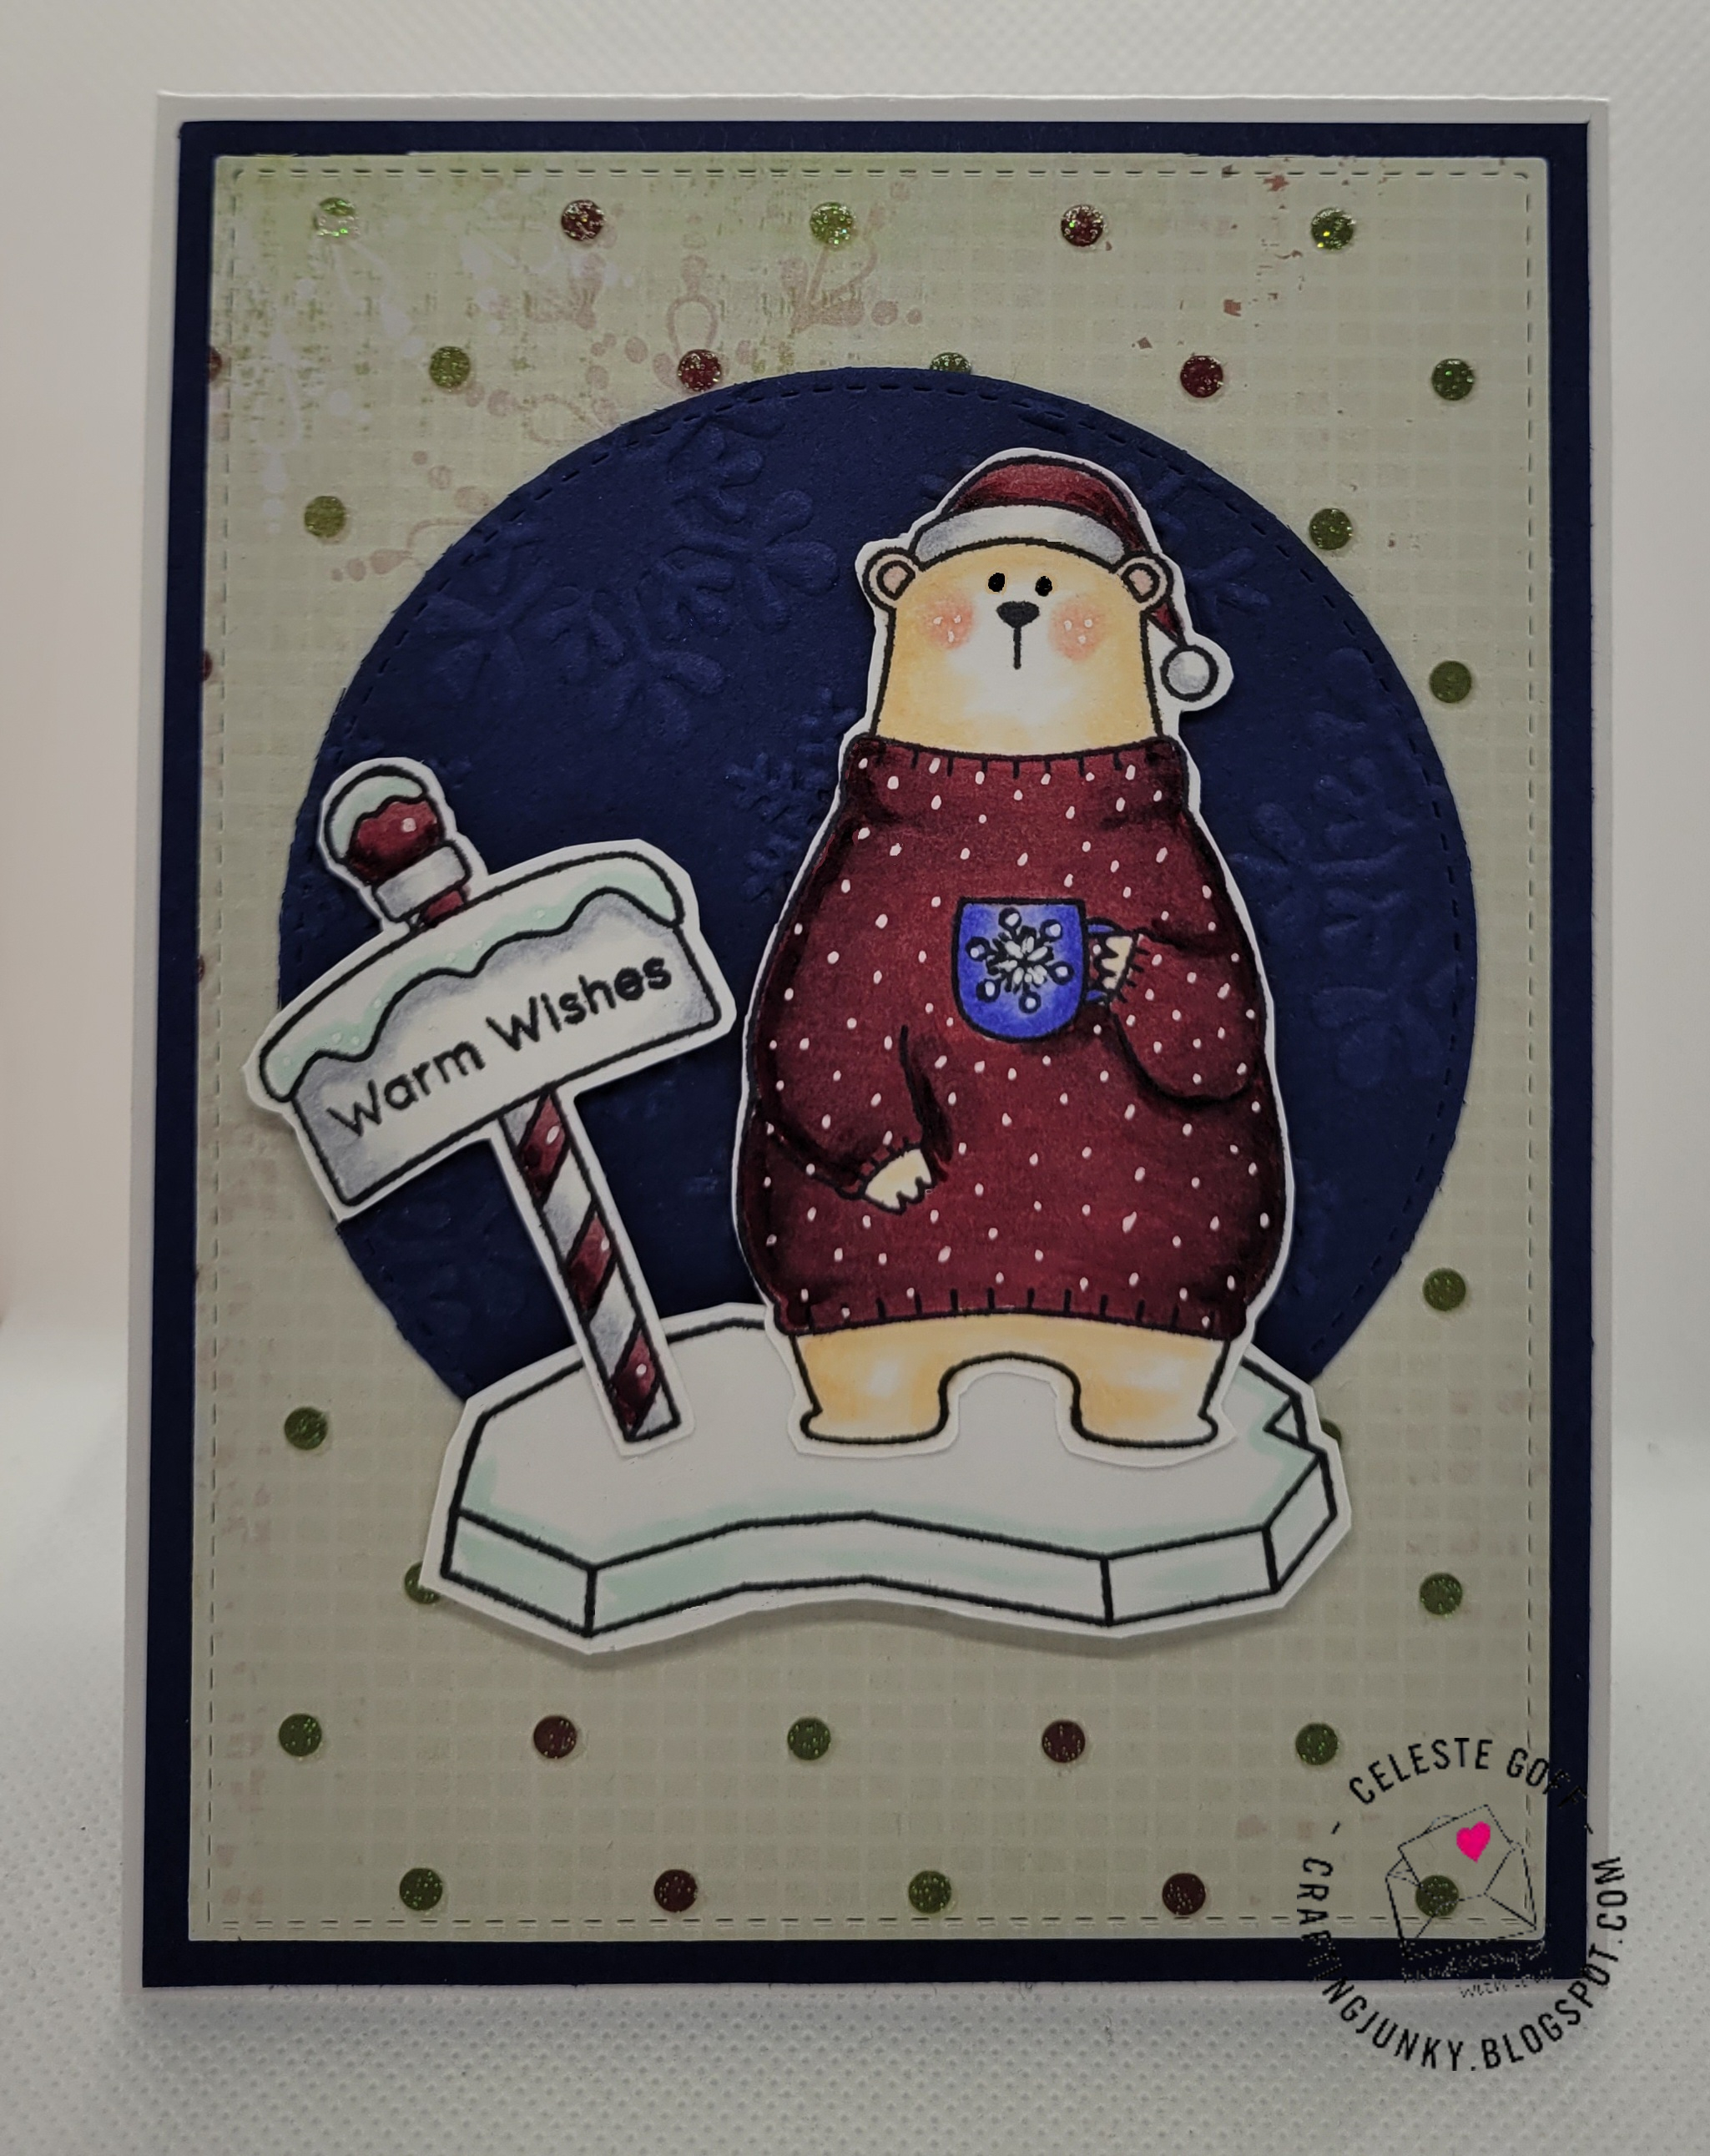
Happy Sunday! This adorable image is the inspiration for this month's Coffee and Cards with Celeste and Deb. To create my card I started by layering some cherry cobbler cardstock onto my white A2 card base. Then using some patterned papers from Heidi Swapp's Noel 6x6 paper pad I created a main panel that I cut down using a stitched rectangle die from Paper Roses. I popped that panel up off of the card using 3M foam tape. I stamped the adorable image and sentiment from Penny Black's Cup Of Joy mini stamp set. I colored them using my Copic markers and fussy cut the images and sentiment banner out. Using the steam images from Paper Smooches Need To Venti stamp set I stamped them onto a white stitched rectangle panel using a smaller die from Paper Roses and Versafine onyx black ink. I popped the images up using Stampin' UP's foam dimensionals and centered them on the panel under the steam. For a finishing touch I added some black gems around the panel for a little sparkle. 
I was out finishing up the last of my Christmas shopping, so I snagged a Starbucks peppermint mocha latte. Now, be sure to pop on over to Debra's blog and see what fun she created for our collaboration this month! Thank you for stopping by my blog today. I wish all of you and your family's a very merry Christmas and a healthy, happy New Year!


Saturday, December 3, 2022

Christmas Hugs-Send A Smile 4 Kids

We are rapidly approaching the end of 2022, and this is our last challenge of the year at Send A Smile 4 Kids. This month we are creating winter cards for kids. I am still in Christmas card-making mode, so I had to make a Christmas card. I created this card by stamping the adorable little images from Mama Elephant's Hot Cocoa stamp set onto white Copic-friendly cardstock and coloring them using my alcohol markers. I fussy cut the images out leaving a small white border around them. I then embossed a plain white piece of cardstock using the Spellbinders plaid embossing folder and mounted the panel directly onto my white A2 card base. I then added a panel of wonky plaid patterned paper from the American Crafts Very Merry 6x6 paper pad onto my card at an angle. Then using a Fiskars scalloped edge punch and some olive cardstock I created a small, scalloped border using some which I attached under the patterned paper to create some interest between it and the white embossed panel. Then using Spellbinders scalloped circle and nesting circle dies I created the focal panel. I popped the adorable little images up using Stampin' UP foam dimensionals. I then stamped the sentiment from the Crate Paper Snow and Cocoa mini stamp set onto more olive cardstock using Versamark ink and heat embossed it using Ranger detail embossing powder in white. I cut that down into a small sentiment strip and mounted it under the focal panel using more foam dimensionals. I die cut the Hugs sentiment using more olive cardstock and My Favorite Things Essential Elements Alphabet dies. I glued the sentiment directly onto the card base, and finished the card with some white gel pen detail and some light green enamel dots from Simple Stories. Now, be sure to head over to Send A Smile 4 Kids and see how the rest of the design team was inspired by this month's challenge. 
 

Sunday, November 27, 2022

But First, Coffee-Coffee And Cards With Celeste And Deb


Hello, and welcome to the November Cards and Coffee with Celeste and Deb. We decided to use this beautiful photo as our inspiration for this month's collaboration. I love all the deep, rich Autumn colors and wanted to use as many of them as I could for my card. I started by stamping the Tricia Girl by Unity Stamp Company onto some white cardstock and colored her skin, hair, and coffee cup using my Copic markers. Then using papers from the Best Occasions Quick Page 12x12 paper pack I stamped and paper-pieced her coat, scarf, shirt, skirt, purse, boot warmers, and her boots. I added some early espresso cardstock by Stampin' Up onto my white A2 card base. I then cut down a pretty piece of patterned paper from the same 12x12 pad and added it to the side and then added a decorative edge that I created with more early espresso cardstock using a decorative edge die. I cut down more paper from the paper pack and glued the decorative edge piece to it. Using a rectangle die from Paper Roses I cut the panel down and adhered it to my card panel. I stamped the Tricia Girl image again onto the panel, fussy cut the paper-pieced image, and glued the two together for a seamless look. I stamped the sentiment from Stampabilities Coffee stamp set and die cut it down using a pierced circle die from My Favorite Things. I then die cut a larger panel of early espresso using a Spellbinders die, and mounted the two together.  I took a dark brown Copic marker and colored some clear rhinestones to match the colors on the card and adhered them around the focal image and the sentiment for a nice finishing touch.

For my coffee, I opted for my standard dark roast Seattle's Best Post Alley served in a fun new mug my daughter got me for my birthday last month. Now, be sure to stop by Debra's blog and see how she was inspired by this month's photo. 


Sunday, November 13, 2022

Give Thanks-CLBH Fall/Winter 2022


Hello, I hope you are enjoying your Sunday. This card was created for the fall/winter Coffee Lovers Blog Hop 2022. I stamped and colored images from CTMH Pumpkin Treats, Reverse Confetti's In All Things, and Hero Arts Grateful Pumpkin bundle sets. I die cut the images using coordinating dies and set them aside to work on my background. I started by layering a piece of sage blue/green cardstock paper from Hobby Lobby onto the card base. I then cut down a small panel of patterned paper from the American Crafts Autumn Crisp paper pad and added a small decorative border with navy cardstock from Hobby Lobby at the edge. I stamped the sentiment from Reverse Confetti's In All Things stamp set using Stampin' UP's night of navy ink onto more of the sage blue/green cardstock and fussy cut the image out. I adhered it and the colored images onto the card using Stampin' UP foam dimensionals. I finished the card off by adding a few details to the images with a white gel pen. Thank you for stopping by my blog today! 


Saturday, November 5, 2022

Friendship Warms The Heart-Send A Smile 4 Kids


Hello, and a very happy November to you! This month at Send A Smile 4 Kids we are creating Holiday cards for kids. I recently picked up this adorable stamp set on a de-stash from a fellow crafter and couldn't wait to use it. I layered some cherry cobbler cardstock from Stampin' UP onto my white A2 card base. I then added a piece of plain white cardstock as a frame and then added a pretty piece of snowflake patterned paper from the Simple Stories Cozy Christmas 6x6 paper pad. Using a scalloped edge die from Papertrey Ink I created a large scalloped border using more paper from the same paper pad. I stamped the sentiment from My Favorite Things PI Merry Kissmas stamp set using Versafine onyx black ink and trimmed it down into a narrow border. I mounted it on more of the cherry cobbler cardstock and adhered it to the scalloped border. I stamped the adorable image from the same My Favorite Things stamp set with Memento tuxedo black ink directly onto a round circle panel I created using a Spellbinders circle stacking die. I also paper pieced the girl's sweater and hat and the snowman's scarf and hat using more patterned paper from the same paper pad. I adhered them directly onto the images on the focal panel and colored everything using my Copic markers. I adhered the entire panel to another piece of cherry cobbler cardstock using a Spellbinders scalloped edge circle stacking die. I adhered the panel to the card using some 3M foam tape. For a nice finishing touch, I covered the pom poms on the girl's hat and the snowbank with liquid glue and poured over some Wow! glitter in white for some sparkle and shine and added some white gel pen to the characters. Be sure to stop over at the SendASmile4Kids blog and see what the rest of the design team created this month. 

Friday, October 28, 2022

Boo!


This fun little Halloween card was created for the There's A Stamp For That Challenge. To create this card I started with a panel of white cardstock that I blended on Tim Holtz distress inks in shaded lilac, villainous potion, and black soot. I took a distress sprayer and spritzed it with water and blotted off the excess for a nice, distressed look. I adhered an American Crafts Halloween spider web doily straight onto the panel using some liquid glue. I die cut the panel down using a stitched stacking rectangle die from MFT and popped the panel up off of my white A2 card base using 3M foam tape. I then stamped, colored, and die cut all of the images from MFT's Witch Way To The Candy stamp and die set. I adhered all of the images to the card using Stampin' UP foam dimensionals. For a finishing touch I added highlights to the individual images using a white gel pen. Thank you for stopping by my blog today. I hope you all have a safe and fun Halloween!!


Sunday, October 23, 2022

Ah, Autumn-Coffee And Cards With Celeste And Deb


Hello, and welcome to the October Coffee and Cards with Celeste and Deb. This month we chose to use pumpkins as our inspiration. I kept my card pretty simple. Using only papers and cut aparts from the Echo Park Reflections Fall 12x12 paper pad I created a scene of pumpkins on a hilly autumn scape with house, trees, and lots of pumpkins. The pumpkins were created with Lawn Fawn's So Thankful stamps and Gina K Designs charcoal brown ink. I added a little dimension to them by coloring over the patterned paper with my Copic markers. The leaves were created with a mini Recollections punch and more of the patterned paper from the collection. I couldn't make up my mind on this card and created a second card using all of the same elements from the Lawn Fawn stamp set, the patterned papers, and the Recollections punch. You'll have to tell me which one you liked better. 

I usually go buy a fancy specialty coffee for my collaborations with Deb but this week I kept it simple. The coffee is my standard Seattle's Best dark market street dark roast served in a simple mug that sums up my life...Thankful! Now, be sure to hop on over to Debra's blog and see how she was inspired by this month's pumpkin inspiration! 

Sunday, October 16, 2022

Always Grateful


 This card was created for the latest Color Throwdown card challenge. I stamped the medallion and leaf images from Stampin' UP's Day Of Gratitude stamp set using Memento Dandelion, Gina K Design's charcoal brown, and Stampin' UP's not quite navy inks. I splattered the background panel with the same inks and a small round paint brush. I cut the panel down using a stitched rectangle die from Paper Rose. I layered it on some early espresso cardstock from Stampin' UP and adhered it to my card base. I fussy cut the leaves and attached them the card with foam dimensionals. I stamped the sentiment from Close To My Heart's Always Grateful Trees stamp set and more of the same charcoal ink. I cut it down to a panel and bordered it with more early espresso cardstock. I popped it up with foam dimensional and adhered it to the focal panel to complete my card. Thank you for stopping by my blog today! 


Saturday, October 1, 2022

Happy Meow-lloween-SAS4Kids October 2022

Hello, and happy October! Fall is here and I am so very happy. This month at Send A Smile 4 Kids we are creating Holiday cards, and I just couldn't help myself. With Halloween coming up later this month I had to create another Halloween card. I created my card by layering a piece of orange and white polka-dot paper from the American Crafts Haunted 6x6 paper pad onto my A2 card base. I then took a piece of basic black cardstock from Stampin' UP and die cut 3 circles using my Spellbinders stacking circle dies. I adhered that panel on top of the patterned paper and added white dashed lines around the outer edges and around each circle for added contrast. I stamped the sentiment from C.C. Designs Meow-lloween stamp set using Versamark ink and white detail embossing powder from Ranger. I stamped the images from the same stamp set onto white Copic-friendly cardstock and colored them using my alcohol markers. I used the coordinating dies to cut them out and placed them around my card panel to create a pleasing Halloween scene. I finished my card by adding some orange enamel dots from Hobby Lobby around the card for some added interest. Now, be sure to pop over to the SAS4Kids blog and see what the rest of the design team  created for us this month!
 

Warm Winter Wishes


Hello! I was invited to guest design for the October Caffeinated Christmas Card Challenge! This month's challenge is sponsored by Miss Ink Stamps, and they were kind enough to send me some goodies for the challenge. To create my card I started by die cutting the focal panel from a Gina Marie Designs scalloped rectangle die and some real red cardstock from Stampin' UP. I then cut down a smaller panel and using the Miss Ink Stamps Diagonal Lines stencil and Tim Holts distress inks in Shabby Shutters and Fired Brick I created the inked plaid background. To create more interest I freehand drew in some white lines with my white gel pen and added some tiny black dots at each intersecting line. I mounted that panel onto some plain white cardstock and die cut an oval window using a My Favorite Things oval die. I then die cut a smaller oval window into the red scalloped panel using a Spellbinders oval die. I adhered all of the panels together and mounted them up off of the card using 3M foam tape. I stamped the gnome from Miss Ink Stamps Big Mugs stamp set, colored it using my Copic markers, fussy cut the image out, and mounted it in the oval window with more foam tape. I stamped the sentiment from Miss Ink Stamps Season's Greetings stamp set onto white cardstock using Versafine onyx black ink and cut it down to a small sentiment strip. I mounted more red cardstock behind it and adhered it to the card. I finished the whole thing off with some cute little black gem stickers from Honey Bee Stamp's Fresh Brewed collection. 


Wednesday, September 21, 2022

Happy Fall


Hello, happy Wednesday! Today's card was created for the latest Freshly Made Sketches. I started with a white A2 card base that I embossed with the Richard Garay sweater embossing folder. I then cut down a piece of plaid patterned paper from The Paper Rose Autumn Plaid 6x6 paper pad and matted it with some early espresso cardstock from Stampin' UP. I inked up some white cardstock using Tim Holtz distress inks in fall colors and then die cut the leaves using Jillian Vance Leaves & Petals die set. I glued the leaves to some plain kraft cardstock I got at Hobby Lobby and die cut it into a panel using The Paper Rose stacking stitched rectangle die. I matted it onto early espresso cardstock and then arranged both panels onto the card following the sketch. I die cut more early espresso cardstock using My Favorite Things Essential Alphabet dies to spell out Fall. I layered three of each together for dimension and glued them to the focal panel. I stamped and heat embossed the word Happy from The Greetery Pretext Sentiments stamp set and cut it down to small strip. I mounted that on some mini foam dimensionals from Stampin' UP and placed it above the alpha die sentiment. It's still in the high 90's here in Southeast Missouri but I'm holding out hope that fall is right around the corner. This card is me secretly hoping!


Friday, September 16, 2022

May Your Days Be Filled With Sunshine & Seashells


Today's card was created for the latest Color Throwdown card challenge. I had placed an order with Honey Bee Stamps over the Labor Day weekend and included in my order was a postcard with this image on the back. I decided to color it with my Copic markers for this challenge and add the flip flops from the Flippin' Fabulous stamp and die set to bottom lower corner for some additional interest. I added some pretty aqua gems from Honey Bee Stamps Harvest Festival gem sticker collection and some white gel pen details to the flip flops and the shells for a finishing touch. This card could not have been any easier! 


Sunday, September 11, 2022

Coffee & Friends-Coffee And Cards With Celeste And Deb


Hello! Welcome to the September Coffee and Cards with Celeste and Deb collaboration. Debra found this amazing inspiration photo for us to use, and I was so excited to play with some fall themed stamps! To create my card I started by layering some early espresso cardstock from Stampin' UP onto my white A2 card base. I then layered a gorgeous piece of plaid patterned paper from the Paper Rose Autumn Plaid 6x6 paper pad on top. I stamped the images from Simon Says Stamp's Pumpkin Spice Sentiments stamp set onto some white Copic-friendly cardstock. I colored them using my alcohol markers in tones complimenting the plaid paper. I die cut the panel using a Gina Marie Designs wonky stitch edge rectangle stacking die. I popped the panel up off of my card using 3M foam tape. I die cut two of the stitched autumn leaves from Jillian Vance Designs using some coordinating-colored cardstock and added them to the upper right corner. To finish up my card I added some natural twine from American Crafts to the leaves and some white gel pen details to the pumpkins and the scarf. 
For my coffee this month I chose an iced pumpkin spice latte from McDonald's. I don't usually go there but it was handy and on my way home. Now, be sure to stop by Debra's blog and see what fun, crafty goodness she created! 


Saturday, September 3, 2022

You're Boo-Tastic!-Send A Smile 4 Kids


Hello! This month at Send A Smile 4 Kids we are creating fun Halloween cards for kids. I picked up a few gently used stamp sets on a destash and just had to use one of them for this challenge. To create my card I started by stamping the spider web background stamp (maker unknown) onto white cardstock using Memento tuxedo black ink and inked it up using Tim Holtz distress inks in Villainous Potion and Black Soot. I then spritzed it with water and cut the panel down using a Pink & Main stacked rectangle die. I layered it onto my card and then cut down a strip of basic black cardstock and die cut three holes in it. I popped the panel up using foam tape and adhered it to my card panel. I then stamped all of the fun Halloween images from Mama Elephant's Bootastic stamp set. I colored them in fun Halloween colors using my Copic markers, fussy cut them out and adhered them to the card in the die cut holes. I stamped a few of the spiders from the same stamp set, fussy cut them out, and adhered them directly to the spider web panel. The sentiment is from the same stamp set and was stamped using Memento tuxedo black ink and die cut using a small fishtail banner from Jillian Vance Designs. I completed my card by adding some white gel pen details around the characters. Thank you for stopping by my blog today. Be sure to pop over to the Send A Smile 4 Kids blog and see how the rest of the design team was inspired by this month's challenge.  

Sunday, August 28, 2022

Coffee & Friends-Coffee And Cards With Celeste And Deb


Hello, and welcome to the August Coffee and Cards with Celeste and Deb collaboration! This month we chose to create coffee themed cards. I have had this Memory Box Stacked Teacups die cut sitting on my desk since last fall. It was given to me by a fellow coffee loving card maker in a card swap. I thought it was time to finally use it. I opted to keep this card fairly clean and simple. Using patterned paper from Echo Park's Flower Market 6x6 paper pad, I selectively pieced paper behind the cups, and popped the image up using Stampin' UP foam dimensionals. I stamped the sentiment from the Altenew Coffee Love stamp set next the die cut using Gina K Design basic black ink. I rounded the two lower corners using my We R Memory Keepers corner chomper. 

For my coffee, I am drinking Seattle's Best Post Alley dark roast in a fun mug by daughter got me for this past Christmas. I am a huge fan of the show Schitt's Creek and this mug makes me giggle every time I use it! Now, be sure to stop by Debra's blog and see what she created for us this month. 


Friday, August 19, 2022

We're The Perfect Pair

I have an old Army mom friend who has her 45th wedding anniversary coming up next month, and she reached out to me to have me create a fun, unique card that she could give her husband. She told me that he loves squirrels and wanted there to be 7 acorns on the card...two for their children and 5 for their grandchildren. I have had the Darcie's Heart & Home Busy Beaver stamp set for years and knew it would be perfect for this card since it had all of the elements she asked for. I stamped the squirrel twice and then the acorns, tree trunk, mushroom, and flowers all from the same stamp set onto white Copic-friendly paper using Memento tuxedo black ink. I colored all of the images using my alcohol markers, fussy cut each image out, and edged them with my Memento dual tip marker in black. I then layered some pretty fall patterned papers from the American Crafts Autumn Crisp 6x6 paper pad onto my white A2 card base. I die cut a white panel using a stitched edge A2 layering rectangle die from Paper Roses. I die cut another small piece of white paper using a Lawn Fawn grass border die and colored it green using an alcohol marker. I used the bottom of the Paper Roses rectangle die to cut it to match my main focal panel. Using the My Favorite Things mini cloud stencil I created a background of fluffy clouds and then adhered the grassy strip to the bottom. I stamped the fun sentiment from Amy R Stamps Wedding Sentimens II using Versafine onyx black ink and then popped the whole panel up off of the card for some dimension. I added my squirrels, tree trunk, acorns, and other accessories directly onto the panel. I love how adorably sweet this card turned out. Happy Anniversary to Colleen and Marv! Thank you for stopping by my blog today. 


Monday, August 8, 2022

Merry Everything


Today's card was created for the latest Caffeinated Christmas Card Challenge. I created my card by stamping the adorable bear from My Favorite Things Cool Day stamp set and coloring him in using my Copic markers. I then cut some frames using my paper trimmer and cherry cobbler cardstock from Stampin' UP and black and white striped paper from the American Crafts Christmas 6x6 paper pad and layered them on top of my focal panel in a wonky fashion. I stamped and hand cut the sentiment banner using My Favorite Things Jingle All The Way stamp set and Versafine onyx black ink. I popped the whole panel up off of the card using 3M foam tape for some fun dimension. I die cut some snowflakes using white cardstock and a die from Simon Says Stamp and layered them around the focal image. I topped them off with some glittery white gems from Honey Bee Stamps Fresh Brewed gem stickers. To finish off my card I added some white gel pen detail to the bear's cheeks. Thank you for stopping by my blog today!


Sunday, August 7, 2022

Sending Hugs


Hello, and happy Sunday! Today's card was created for the latest Color Throwdown card challenge. To create my card I started by stamping the elements from Stampin' UP's Kinda Eclectic onto a white card base using inks from Gina K Designs that matched the color challenge. I cut the panel down to be slightly smaller than my A2 card base and attached it using 3M foam tape for some dimension. I then stamped the butterflies from the same stamp set using more Gina K Designs inks and fussy cut them out. I stamped the sentiment from Simon Says Stamps Friendship Messages stamp set using black ink and die cut the panel down using a fish tail banner die from Jillian Vance Designs. I adhered the banner and layered butterfly onto the card panel using mini Stampin' UP foam dimensions. To finish off the card I added some gem stickers from Honey Bee Stamps Freshly Brewed collection. I love how pretty this card turned out and think it would make a lovely note card set by adding different sentiments. Thank you for stopping by my blog. I hope you have a wonderful rest of your weekend!


Saturday, August 6, 2022

Hey! Thanks Dude-Send A Smile 4 Kids


Hello, happy August! This month at Send A Smile 4 Kids we are creating thank you cards for kids. To create my card I started by stamping the sentiment from Simon Says Stamp's All Boy stamp set at an angle on a cardstock panel using various colored inks. I stamped the thanks Dude from the same stamp set and used my Copic markers to color it to match the inks I used to stamp the rest of the card. I stamped the gaming controllers onto a separate piece of white Copic-friendly cardstock, colored them using my alcohol markers, and then fussy cut them out. I adhered them to the panel using my snail adhesive and then die cut the panel using a rectangle stitched die from The Paper Rose. I matted that panel onto some basic black cardstock and then popped the panel up using some 3M foam tape. My camera didn't pick it up on the photo, but I added some Glossy Accents to the buttons on the controllers for some gloss and shine. Thank you for stopping by my blog and be sure to head over to the Send A Smile 4 Kids blog to see how the other design team members were inspired this month. 

Sunday, July 24, 2022

Sending You Cozy Winter Wishes-Coffee And Cards With Celeste And Deb


Hello, and welcome to the July Coffee and Cards with Celeste and Deb! This month we are celebrating Christmas in July. I created my card by layering a pretty kraft snowflake patterned paper from American Crafts Noel 6x6 paper pad onto my white A2 card base. I then die cut a hillside with white cardstock and the Drifting Stitched Border die from Simon Says Stamp. I stamped the sentiment directly onto the hillside panel using My Favorite Things Cozy Winter Wishes stamp set and Memento tuxedo black ink. I popped the panel up using some 3M foam tape and adhered it to the card panel. I then  stamped, colored, and fussy cut the house, tree, and snowman images from the same My Favorite Things stamp set and adhered them to my card. Love how adorably this little winter scene came together.
We just got a new coffee shop here in our little town, and since it's ridiculously hot (triple digits today) I had to try an iced coffee. This is the iced Colorado Mocha from Ziggi's coffee, and it definitely hit the spot while I was out running my errands. Now be sure to head over to Debra's blog and see what fun she created for us this month!


Saturday, July 16, 2022

You're On The Nice List


Happy Saturday! Today's card was created for the latest Freshly Made Sketches card challenge. To create my card I started by stamping the adorable Santa and sentiment from My Favorite Things Jingle All The Way stamp set onto some white Copic-friendly cardstock. I colored the image using my alcohol markers. I die cut the panel down using a layering stitched rectangle die from Paper Rose. Using papers from the American Crafts Jolly 6x6 paper pad I die cut another panel using the same Paper Rose die. I then a 2" strip using more of the patterned paper and edged it with some red cardstock that I die cut using My Favorite Things Fine Finish Edge die. I popped the focal panel up off of the card using 3M foam tape and then added the gifts and tree that I stamped, colored, and fussy cut using the same stamp set. I added some Nuvo Glitter Drops in white blizzard to the tree, gift bows, and Santa's hat and beard for a finishing touch. Thank you for stopping by my blog today! 


Saturday, July 2, 2022

Let It Snow-Send A Smile 4 Kids


Hello and happy July! I cannot believe the year is already half over. This month at Send A Smile 4 Kids we are having Christmas in July. To create my card I started layering some dark navy cardstock directly onto my card base. Then I die cut the snow globe and sloped hillside using My Favorite Things Snow Globe die set. I stamped the snow on the background using Papertrey Ink's Winter Snow Globe stamp set with Versamark ink. I heat set it using Ranger fine white detail embossing powder, and then inked the background with Stampin' UP's bashful blue ink. I adhered the background hillside that I die cut using the same MFT die. I then stamped the trees and skiing penguin using the My Favorite Things Snow Globe Singles stamp and die set. I colored the images using my Copic markers. I adhered them directly to the snow globe panel. I stamped the sentiment from the same stamp set onto the bottom portion of the snow globe and heat set that using more Ranger white embossing powder. I popped the snow globe up off of the card using Stampin' UP foam dimensionals. I finished this card by adding some Nuvo white blizzard glitter drops to the trees and snow drift and some blue 4mm sequins from Pretty Pink Posh. 


Saturday, June 25, 2022

Warm Wishes


Hello! I am guest designing for the latest 52 {Christmas} Card Throwdown challenge. To create my card, I started by layering some navy cardstock from Hobby Lobby's Recollections onto my white A2 card base. I then layered some patterned paper from My Mind's Eye Oh Christmas Tree 12x12 paper pad. I then die cut a circle panel using more navy cardstock using a stitched circle die from My Favorite Things, embossed it using a snowflake embossing folder from The Paper Studio, and adhered it directly onto my card. I then stamped all of the images from the My Favorite Things Cool Day stamp set onto Copic-friendly white cardstock, colored them using my alcohol markers, and fussy cut them out. I popped the images up off of the card using Stampin' UP foam dimensionals and then added white gel pen details to the images. Thank you for stopping by my blog today!  


Sunday, June 19, 2022

Hello Honey-Coffee And Cards With Celeste And Deb

Hello and Happy Father's Day! For this month's Coffee and Cards with Celeste and Deb we chose bees as our main theme for our cards. To create my card I started by layering some basic black cardstock onto my white A2 card base and then stamped the bee onto some white cardstock using Hampton Art Hello Honey stamp set and Memento tuxedo black ink. Using one of the foliage stamps in the set I created an oval wreath around my bee, stamped the sentiment above and below the bee, and added some honey comb elements in the corners. I colored all of the images using my Copic markers and die cut that panel using a Paper Rose stitched edge stacking die. I mounted the focal panel onto my card base using 3M foam tape and then finished the card off with some Wink of Stella clear shimmer pen onto the wings and some pretty gems from the Honey Bee Stamps Fresh Brewed gem collection. 
My coffee selection this month is kind of coffee themed. I went this past week to St. Louis with some friends and stopped at a local restaurant that microbrews their own beer. I couldn't turn down this amazing maple coffee stout, especially given how hot it's been here in the Midwest this past week. This stuff really hit the spot! Now be sure to stop by Debra's blog to see what fun she created this month!