Sunday, April 29, 2018

With Love-Coffee And Cards With Celeste And Deb

Hello and welcome to the April Coffee and Cards with Celeste and Deb collaboration. This month we have another fun guest designer joining us, my friend Maria Giselle, who I had the pleasure of meeting at a Copic coloring certification class in St. Louis two years ago. And here's a fun fact about the three of us...Deb, Maria, and myself are all in the healthcare industry and we all share a love of card making and crafting!
So, despite mother nature doing her best to hang onto winter (in our area at least) we thought it would be fun to use the above photo as our inspiration and focus on a springtime project. I used the inspiration photo quite literally and started my project with a piece of basic black cardstock from Stampin' UP and prepped it with my EK Success powder tool. I then stamped the wreath from the WPlus9 Valentine Wishes stamp set onto the cardstock using Versamark ink. I then selectively sprinkled some Zing embossing powder in rouge onto the flowers and then Recollections embossing powder in snow white onto the rest. I then stamped the sentiment from the Winnie & Walter The  Big, The Bold, and the Happy stamp set in the center of the wreath and sprinkled more white embossing powder onto it. I hit it with my heat tool to set it and then added some white dashed lines around the outer edge of the card using my white gel pen. I added some fun foam to the back of the panel and popped it up off of my white card base and that completes my card. Love how clean and simple this is but offers so much impact. I may have to duplicate this card using different sentiments in the center! 
For my coffee selection this month I opted for a Dunkin Donuts mocha macchiato and as a side bonus I got a donut for free with my purchase! Coffee and a donut? That's a win in my book any day! Now be sure to pop on over to Deb and Maria's blogs and check out what gorgeousness they've created! Thank you for stopping by today and be sure to leave a comment and subscribe. 


Sunday, April 22, 2018

Merry Christmas

Today's card was created for the latest Christmas Card Throwdown theme challenge. To create this fun all white card I started by cutting a focal panel and adhering a snow drift to it that I had created using a Paper Smooches stitched line die. I then die cut the entire panel using a stitched edge rectangle die from Gina Marie Designs. I then adhered both of the trees from the Taylored Expressions Evergreen die set onto the panel followed by two of the deer from the Impression Obsession Deer Trio die set directly onto my winter scene panel using my Zig two way glue pen. I die cut the Simon Says Stamp Merry Christmas sentiment and adhered that directly onto the panel. I popped the entire panel up off of the card using fun foam from Hobby Lobby and then finished it off with some 6mm and 4mm clear sparkling sequins from Pretty Pink Posh. I love how pretty this turned out. Thank you for visiting my blog today and don't forget to leave a comment if you liked my card. 

Friday, April 20, 2018

Hello Spring

Today's card was created for the latest Time Out Challenge. To create my card I started by die cutting a panel out of patterned paper from the Doodlebug Design Springtime 6x6 paper pad using a funky edge rectangle die from Gina Marie Designs. I popped the panel up off the card using some inexpensive fun foam I picked up at Hobby Lobby. I stamped the floral background onto some Copic-friendly cardstock using the Inkadinkado Garden Life stamp set and colored it using my alcohol markers. I die cut it down to a circle panel using a x-edge circle die from Gina Marie Designs and then matted it onto a piece of patterned paper from the same paper pad that I had cut down into a large scalloped circle using a die from Spellbinders. I stamped the butterfly from the same stamp set, colored it with my alcohol markers, fussy cut it out, and popped it up off of the circle panel using some foam dimensionals from Scrapbook Adhesives. I then stamped the girl image from the C.C. Designs Rainy Day Emma stamp set onto some Copic-friendly cardstock. I stamped the image again several times onto more of the patterned paper from the same paper pad and fussy cut them out and glued them onto the colored image. I fussy cut the entire image and edged it with my dual tip Memento tuxedo black marker. I popped her up off of the card using more foam dimensionals. I then stamped the sentiment from the Studio Calico stamp set onto some white cardstock and cut it down into a small sentiment strip and mounted it directly to the bottom of the focal panel. To complete my card I added some clear sequins in 6mm and 4mm from Pretty Pink Posh and then added some shimmer to the butterfly, flowers, and the girl's outfit using my Spectrum Noir clear glitter pen. I hope you like my card and I thank you for visiting my blog!

Wednesday, April 18, 2018

Hope Today Is All Rainbows & Unicorns

Hello, and happy hump day! Today's card was created for the latest The Paper Players challenge. As you know, I struggle with clean and simple cards but I knew as soon as I saw this challenge that I could make this one happen. My friend Becky gave me a piece of fun cardstock that she had created a fun pattern on using a stencil and some distress oxide inks and a glitter brush. I die cut the panel down into two hearts using a heart die from the Folk Hearts by Essentials by Ellen die set. I then added some black dashed lines around the outer edges of them both. I then stamped and colored the adorable little unicorn from the Greeting Farm's Magical Day stamp set onto some Copic-friendly cardstock and colored the image using my alcohol markers. I fussy cut the unicorn out and popped it up using Stampin' UP foam dimensionals. I cut a panel of white cardstock slightly smaller than my white card base and added some black dashed lines around the outer edge. I then adhered my heart panel directly onto the focal panel and stamped the sentiment and the butterflies from The Greeting Farms Magical Friends stamp set. I popped the whole focal panel up off of the card using some inexpensive fun foam I picked up at Hobby Lobby. To finish my card I added some pretty shimmer and shine to the unicorn's mane and tail and the butterflies using my Spectrum Noir clear glitter pen. I loved how adorably this card turned out that I created a second. I hope you like them both and thank you for visiting my blog today!


Monday, April 16, 2018

Winter Wishes


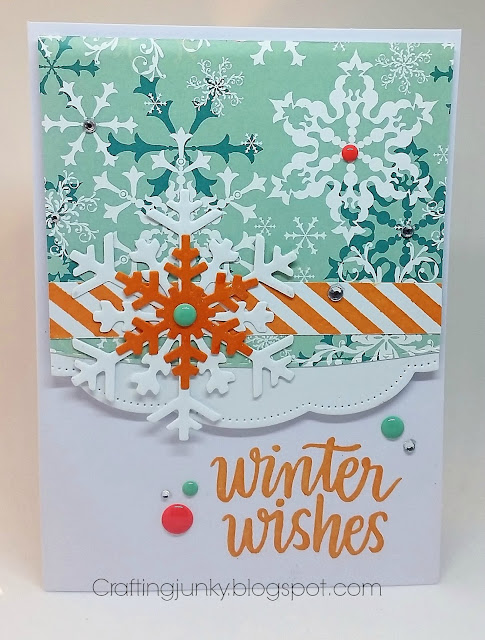
Hello, and happy Monday! Today's card was created for the latest Jingle Belles photo challenge. I have to be honest...I would never think to put orange on a Christmas card so this one perplexed me for a few minutes until I remembered my fun Simon Says Stamp set Hand Lettered Winter Wishes. I love the graphic diagonal stripe and bold sentiments in this set and thought it might be fun to combine them with some traditional blue and white cardstock for a fun mix of colors. I started by stamping the sentiment from the SSS stamp set directly onto my card base using Memento tangelo ink. I then die cut a piece of white cardstock using a pierced scalloped edge rectangle die from Gina Marie Designs and cut down one edge for a fun border to my blue and white patterned paper from Gina K Designs. I stamped the diagonal border onto some white cardstock using the same Memento ink and cut it down into a thin strip and layered it onto my patterned paper. I die cut a few snowflakes in two different sizes and colored one using the Memento tangelo ink and adhered them together using a glue dot and then glued them down to the card panel. I popped the entire focal panel up off of the card using some inexpensive fun foam from Hobby Lobby. I finished the card off by adding some enamel dots from Simple Stories Life Documented and some Recollections clear rhinestones. For some additional sparkle and shine I added some clear Spectrum Noir glitter pen to the snowflakes and the sentiment. Thank you for visiting my blog and if you like my card please leave a comment and subscribe!

Saturday, April 14, 2018

For You-Unity {show & tell} Sketch Challenge

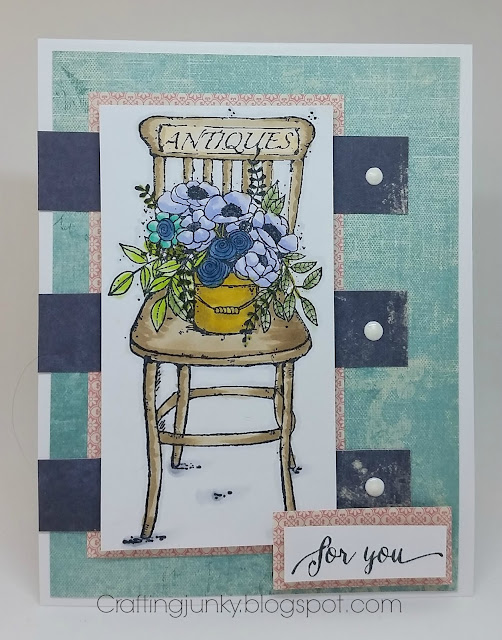
My card today was created for the latest Unity {show & tell} Facebook group sketch challenge. I love this sketch and have used one similar to it months back during a collaboration with my friend Debra Davison. To create my card I started by stamping the image from the March Unity Stamp Company kit of the month Stay Classy that I borrowed from my buddy Becky onto some Copic-friendly cardstock. I colored the image using some muted spring tones for a nice vintage look and cut the image down into a rectangle panel. I then mounted some patterned paper from Glitz Love You Madly 6x6 paper pad onto my white card base. I cut the focal image down into a rectangle panel and then cut more of the patterned paper to match the sketch. I assembled the card in the manner of the sketch and then stamped the sentiment from the WPlus9 Strictly Sentiments stamp set onto more white cardstock and mounted it onto the card using foam dimensionals from Scrapbook Adhesives. I popped the focal image up off of the card using some fun foam from Hobby Lobby. To finish my card and complete the sketch I added some Ranger Enamel Accents in glacier white to the ends of the accent strips. I love how beautifully this turned out. Thank you for visiting my blog and if you like my card be sure to leave a comment.