Showing posts with label Simple Stories. Show all posts

Tuesday, March 31, 2026

Happy Easter


Hello, and welcome to my blog! Today's card was created for the latest AAA Cards and Inspired By card challenges. I created my card by stamping the adorable bunny, carrot, eggs, and sentiment from The Alley Way Stamps Spring Has Sprung stamp set using Copic friendly cardstock and patterned papers from Simple Stories Summer Lovin' and Sunkissed 6x8 paper pads. I die cut a square panel using a nesting stitched edge square die from My Favorite Things and stenciled the background using My Favorite Things mini cloud edges stencil and Bashful Blue ink from Stampin' UP. I layered an A2 panel of navy cardstock onto my card base, die cut a smaller panel of white cardstock that I embossed using a Lifestyle Crafts large polka embossing folder. Using patterned paper from the Simple Stories paper packs and a Lawn Fawn grassy border die, I created the grass for my adorable bunny to nestle into. I fussy cut him, the carrot, and the two eggs and adhered them onto my focal panel. I matted that with more navy cardstock and adhered it to the card at an angle. I created the sentiment banner using a tag die that has been in my stash so long I no longer know who created it. LOL. I added an orange button from my craft stash to the edge of the sentiment banner to finish off this adorable Easter card. I hope everyone has a wonderful Easter weekend with their family and friends!

Sunday, April 30, 2023

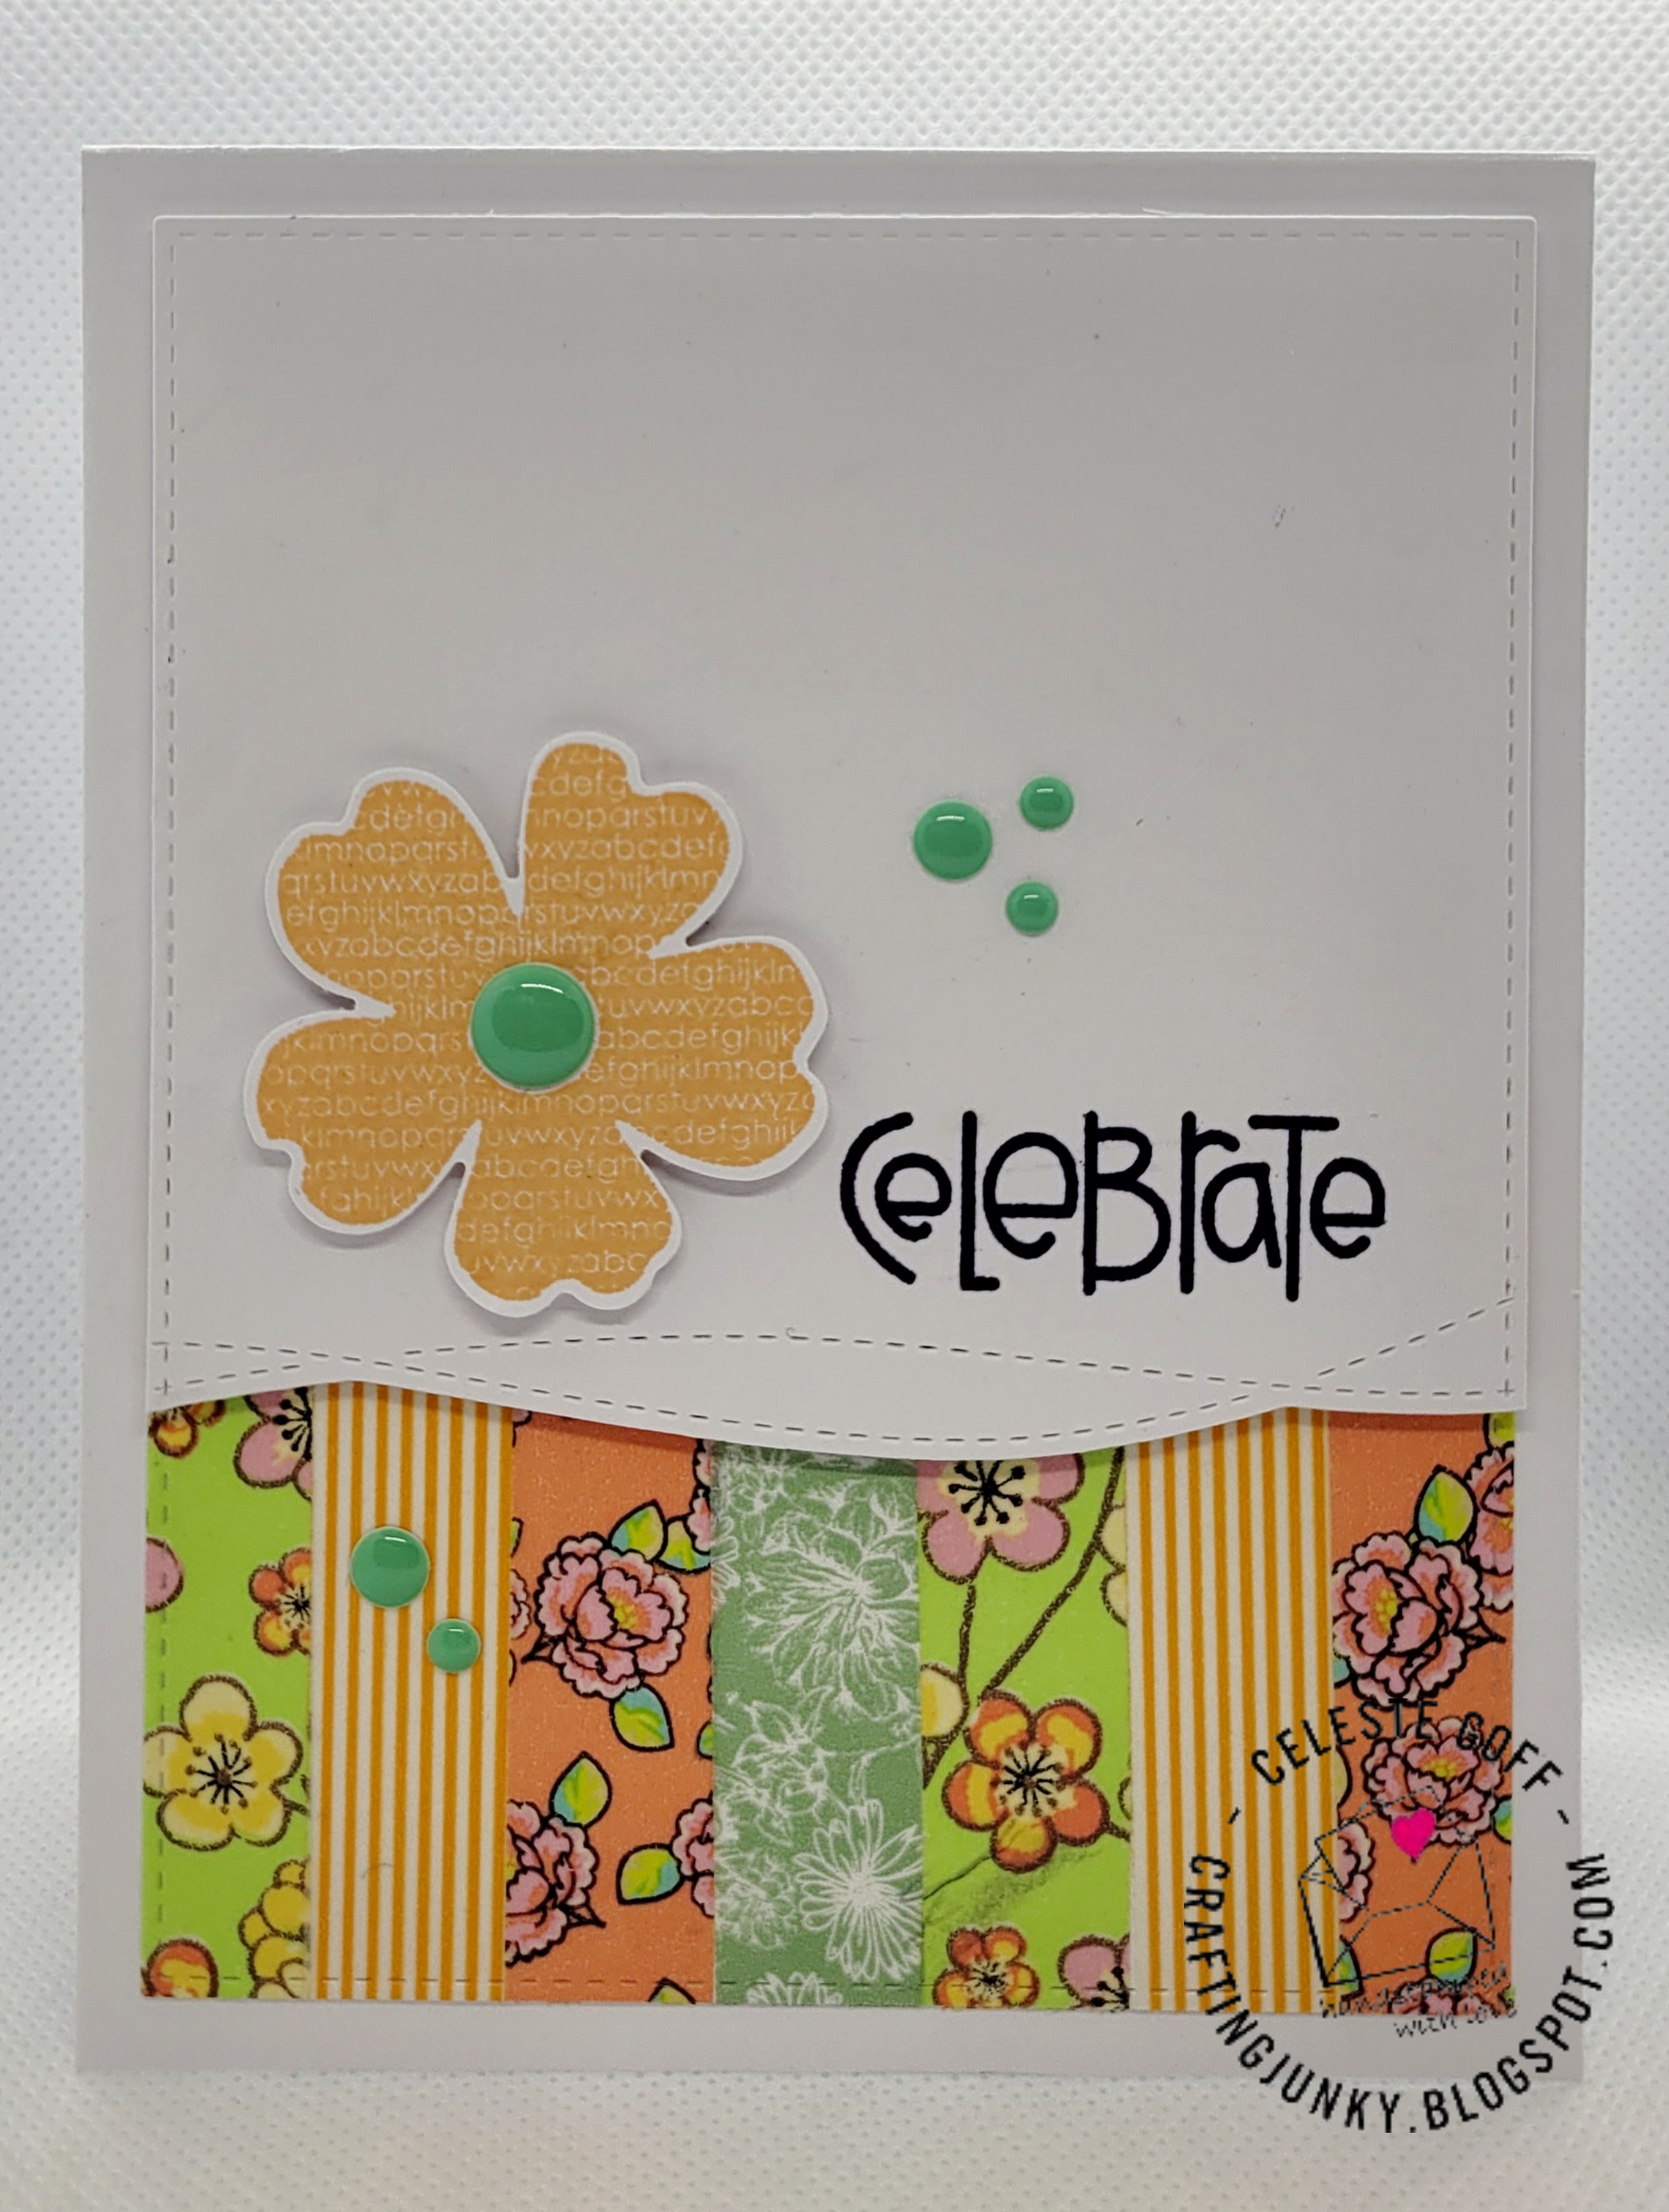
Celebrate-Coffee And Cards With Celeste And Deb


Hello, and welcome to the April Cards and Coffee collaboration between Deb and myself. This month we are using washi tape as our inspiration. I'm sure I'm not alone in the crafting community when I say that I have way more of this stuff than I could ever possibly use. So, given that we thought it would be fun and a clever way to use up some of the stuff we have in our stash. To create my card I started with a small 2"x4" cardstock panel. Using a vertical orientation, I laid my collection of American Crafts washi tapes right up next to each other in a pleasing color arrangement. I then used a stitched rectangle die from Paper Rose Studios to give it some additional detail. I then cut down a white cardstock panel using Simon Says Stamp's Drifting Stitches Border die and the same rectangle border die. I then stamped the sentiment from Paper Smooches Sentiment Sampler stamp set and Versafine onyx black ink. I then stamped the flower from Stampin' UP's Flower Shop stamp set using Gina K Designs Sweet Mango ink and punch the image out using the coordinating punch. I adhered the washi tape panel directly to my white A2 card base. Then I popped up the main focal panel with the sentiment using 3M foam tape. I popped the flower up off of the card using Stampin' Up's foam dimensionals. I adhered it to the left of the sentiment and finished it off with some fun enamel dots from Simple Stories. 
I attended a fun caffeinated event in my town this weekend that consists of a walking tour of our downtown, visiting vendors who serve all things chocolate or caffeinated. On one of my stops, I tried a Vietnamese salted cheese coffee. Now, I know what you're thinking...salted cheese in a coffee? But trust me when I say, this coffee was rich and delicious! I only wish I'd gotten the larger size. I recommend it if you have the opportunity to try it. Thank you for stopping by my blog. Now, be sure to head over to Deb's blog and see how she was inspired by our washi tape challenge this month. 


Sunday, December 6, 2020

Season's Greetings


Today's card was created for the Cardz 4 Galz, Send A Smile 4 Kids, and Freshly Made Sketches card challenges. To create my card I started by stamping the adorable little snowman from the Inkadinkado Christmas Characters stamp set onto some white Copic-friendly cardstock, coloring it with my alcohol markers, and cutting it down with a Spellbinders circle die. I die cut a larger circle to frame it using a pierced edge circle die from My Favorite Things and some early espresso cardstock from Stampin' UP. I die cut a square of patterned paper from the Simple Stories Cozy Christmas 6x6 paper pad and matted it with some early espresso cardstock from Stampin' UP. I stamped the sentiment from the same Inkadinkado stamp set using Versamark clear ink and more early espresso cardstock and heat embossed it using white embossing powder from Ranger. To finish my card off I stamped a few of the snowflakes from the stamp set randomly around the white A2 card base using Stampin' UP's sahara sand ink. Love how adorably this turned out! 


Sunday, January 27, 2019

Merry-Coffee And Cards With Celeste And Deb

Hello and welcome to the January Coffee and Cards with Celeste and Deb! Hope everyone had a wonderful holiday season and aren't covered up with too much snow. We got our first heavy snow of the season this past week. This month Deb and I chose to use a mood board as our starting point for our cards. I found this fun image on Pinterest and fell in love with the earthy colors and the snow! To create my card I started by layering a strip of mint and gold foil hearts patterned paper from the Crate Paper Main Squeeze 6x6 paper pad onto a piece of Simple Stories woodgrain paper. I then added a strip of gold glitter washi tape from American Crafts Make It Happen collection to the side for some added shine and interest. I mounted that panel to my A2 white card base. I then stamped the beautiful image from the Unity Stamp Company's February KOTM stamp set Being Who You are onto some white copic-friendly cardstock and colored it using coordinating colors to the mood board. I die cut the image using a pierced edge oval die from My Favorite Things and adhered it directly onto the card panel. To finish off this simple card I stamped the sentiment from the Unity Stamp Company's October KOTM stamp set All Winter Long using Versafine onyx black ink onto a white strip of paper and adhered it directly below the focal image. 
For my coffee selection this month I opted for a Starbuck's Cinnamon Shortbread latte.  And yes, it's as tasty as it sounds!
Thank you for stopping by my blog today and checking out this month's collaboration project. Now, be sure to pop on over to Deb's site and show her some blog love with a nice comment!


Monday, April 16, 2018

Winter Wishes


Hello, and happy Monday! Today's card was created for the latest Jingle Belles photo challenge. I have to be honest...I would never think to put orange on a Christmas card so this one perplexed me for a few minutes until I remembered my fun Simon Says Stamp set Hand Lettered Winter Wishes. I love the graphic diagonal stripe and bold sentiments in this set and thought it might be fun to combine them with some traditional blue and white cardstock for a fun mix of colors. I started by stamping the sentiment from the SSS stamp set directly onto my card base using Memento tangelo ink. I then die cut a piece of white cardstock using a pierced scalloped edge rectangle die from Gina Marie Designs and cut down one edge for a fun border to my blue and white patterned paper from Gina K Designs. I stamped the diagonal border onto some white cardstock using the same Memento ink and cut it down into a thin strip and layered it onto my patterned paper. I die cut a few snowflakes in two different sizes and colored one using the Memento tangelo ink and adhered them together using a glue dot and then glued them down to the card panel. I popped the entire focal panel up off of the card using some inexpensive fun foam from Hobby Lobby. I finished the card off by adding some enamel dots from Simple Stories Life Documented and some Recollections clear rhinestones. For some additional sparkle and shine I added some clear Spectrum Noir glitter pen to the snowflakes and the sentiment. Thank you for visiting my blog and if you like my card please leave a comment and subscribe!

Sunday, July 23, 2017

Happy Birthday 2 You

Today's card was created for the latest Watercooler Wednesday challange. To create my card I started by layering some Stampin' UP early espresso cardstock onto my white card base. Then I created a focal panel using some typing paper and gluing hexagon scraps that I created using a Fiskars punch and patterned papers from the Simple Stories Take A Hike 6x6 paper pad. I love using this technique to get rid of those tiny scraps that I accumulate making cards. I went around the edges of each hex shape with Tim Holtz distress ink in tea dye for a nice vintage look. Once the panel was complete and adhered to the card I stamped the sentiment using a Stampabilities stamp that I picked up at Hobby Lobby in Gina K charcoal brown ink. I added a border of early espresso cardstock and set the sentiment at an angle for some added interest. For a finishing touch I created two faux enamel dots using Nuvo Crystal Drops in dark walnut. Love how clean and simple this card is. I hope you like it too!


Sunday, June 25, 2017

Creative Fuel-Coffee And Cards With Celeste And Deb

Hello and welcome to another installment of Coffee And Cards With Celeste and Deb! We have another exciting guest designer with us this month, the very talented Renee Moran. This month's post also corresponds with the current Summer Coffee Lovers Bloghop
To create my card I started with a clean white card base. I layered on some pretty patterned papers from the Pink Paislee Hey Kid 6x6 paper pad. I die cut a fun curved scalloped border from Simon Says Stamp to help break up the patterns. I stamped the mug from the Reverse Confetti Just Brew It stamp set onto some white cardstock using Stampin' Up's Tangerine Tango ink and die cut the image using the coordinating die. I popped the image up using some 3M foam tape onto the die cut oval focal panel I created with some My Favorite Things oval dies. I stamped the sentiment from the Honey Bee Blah Blah Blah stamp set using Versafine onyx black ink for a nice crisp look. To finish my card I added a few orange enamel dots from the Simple Stories Life Documented collection. I hope you like it!
As for my coffee choice I opted for a nice cup of Dunkin' Donuts toasted almond latte! And yes, it's as tasty as it sounds!
Now be sure to hop on over to Deb and Renee's blogs and enjoy some more fun coffee creations! 

Wednesday, May 31, 2017

Dad


I decided to try and do a CASE card and I have always been a big fan of Lori Tecler and her fun and creative cards. I decided to do an A2 sized card using some of the same elements she used on her great card. I started with a clean white card base and layered on some kraft cardstock that I picked up at Hobby Lobby. I cut down a navy panel using more Hobby Lobby cardstock and then a plain white panel to go on top. I stamped the Happy Father's Day sentiment over and over using a sentiment from Hero Arts Happy Dad's Day stamp set and some Gina K Designs navy ink and mounted it onto the card panel. I cut a fishtail banner using a Jillian Vance Design banner die and some more kraft cardstock and popped it up off of the card using 3M foam tape for some great dimension. I die cut the pierced edge oval using a My Favorite Things die and more of the same navy cardstock. Finally, I die cut the focal sentiment from kraft three times using a Simon Says Stamp die and adhered them together using my Zig 2 Way glue pen and then adhered it directly onto the oval. A few navy enamel dots from the Simple Stories Life Documented collection finished this fun card off. Thank you Lori for the inspiration!


Sunday, October 16, 2016

Coffee And Cards With Celeste And Deb-Part 3

Hello, and thank you for stopping by! For our third week of our month long collaboration my crafty friend Debra Davison and I decided to do a fall themed card. Years ago, when I first started making cards I was mainly purchasing 12x12 paper pads, which I quickly learned were too large scaled in pattern to work for a standard A2 sized card. The larger patterns just get lost on such a small surface. As a result, I have a large collection of 12x12 papers that I am hoarding, waiting for the right moment to use them. While digging through my stash of papers I discovered a paper pad that I had purchased years ago to create a family themed mini photo album and felt they would be perfect for my fall themed card. All of the papers are from the Simple Stories Generations paper collection. I started with a floral base and layered on some craft paper on top that I added some dimension to by popping it up with some 3M foam tape. I then die cut some of the patterned papers from the collection using a Jillian Vance fishtail banner die. I arranged them onto the card and popped them up using more foam tape. I die cut some very small circles from more of the same craft cardstock using a My Favorite Things pierced edge circle die. I then stamped all of the coffee images onto white card stock using the Unity Stamp Company Coffee Side By Side stamp set. I colored the images using Copic markers, added glossy accents to a few of the images and some Stickles to others and then fussy cut them out. I mounted them directly to each little circle and then adhered them directly onto each banner. I stamped the sentiment in a dark charcoal brown ink from Gina K Designs using The Latina Crafter's Need Caffeine stamp set. I added some dark brown baker's twine to the ends of the banners and some dark brown faux stitches around the inside edge of the focal panel and called this card done. As for my coffee choice this week, I actually opted for a Chai Tea Latte from Panera's. Yesterday was a beautiful day and after a 3 mile run, laundry, grocery shopping, a haircut, and catching up with a couple of friends I opted to end my day with a nice Greek salad, a small cup of warm pumpkin soup, and a latte! It was the perfect ending to a long but wonderful day! Now, pop on over to Deb's blog, Meticulosity and show her some love! 

Sunday, September 4, 2016

Thank You For That Thing You Did

Today's card was created for the latest Unity Stamp Company Facebook challenge. I absolutely adore fall but don't have too many stamps from Unity that reflect that season of the year. So, I pulled out the large bloom from the Now & Always stamp set and did some fun paper piecing. I started by layering a brown wood grain piece of patterned paper from Simple Stories Take A Hike 6x6 paper pad onto my white card base. I prepped the paper with my anti-static tool and heat embossed the sentiment from the I Hope You Feel Beautiful stamp set. Once dry I went all around the panel with my white gel pen and added some faux stitching. I them stamped the bloom and its leaves onto more patterned papers from the same paper pad, fussy cut them out, and edged them with my black Memento marker for nice crisp edges. I mounted the bottom layer of the bloom directly onto the card and then popped the remaining two layers up using foam dimensionals from Stampin' UP. A button that I had from my stash completed the card. I do have to apologize for the poor quality of this photo. I usually take better pics than this but my phone is on the fritz and I took this with my tablet. Apparently the photo quality is not as good on that device. Anyway, I hope you like it!


Monday, July 4, 2016

Flip Flops

My second card today was created for the latest Just Us Girls challenge. This week's challenge is a word challenge and the word is summer. Nothing screams summer more to me than flip flops. So, I broke out my Fresh Squeezed Stamps Beechy Keen stamp set and stamped the flip flops into a rainbow pattern onto my card panel. I colored each of the pairs in rainbow colors using my Copic markers. I went over each one using my clear Wink of Stella glitter pen for some pretty shine and shimmer and added a small clear rhinestone from Recollections to each one. I stamped the sentiment below and added a small flourish from The Cat's Pajama's Simply Stacked Sentiments stamp set and added a small rhinestone to it as well. I adhered a small diagonal striped patterned paper from the Simple Stories Urban Traveler 6x6 paper pad to the bottom and rounded the corners using my We R Memory Keepers Corner Chomper. I just love how pretty this turned out and I hope you like it too!


Tuesday, June 7, 2016

Fan-Freakin-Tastic

Today's card was created for the latest The Paper Players theme challenge. I started with a pretty striped pattern paper from the Simple Stories Urban Traveler 6x6 paper pad and, using the center, die cut the letters DAD  for my in-laid die cut sentiment. I covered the die cut holes by layering a piece of white cardstock over that panel and stamped the fan from The Sweet Stamp Shop Spin Me stamp set. I colored the image using my Copic markers and then inlaid the die cut sentiment underneath. I added some faux black stitched lines around the outside of the white center panel just to add a bit more contrast. I hope you like it!


Sunday, May 8, 2016

Daughter

Hello and Happy Mother's Day! Today's card was created for my daughter for Mother's Day and I thought I would enter it into the latest Just Us Girls challenge. I kept this one pretty simple because I wanted the butterfly to take center stage. I stamped the smallest butterfly from a Hero Arts stamp set and colored it using various shades of purple Copic markers. I fussy cut the image out and inked around the edges with a Memento tuxedo black marker to give it a nice, clean look. I die cut a small piece of text paper from the Simple Stories Urban Traveler 6x6 paper pad using a stitched die from Gina Marie Designs. I mounted the die cut image straight onto my card panel and stamped the butterfly again so I could get the antennae. I put a mini glue dot in the center of the butterfly and some Stampin' UP foam dimensionals on the wings and mounted the butterfly onto the die cut panel. I added some clear Wink of Stella for some pretty shimmer and then colored a few rhinestones from Recollections purple using my Copics and added them to the body of the butterfly. I stamped Daughter from the MFT Girly Graphic T stamp set and then You're So Beautiful from the MFT Mother's stamp set. I mounted the whole panel onto so pretty purple cardstock from Hobby Lobby and added some faux black stitched lines around the outside edge and called this card done. I hope you like it!


Friday, October 16, 2015

So Thankful For You

Today's card was created for the newest Curtain Call Inspiration Challenge. I just love fall and all of the things that come with fall...the crisp weather, the foliage, the cozy clothing, fires in the fireplace, and pumpkins! I love pumpkins!!! One of the very first Lawn Fawn stamp sets I ever bought was the So Thankful mini stamp set. And even though I have other pumpkin stamps I knew this set would be perfect for this challenge. I started with some gorgeous fall papers from Simple Stories and all of the papers on this card are from that same collection. I apologize because I cannot recall the name of the collection and it's one of their first so I don't believe it's available any longer. I layered the pretty damask paper onto my card base, rounded the corners, and inked the edges with some Tim Holtz distress ink in tea dye. I stamped the larger pumpkin twice onto some of the orange paper and the smaller one once. I have the dies for these sweet pumpkins but wanted no white edging so I fussy cut them and then edged them with a Memento rich cocoa dual tip marker. I mounted the pumpkins directly onto the linen paper and rounded the corners on the right side. I added the brown gingham strip of paper and some dark brown cardstock that I cut a scallop out of it using a Fiskars punch onto the left side and popped it up using some Stampin' UP foam dimensionals. I added some American Crafts hemp twine and then stamped the sentiment onto some more linen paper, cut a banner out of it, and mounted it up onto the focal panel with some more foam dimensionals. A few 4mm espresso sequins by Pretty Pink Posh and I called this card done! I love this pretty card and think it's pretty enough to use year round!


Friday, September 25, 2015

I Like You 'N Coffee

I'm so excited because this will be the third Coffee Lovers Bloghop that I've participated in but the first one that I've participated in on my blog. I had always used Flickr and I know that not everyone has a Flickr account so my post will exclude no one from commenting! I plan on posting several creations but this is my first one this week. I started with the beautiful patterned papers from Simple Stories Take A Hike 6x6 paper pack. I layered them onto my white card base using some Stampin' UP chocolate chip cardstock. I stamped the to-go coffee cup from My Style Stamps Coffee Lovers stamp set onto some of the patterned papers and fussy cut them out. I went around the edges of each piece with my Memento tuxedo black dual tip marker to make them look like they were perfectly cut. I glued each peice together using snail adhesive and then popped them up using Stampin' UP foam dimensionals. I used a Nestibilites postage edge rectangle die to cut the center panel and mounted it onto some more chocolate chip cardstock and stamped the adorable sentiment from Reverse Confetti's I Like You stamp set in charcoal brown ink by Gina K. I just how sweet this card is and plan on making several of these to give out to my coffee loving friends! 


Sunday, August 30, 2015

You 2 Are Adorkable

Today's card was designed for the Casology Cue Card plaid challenge. I started with some pumpkin colored cardstock from Hobby Lobby and then layered on a gorgeous fall plaid patterned paper from Simple Stories Take A Hike 6x6 paper pack. Love the rich fall colors in this paper pad! I took a piece of white cardstock and created a square focal panel and then used a Paper Smooches edge die to create the x's along the edge. I mounted it onto some more pumpkin cardstock and then added some small black dots inside each x with my Memento tuxedo black dual tip marker. I stamped the adorable images from the Paper Smooches Going Incognito stamp set and added a small dashed line to create their noses. I don't know why but I thought it might add a bit more dimension to the main characters. I then did some selective stamping to create the sentiment using some black ink and the sentiments from the PS stamp set. The numeral is from the Hampton Arts Decadence alpha stamp set. I hope you like it!