Showing posts with label My Favorite Things. Show all posts

Friday, May 17, 2024

Hello


Happy Friday! Today's card was created for the latest Color Throwdown card challenge. I have to say that clean and simple have never been my style when it comes to cardmaking. It's not that I don't love it when I see it. I've never been comfortable with that creative style. But I do have to say that I love this card. I started with a white card panel that I stamped the floral images from CTMH's Thoughts Of You stamp set using Gina K Designs basic black ink. I stamped the coordinating petal stamp using tempting turquoise, tangerine tango, and perfect plum inks from Stampin' UP. I filled in the stems with a C1 Copic marker for a little bit of contrast. I die cut a Hello sentiment using Stampin' UP black cardstock and adhered it to the focal panel. I die cut the panel using a stacking stitched rectangle die from My Favorite Things and popped it up off of the card using foam tape. I finished the card off by adding a bit of clear Wink of Stella shimmer pen to the petals. Unfortunately, my camera didn't do a good job picking that up on screen. Anyway, thank you for visiting my blog. I hope you have a wonderful weekend!


Sunday, March 17, 2024

Have A Warm And Cozy Holiday-Coffee And Cards With Celeste And Deb


I apologize for this post being later than normal for my monthly collaboration with Deb. I just got back from Florida and found myself woefully prepared for my post. I had to scramble to get this card put together and post it to my blog. This month Deb and I were inspired by all things green in honor of St. Patrick's Day. I also wanted to participate in the Caffeinated Christmas Card Challenge, so my card is Christmas themed. I kept my card pretty simple. I started by layering some green cardstock from American Crafts 6x6 Christmas pad onto my A2 white card base. I then layered a pretty piece of green snowflake paper from Authentique's Solitude 6x6 Christmas paper pad on top. I die cut a large stitched circle using My Favorite Things stacking stitched circle dies, white cardstock, and striped paper from the same Authentique paper pad. I stamped the sentiment from Simon Says Stamp's Inside Holiday Greetings stamp set using black ink. I popped the circle panel up off of the card using foam tape. I then stamped the travel coffee mug from My Style Stamps Coffee Lovers stamp set onto more of the green cardstock, as well as white cardstock from the same American Crafts Christmas pad. I stamped the sleeve from the stamp set onto more Authentique patterned paper. I fussy cut them all out and glued them all together. I adhered them to the left of the sentiment on the circle panel. To finish off the card I die cut a simple snowflake from more white cardstock using a My Favorite Things snowflake die. I adhered it to the sleeve and adhered a small clear gem to the center. 

My beverage this month is a spicy Thai tea. Now, be sure and head over to Debra's blog and see what she created using this month's inspiration! 


Sunday, February 18, 2024

You Make Me Happy


Today's card was created for the latest Color Throwdown card challenge. To create my card, I die cut a white card panel using a scalloped edge rectangle die from Gina Marie Designs and popped it up off my kraft A2 card base using some low-profile foam tape. I then die cut a kraft panel using a stitched rectangle die from My Favorite Things. I stamped the subtle background using Stampin' UP's crumb cake ink and Unity Stamp Company's Faithful Letter red rubber background stamp. I then stamped the poppies from Altenew's Painted Poppy stamp set directly onto the kraft panel. I stamped the Happy sentiment from the same stamp set directly onto the panel using Versafine onyx black ink. On separate white cardstock I stamped the leaf using Altenew's moss green ink and the poppy's in Gina K Designs red hot ink. I fussy cut the poppy's and the leaf out and popped them up off of the card using more foam tape. I stamped the additional sentiment onto black cardstock using Versamark clear ink and heat embossed it using Ranger's detail white embossing powder. I cut the sentiment down into little strips and adhered them around the word happy. To finish off my card I die cut a few butterflies in more black cardstock using Stampin' UP's Beautiful Wings embosslit. I adhered those around the card, and added some white gel pen details. I love how this turned out!


Sunday, November 27, 2022

But First, Coffee-Coffee And Cards With Celeste And Deb


Hello, and welcome to the November Cards and Coffee with Celeste and Deb. We decided to use this beautiful photo as our inspiration for this month's collaboration. I love all the deep, rich Autumn colors and wanted to use as many of them as I could for my card. I started by stamping the Tricia Girl by Unity Stamp Company onto some white cardstock and colored her skin, hair, and coffee cup using my Copic markers. Then using papers from the Best Occasions Quick Page 12x12 paper pack I stamped and paper-pieced her coat, scarf, shirt, skirt, purse, boot warmers, and her boots. I added some early espresso cardstock by Stampin' Up onto my white A2 card base. I then cut down a pretty piece of patterned paper from the same 12x12 pad and added it to the side and then added a decorative edge that I created with more early espresso cardstock using a decorative edge die. I cut down more paper from the paper pack and glued the decorative edge piece to it. Using a rectangle die from Paper Roses I cut the panel down and adhered it to my card panel. I stamped the Tricia Girl image again onto the panel, fussy cut the paper-pieced image, and glued the two together for a seamless look. I stamped the sentiment from Stampabilities Coffee stamp set and die cut it down using a pierced circle die from My Favorite Things. I then die cut a larger panel of early espresso using a Spellbinders die, and mounted the two together.  I took a dark brown Copic marker and colored some clear rhinestones to match the colors on the card and adhered them around the focal image and the sentiment for a nice finishing touch.

For my coffee, I opted for my standard dark roast Seattle's Best Post Alley served in a fun new mug my daughter got me for my birthday last month. Now, be sure to stop by Debra's blog and see how she was inspired by this month's photo. 


Saturday, October 1, 2022

Warm Winter Wishes


Hello! I was invited to guest design for the October Caffeinated Christmas Card Challenge! This month's challenge is sponsored by Miss Ink Stamps, and they were kind enough to send me some goodies for the challenge. To create my card I started by die cutting the focal panel from a Gina Marie Designs scalloped rectangle die and some real red cardstock from Stampin' UP. I then cut down a smaller panel and using the Miss Ink Stamps Diagonal Lines stencil and Tim Holts distress inks in Shabby Shutters and Fired Brick I created the inked plaid background. To create more interest I freehand drew in some white lines with my white gel pen and added some tiny black dots at each intersecting line. I mounted that panel onto some plain white cardstock and die cut an oval window using a My Favorite Things oval die. I then die cut a smaller oval window into the red scalloped panel using a Spellbinders oval die. I adhered all of the panels together and mounted them up off of the card using 3M foam tape. I stamped the gnome from Miss Ink Stamps Big Mugs stamp set, colored it using my Copic markers, fussy cut the image out, and mounted it in the oval window with more foam tape. I stamped the sentiment from Miss Ink Stamps Season's Greetings stamp set onto white cardstock using Versafine onyx black ink and cut it down to a small sentiment strip. I mounted more red cardstock behind it and adhered it to the card. I finished the whole thing off with some cute little black gem stickers from Honey Bee Stamp's Fresh Brewed collection. 


Sunday, March 27, 2022

Friends Are The Gardeners Of Our Souls


Hello and happy Sunday! I created my card today for the latest Just Us Girl's card challenge. I was browsing through my local Hobby Lobby yesterday and happened upon the cutest little gnome stamp set and couldn't resist buying it. As soon as I saw this challenge today I knew I had to use it. I started by stamping the gnome images from Inkadinkado's Garden Gnome stamp set onto Copic-friendly cardstock and colored them using my alcohol markers and the colors in the photo as my guide. I then die cut the images down to a focal panel using a Paper Rose stitched rectangle die. Using patterned papers from the Little Yellow Bicycle Fern & Forest 6x6 paper pad I created a fun backdrop for my focal panel. I then stamped the sentiment from the Stampendous True Friends stamp set and die cut it out using a pierced edge oval die from My Favorite Things. I finished my card off by scattering a few clear rhinestones from Recollections around the sentiment and main images. Thank you for stopping by my blog today!


Saturday, March 5, 2022

Another Year Older? Send A Smile 4 Kids

This month our Send A Smile 4 Kids challenge is to create card for boys. I'm a complete sucker for Darcie's Heart & Home critters so I had to stamp the sweet little skunk from the Busy Beaver clear stamp set and color him as well as the stump and mushroom from the set. I fussy cut them out and then added them to a die cut circle panel I created using a My Favorite Things stitched edge circle die. Using my Copic markers I created grass and then created the sky using the My Favorite Things small cloud stencil and some Tim Holtz distress ink and a blender tool. I attached the stump, the skunk, and the mushroom onto the panel and then stamped the sentiment from the same stamp set onto the upper left side of the panel. I layered some patterned paper from the American Crafts Autumn Crisp 6x6 paper pad onto my A2 white card base and then popped the the focal panel up off of the card using 3M foam tape. Love how cute this card turned out. I can't wait to see what everyone created this month for our challenge! 


Saturday, February 5, 2022

Have A Magical Day-SAS4Kids


Hello and happy February! This month's Send A Smile 4 Kids challenge is focusing on spring/Easter cards for kids. My sweet granddaughter is having a birthday early next month and I wanted to create a fun card for her. I've never made a 3D box card before. I wish I had dies to create the base, but unfortunately, I don't. So, I created one from scratch using white cardstock and pretty patterned papers from Pebbles Sunny Side 6x6 paper pad. The adorable images and sentiment were stamped using My Favorite Things Pure Innocence Fairy Girl mini stamp set using Memento tuxedo black ink and colored using Copic markers. I fussy cut the images out and adhered them strategically on the box so they could all be seen when the box is open. The sentiment was die cut using a pierced edge oval die from My Favorite Things and layered onto a piece of patterned paper die cut using a Verve Stamps label die and adhered directly onto the front of the card. To finish it up I added some white gel pen details to her hair, wings, mushrooms and a little Nuvo clear glitter to the wings, pom poms on her shoes, and the dots on the mushrooms! And finally, I added a few clear rhinestones from Recollections on either side of the sentiment and on the fairy's wand. I can't wait to see what everyone else has created for this month's challenge. 

Sunday, January 23, 2022

Coffee Is Always A Good Idea


Hello and happy Sunday! Today's card was created for the latest Fusion Card Challenge. This card has absolutely no stamping on it!! This entire card was created from papers from the Echo Park Coffee 6x6 paper collection. I started by layering the chalkboard black and white patterned paper directly onto my A2 white card base leaving an 8th of inch white border around the edges for some visual contrast. I then layered an olive diamond grid paper vertically to the left and a black and white buffalo check strip horizontally onto the papers for some nice visual interest. I die cut a circle of some of the solid patterned paper in the pad using a My Favorite Things pierced edge circle die and adhered a sentiment I had fussy cut from one of the sentiment sheets. I also fussy cut the girl and popped them both up off of the card using some 3M foam tape. I adhered a small semi-circle behind the girl's head that I had punched out with a Fiskar's punch to complete my card. This is one of the easiest cards I've put together in a long time but I love the end results!


Sunday, January 16, 2022

Sending You Warm Thoughts


Well, we were supposed to get snow here in Southeast Missouri last night and today, but it never came to fruition. So, the only snowflakes I get to enjoy today are the ones I put on my card for the latest Caffeinated Christmas Card Challenge! I created my card using some fun patterned papers from the American Crafts Hot Cocoa 6x6 paper collection, some cherry cobbler cardstock from Stampin' UP, pretty snowflake dies from My Favorite Things, a punch from Martha Stewart, a mug die, and a cloud punch from Fiskars that I altered to look like whipped cream. After assembling my card and stamping the sentiment from the My Favorite Things Cozy Greetings stamp set I added some pretty white blizzard Stickes to all of the snowflakes and the whipped cream for some pretty shine. Thank you for visiting my blog today, and I hope that you got to enjoy some snow in your corner of the world this weekend!


Ho Ho Ho-Coffee And Cards With Celeste And Deb


I cannot believe it's been a month since I posted on my blog. It's been a busy holiday season, but it's time to get back at it. Debra and I decided to try our hand at a sketch and I found this great one on Pinterest. I still have all of my Christmas card making supplies out, so I thought it would be fun to start building this year's stash! I created my card by layering some great patterned papers from the Pebbles Welcome Christmas 6x6 paper pad onto some cherry cobbler cardstock from Stampin' UP following the sketch exactly as shown. I stamped the adorable image and sentiment from the Close To My Heart Santa mini stamp set onto some white Copic-friendly cardstock using Gina K designs black ink. I colored the image using my alcohol markers and then die cut it into a circle panel using a pierced edge circle die from My Favorite Things. I then cut a larger circle from more cherry cobbler cardstock using a Spellbinders circle die and layered the two together and mounted it onto my card. To complete my card I added some pretty red sequins from my stash on either side of the sentiment and some Glossy Accents to Santa's nose. 
For my coffee I opted for a nice hot cup of butterscotch rum roast and an awesome coffee buzz chocolate treat! Now be sure to head over to Debra's blog to see what fun she created with our sketch this month!


Sunday, December 12, 2021

Wishing You Warmth and Coziness All Winter Long-Coffee and Cards with Celeste and Deb


Hello and welcome to the December Coffee and Cards with Celeste and Deb! Deb and I decided to use this fun winter/Christmas mood board as the inspiration for this month's collaboration cards. I just love all of the images on this mood board! I have an awesome friend who used to get the KOTM's from Unity Stamp Company and she's been kind enough to let me play with her whole collection...thank you Becky! The October 2018 collection really caught my eye and I decided to use several images from that stamp set. I stamped the background stocking stamp onto some kraft cardstock using Memento tuxedo black ink and then cut the panel down using a Pink and Main rectangle stacking die. I mounted it directly to my white A2 card base. To add some interest to the background I added lots of white gel pen detail to the snowflakes and stockings. I then stamped the focal image onto some white Copic-friendly cardstock and die cut it with a pierced edge oval die from My Favorite Things. I stamped the same image again and fussy cut the scarf and adhered it to the focal panel. I colored the images using my alcohol markers and attached the whole thing to my card. I then stamped the sentiment onto more white card stock and mounted them onto some white cardstock I had colored with my Copic marker to match. To finish off this card off I simply added a few clear rhinestones from Recollections around the focal panel. Love this quick and simple card!
We got a new Scooter's Coffee here in our little town, so I popped in and tried their iced Peppermint Mocha latte! I ran a very cold and windy 5K this morning and this was the perfect way to refresh after my run! Be sure to pop on over to Deb's site and see how she was inspired by the mood board!


Wednesday, October 27, 2021

It's Pumpkin Spice Season


Hello and welcome to my blog! Today's card was created for the latest Global Design Project card challenge. I recently won the Close To My Heart Pumpkin Treats stamp and thin cuts combo during a recent coffee blog hop and I just couldn't wait to use this fun set! So, it seemed fitting to use it for this current challenge. I started by stamping the mug and pumpkin pie onto some Copic-friendly white card stock using Memento tuxedo black ink and used the coordinating dies to cut them out. I then layered some gorgeous coffee themed patterned paper from the Echo Park Coffee 6x6 paper pad onto some navy cardstock. I adhered that panel directly onto my white A2 card base. I cut another strip of patterned paper from the same paper pad, matted it onto more navy cardstock and adhered that to the left of the card panel. I die cut an oval from the navy cardstock using a pierced edge oval die from My Favorite Things and then cut a smaller oval from white cardstock using a Spellbinders oval die. I cut another half oval using more of the patterned paper from the paper pad and the Spellbinders die and adhered it to the smaller white oval to create a faux tablecloth for my images. Using a foam blending brush and some distress ink I added a little color to the focal panel. I then stamped the sentiment from the Simon Says Stamp Pumpkin Spice Sentiments stamp set onto the focal panel using Gina K Designs black ink. I added the oval focal panel directly onto the card. I adhered the mug directly to the panel and popped the pumpkin pie image up off of the card using Stampin' UP foam dimensionals. For a finishing touch I added some white jelly roll highlights to the mug and the pie. You just can't go wrong with this cute stamp set!   


Sunday, October 24, 2021

Boo!-Coffee And Cards With Celeste And Deb


Hello, and welcome to the October Coffee and Cards with Celeste and Deb! With Halloween right around the corner Deb and I thought it would be fun to create a Halloween card. I love making Halloween cards and always send out at least a half dozen every year. I created this fun card for my bestie who absolutely loves Halloween. To create my card I started by die cutting the Lil' Inkers ghost die from white cardstock and then cut it out with a stitched edge circle die from My Favorite Things using white cardstock. I then cut the circle again using black cardstock and mounted the two together. I then stamped the sentiment from My Sentiments Exactly's Halloween Innies & Outies stamp set using Versafine onyx black ink. I poured some Zing clear embossing powder over it and heat set it. Then using Pink and Main's stacking rectangle dies I layered some patterned paper from American Crafts Halloween 6x6 paper pad onto some black cardstock and adhered it directly onto my white A2 card base. I then cut a smaller strip of spider patterned paper from the same American Crafts paper pad and mounted that onto more black cardstock. I adhered that to the top of the card and then glued the focal circle panel lower onto the card. To finish this fun card off I added some 6mm black matte sequins from Pretty Pink Posh to the top right and bottom left. I love how this turned out!

For my coffee this month I decided to try something new that my running buddy suggested to me...Protein coffee! I am drinking Bang's chocolate peanut butter blast and, I have to say, it's pretty good! I drank it cold and it's very creamy and tasty! Now, be sure to pop on over to Deb's blog and see what sort of Halloween fun she created this month! And thank you for visiting my blog today. I appreciate all of your support!


Saturday, October 9, 2021

I'm Nuts About You


My card today was created for the Freshly Made Sketches card challenge. To create my card I started with a base of Stampin' UP's crumb cake cut to an A2 size. I layered on strips of Stampin' UP's early espresso and Paper Rose's Autumn plaid patterned paper for the diagonal stripes at the bottom. I then die cut a circle using a die from the My Favorite Things stitched circles stax. I stamped the leaves from the Avocado Arts Nuts About You stamp set at the bottom of the circle using Stampin' UP inks in autumn colors. I then stenciled the clouds onto the panel using My Favorite Things mini cloud stencil and Tim Holtz distress ink in faded jeans. I stamped the rake, the squirrel, the acorn, and the stump onto some white Copic-friendly card stock, colored them using my alcohol markers, and fussy cut them. I adhered them directly onto the focal panel using liquid glue and then popped the acorn up using a foam dimensional. For a final touch I added googly eyes to the squirrel and white gel pen for added detail. Thank you for stopping by my blog today!


Saturday, August 7, 2021

Lucky Stars-Send A Smile 4 Kids

Hello and happy August! This year is really flying by. This month's challenge over at Send A Smile 4 Kids is to create a card for a child to give to a staff member/special person. To create my card I started by die cutting some stars using dies from My Favorite Things and patterned papers from the Simple Stories 6x8 Sunkissed paper pad. I then stamped the sentiment from the Hero Arts OWH Year Round Sentiments stamp set onto some heavy weight cardstock using Gina K Designs navy ink. I cut the sentiment down to a strip and mounted it onto some navy blue cardstock from Hobby Lobby. I punched a few tiny stars using a mini punch from Studio G and glued them on either side of the sentiment. I then adhered another piece of navy cardstock directly onto my white A2 card base and then adhered a smaller white panel that I had embossed using a Spellbinders plaid embossing folder. I adhered it to the card, popped the stars up using foam tape, adhered the sentiment strip below it, and embellished the card with enamel dots from the My Mind's Eye Now & Then collection and some clear Rhinestones from Recollections. I love that this card can be either masculine or feminine. Thank you for stopping by today and be sure to check out what the rest of the Send A Smile design team created for this month's challenge!


Saturday, May 1, 2021

Dad You're A Star-Send A Smile 4 Kids

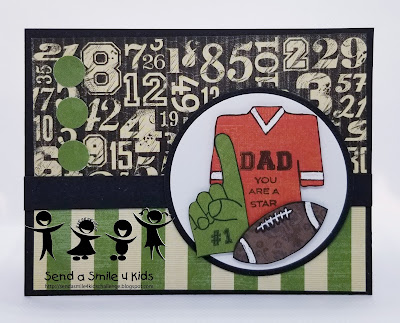
Hello and happy May 1st! This month's Send A Smile 4 Kids challenge focuses on cards to give to dads/grandpas/special men. To create my card I started by stamping the sports shirt, football, and foam finger from the Alley Way Stamps Touchdown stamp set onto patterned papers from the Graphic 45 Good Ol' Sports and Echo Park's This & That 6x6 paper pads and fussy cut the images out. I layered some basic black cardstock from Stampin' UP onto my white A2 card base and then layered more patterned papers from the Graphic 45 Good Ol' Sports on top. I added a small 1/2" strip of the basic black cardstock to break up the patterns. I then die cut a white piece of cardstock using a Spellbinders simple circle die and matted it onto a larger circle of basic black using a pierced edge circle die by My Favorite Things. I adhered both circles together and glued them directly onto the card using my snail adhesive. I then stamped the letters DAD from the Alley Way Stamps set onto the sports jersey using Memento tuxedo black ink and then using selective inking I stamped the "you are a star" from the Altenew Apothecary Labels stamp set below it. To finish off my card I added 3 small circles that I cut from the same Graphic 45 paper pad using a small circle punch from EK Success and adhered them directly to the patterned paper in the upper left hand corner. I can't wait to see how everyone else is inspired this month!


Saturday, March 6, 2021

Rawr-Send A Smile 4 Kids


Hello and happy Saturday! My card today was created for this month's Send A Smile 4 Kids challenge. Our challenge this month is to create a card for boys. I started by stamping the adorable images from the Neat & Tangled Prehistoric stamp set onto some white Copic-friendly cardstock and colored them using my alcohol markers. I fussy cut the images leaving a small white border all around. I die cut a focal panel using more white cardstock and a pierced edge oval die from My Favorite Things. Using my Tim Holtz distress inks I ink blended a background and spritzed it with some water to create some fun texture. I matted that panel onto another larger oval I created with some early espresso cardstock from Stampin' UP and an oval die from Spellbinders. I popped the adorable boy and his dino up off of the panel using some 3M foam tape. I then created the background my layering some patterned paper from the Basic Grey Archaic 6x6 paper pad and some seafoam green cardstock from Hobby Lobby that I added some detail to using the Altenew Scales Debossing cover plate. I layered all of that onto more early espresso cardstock and then adhered it all to my white A2 card base to complete my card. Now be sure to pop over the Send A Smile 4 Kids blog to see what the rest of the designers created to inspire you this month!

Sunday, February 28, 2021

Thinking Of You


Hello and happy Sunday! It's the last day of February and it's pouring here in Southeast Missouri. While it makes getting outside to play difficult it does allow me some time to stay in and get inky. Today's card was created for the latest Just Us Girls card challenge.
To create my card I started by smooshing some Tim Holtz distress inks onto one of my square acrylic blocks. I spritzed it with some water using my Mini Mister and then pressed the block directly onto my focal panel. I let the ink air dry and then stamped the trees from the Inkadinkado Trees stamp set onto the panel using Versafine onyx black ink. I stamped the sentiment from the My Favorite Things Inspired By Flowers #4 stamp set using the same ink. I mounted the panel onto some basic black cardstock from Stampin' UP and adhered the whole thing to my A2 white card base. To finish it off I added some black self adhesive gems from Ki to the corners. I love cards that I can give to either a male or female recipient! Thank you for stopping by my blog. If you enjoyed my card be sure to leave a comment. I read and appreciate them all! 

Thursday, February 11, 2021

Monogrammed Cards

Okay, not a great photo but I had no other way to share all six cards at one time in my tiny little photo cube. A friend of mine is having a birthday this coming Monday and I wanted to create something special for her. To create these cards I started by layering some early espresso cardstock from Stampin' UP that I had die cut using Pink & Main A2 rectangle dies and adhered the panels directly to my cream A2 card bases. I took more cream cardstock and stamped them with Stampin' UP's sahara sand ink using Unity Stamp Company's Small Details background stamp. I cut the panel using a small Pink & Main A2 rectangle die. I then matted panels of pattered paper from the My Mind's Eye Lost & Found Market Street 6x6 paper pad onto more early espresso cardstock and adhered them to the card panel. Using a small Jillian Vance Designs fish tail banner die I cut out some fun fish tails for the tops of the cards, which I die cut using more early espresso cardstock. I then stamped the pretty wreaths from the Maggie Holmes Hello Love mini stamp set using Gina K Designs charcoal brown ink. My friend's name is Michelle so I stamped the capital M from The Paper Studios Timeless Alphas stamp set using Gina K Designs innocent pink ink. I die cut the circles out using a Spellbinders circle die and then matted them using early espresso and a larger circle die from My Favorite Things. I finished these pretty cards off with some small and medium clear rhinestones from Recollections. Love how these turned out. I hope Michelle likes them!