Showing posts with label Spellbinders dies. Show all posts

Sunday, May 17, 2026

Happy Birthday-Coffee And Cards With Celeste And Deb


This month Deb and I are creating mini slimline cards. I recently watched a YouTube tutorial on how to create this fun fold flap mini slimline card and couldn't resist trying it. I started with a 7" x 6.25" piece of white cardstock. I scored it at 1.25" and again at 3.5" and folded my score lines. Using Ki Color Crush 6x6 patterned paper pad I selected 3 patterns that I felt went well together and cut them at 1"x 6," 1.25" x 6," and 3.5" x 6." The 1" strip went in the center fold which I popped up a bit with foam tape at the top and bottom of the panels for a little extra dimension. The 1.25" strip went on the top left panel before I adhered the middle flap down. The final strip went on the inside. I then die cut two panels, one in dark pink with a scalloped circle die from Spellbinders, and the second in white using a stitched circle die from My Favorite Things. I adhered them together and popped them up on the card only adding foam tape to the left of the circle so it would not stick to the inside panel of the card. I stamped, colored, and fussy cut the cupcake using Hero Arts CL158 stamp set. I popped that up on the focal panel and added some Stardust Stickles to the cherry and frosting for some added sparkle and shine. The happy sentiment was stamped using The Greetery's Pretext Sentiments and the Birthday was stamped using a Unity Stamp Company red rubber stamp that I got as a freebie from a recent order. They were placed over the cupcake. I finished the card off by adding a circle strategically inside that could not be seen with the front panel closed. I stamped the sentiment from Lil' Inker Designs stamp set. 
My coffee this month is a homemade Chai latte from a mix I picked up at a Home Goods in St. Louis served in a fun, snarky mug one of my friends gave me. It was pretty good for being a mix. Thank you for stopping by my blog today. I greatly appreciate you. Be sure to stop by Debra's blog and see how she was inspired this month. 

Saturday, January 24, 2026

Happy Valentine's Day


Today's card was created for the latest Freshly Made Sketches card challenge. I created my card by creating a focal panel using light pink cardstock from my stash, a stitched rectangle die from Paper Rose, and an embossing folder from The Paper Studio. I layered that onto some darker pink cardstock and adhered the panel directly onto my white A2 card base. I stamped the adorable hedgehog from Colorado Craft Company's Mini Love Cards stamp set, colored it using my alcohol markers, and fussy cut it out. I cut a heart using a Hero Arts layering heart die and patterned paper from Echo Park's Hello Valentine's 6x6 paper pad. I die cut a circle panel using a stitched circle die from My Favorite Things and white cardstock. I layered that onto a larger base using a Spellbinders nesting circle die and dark pink cardstock. I adhered the circle panel to the lower right area of the heart and popped all of it up off of the card using foam tape. I adhered the hedgehog using more foam tape. I stamped and fussy cut the sentiment using Memento tuxedo black ink and wood block stamp from Hampton Arts and adhered that to the focal panel. I finished off my card by coloring a few clear rhinestones from Recollections with my alcohol markers a pretty pink to match the card and scattered them around the focal image. Thank you for stopping by my blog today!


Sunday, December 21, 2025

Noel-Coffee And Cards With Celeste And Deb

Holy cow, how is it almost Christmas? I feel like this month has been in hyperdrive. We are less than a week away from Christmas, and the new year is looming large! This month Deb and I chose to use this beautiful Christmas image as our inspiration for our collaboration. I created my card using the color scheme from this photo. I started by layering some basic black cardstock onto my A2 card base. I die cut a panel out of white cardstock using a Spellbinders postage edge die.  I then layered some forest green cardstock on top, and then a panel of kraft cardstock that I embossed using a Spellbinders plaid embossing folder. I stamped and colored the focal images from Concord and 9th's Merry Mantle stamp set, colored them to match the inspiration photo, and die cut them out using the coordinating dies. I die cut the sentiment from the same die set using basic black cardstock. Everything was popped up off of the card using thin foam tape. I added a few clear rhinestones from Recollections around the focal images for a little sparkle and shine. 
For my coffee this month, I opted for a nice cup of dark Dubai chocolate in a fun, snarky mug one of my friends gave me a few years ago. It's very fitting! Now, be sure to head over to Debra's blog and see how she was inspired this month. I wish you all a very Merry Christmas, and a healthy, happy, and prosperous New Year! 

Sunday, July 6, 2025

You Look Better Without Him


Today's card was created for the latest Paper Players card challenge. No one likes to think about a long-term relationship ending, but we all know it happens. I have a friend whose daughter just ended her marriage, and she asked me to create a card for her. I used Kelly Purkey's F Bomb stamp set and heat embossed it onto some pink cardstock using Ranger's white detail embossing powder. Using various punches from Stampin' UP and dies from Spellbinders, I created lots of circles, hearts, and flowers using beautiful, patterned paper from Echo Park's Hello Valentine 6x6 paper pad. I created a panel by die cutting a rectangle using a Paper Rose stitched rectangle die, embossed it using a Spellbinders plaid embossing folder, and adhered the whole panel down onto my white A2 card base using thin foam tape for a little added dimension. I adhered the circles I created onto the focal panel using Bearly Art liquid glue. I embellished the card using some Recollections clear rhinestones in various sizes. I love how this card turned out! Thank you for visiting my blog today. I hope you have a wonderful rest of your weekend. 

Saturday, June 7, 2025

Scooting By To Say Hi-Send A Smile 4 Kids


This month at Send A Smile 4 Kids we're creating cards that celebrate summer fun. I had to crack out an oldie but goodie for this card. I stamped by stamping the scooter from Paper Smooches Spiffy Scooters stamp set onto white card stock. I colored the lights and wheels using my alcohol markers. Using patterned papers from Simple Stories Sunkissed 6x8 paper pad, I stamped the scooter again onto various patterned papers, fussy cut them out, and adhered them to the original image. Using real red cardstock from Stampin' UP and a pretty orange polka paper from the same Simple Stories paper pad I created my card base. I then created a contrasting strip for the bottom half of the card using a pretty floral paper from the same paper pad and red cardstock. I created the frilly border using a border punch from EK Success. Using Spellbinders nesting circle and scalloped circle dies I created the focal panel using red cardstock and a nice blue grid patterned paper. I popped up the circle panel using thin foam tape. I adhered the scooter onto the circle with a few clouds I had punched using a mini cloud punch by Fiskars. I finished the card off by stamping the sentiment from the same stamp set at the bottom of the card. I love how cute this sweet, summer card is! Be sure to stop by the Send A Smile 4 Kids blog and see how the rest of the design team was inspired by this month's challenge. We would love if you were to join us with a fun summer creation! 

Sunday, May 18, 2025

I Like Big Mugs-Coffee And Cards With Celeste And Deb


This month Deb and I are focusing on coffee-themed cards! It's been a long time since I've created a masculine coffee card. So, I decided to break out my Miss Ink Stamps Big Mugs stamp set. I stamped the adorable gnome with his mug coffee mug onto white cardstock, colored him with my Copic markers, and fussy cut him out. I stamped background mushroom scene using Woodware Craft Collection Vintage Fungi. I die cut the panel using The Greetery's Nordic Circle dies. I stamped and colored more mushrooms from Bo Bunny's Woodland Mushroom stamp set. I fussy cut the smaller mushrooms and adhered them to the Nordic Circle panel. I die cut a panel of distressed blue patterned paper from We R Memory Keepers Anthologie's 6x6 paper pad using a Spellbinders nesting die. I adhered that directly onto my chocolate brown card base. I added white dashed lines around the outer edge using a white gel pen. I adhered the focal panel on top. I popped the gnome up onto the scene with thin foam tape. I stamped the sentiment from the Miss Ink Big Cups stamp set using Versafine onyx black ink and a stitched banner die from Unity Stamp Company. I adhered that to the lower left side of the card. I finished the card off by adding white gel pen details to the mushrooms, gnome, and butterfly. 
I chose an icy white chocolate latte from a local coffee shop here in town called Ground About. It's been getting warm here in the Midwest and this icy treat hit the spot while I was out running errands! I hope you stop by Debra's blog to see what fun she created this month. She always creates the best cards!

Sunday, April 20, 2025

Always Bee Yourself-Coffee And Cards With Celeste And Deb


Hello! This month Debra and I decided to feature cards using an embossing folder. I bought a Momenta honeycomb embossing folder sometime last year and am ashamed to admit that this is the first time I've used it. I created my card by layering butter yellow cardstock directly onto my card base. Then a smaller panel of black cardstock. I cut down an even smaller panel of white cardstock and die cut a circle from the upper center using a Spellbinders nesting circle die. I stamped the sentiment from the Hampton Art Hello Honey stamp set at the bottom right side. I took a smaller piece of the butter yellow cardstock and ran it through the Moment honeycomb embossing folder. I adhered it the card base and then popped up the white panel using thin foam tape and adhered it with the cut out over the embossed panel.  I stamped one of the blooms from Simon Says Stamps Butterfly Blossoms stamp set (I've been a little obsessed with this set lately) onto a separate piece of white cardstock, colored it using Copic markers, and die cut it using the coordinating die. I adhered that the lower left side of the card. I stamped the smaller bee from the Hampton Art stamp set twice, colored them using Copic markers, and fussy cut the images. I adhered them in the embossed circle using foam tape. I finished off the card by using some sparkling black gems I had in my stash and crystal Stickles to the wings and bodies of the bees and all of the flowers. I love how beautifully this card turned out.

 
For my coffee this month, I swung by my local Ziggi's coffee shop and picked up a frosty Horchata Blender, a nice frosty coffee with coconut milk, vanilla, and cinnamon. I will be purchasing this again! Now, be sure to stop by Deb's blog and see how she was inspired this month. 

Saturday, December 7, 2024

Oh, So Merry-Send A Smile 4 Kids


Hello, happy December! This month at Send A Smile 4 Kids we are creating winter cards. Nothing says winter to me like snow...or snowmen! I found inspiration for this adorable card on Pinterest, and just had to give it a try. I started by layering pretty red snowflake paper from My Mind's Eye Sweater Weather paper pad onto black cardstock and mounted it onto my white A2 card base. Using a stitched circle die from My Favorite Things, I created a circle out of simple white cardstock. I cut down to 2/3 of its size. I added the scarf by cutting down more patterned paper from the same paper pad into rectangles. I adhered them to card using more foam tape. The eyes were created with a small EK Success 1/4" circle punch using black cardstock, and the nose was created with a Spellbinders triangle die and orange cardstock. The entire snowman was adhered to the card using thin foam tape. The sentiment was stamped onto black cardstock using Pawsome Stamps Puffy Holiday Greetings stamp set and Ranger detail white embossing powder. I fussy cut the sentiment out and adhered it with foam tape as well. I finished off the card by adding some black gems around the image for a bit more interest. Thank you for stopping by my blog today. Be sure to head over to the Send A Smile 4 Kids blog and see how everyone else was inspired this month!

Saturday, July 6, 2024

Santa Has Favorites-Send A Smile 4 Kids


This month at Send A Smile 4 Kids Send A Smile 4 Kids we are celebrating Christmas for kids. I thought it would be fun to create a sweet card for my youngest granddaughter. I stamped the adorable images from My Favorite Things Jingle All The Way onto Copic-friendly cardstock using Memento tuxedo black ink. I colored the images using my alcohol markers, and fussy cut them out. I then die cut a panel of white cardstock using a layering shaped die from Spellbinders. Using Simon Says Stamp's Falling Snow stencil white Hero Paste, I created a snowy background. Once the paste was dried, I inked the background using Tim Holtz distress inks in blues. I mounted the panel directly to my A2 cardbase and stamped the sentiment below it is using Gina K Designs black ink. I popped the images up on the focal panel using foam tape to create a fun, wintery scene. I added some white gel pen details to finish up this cute Christmas card. Thank you for stopping by my blog and be sure to head over to the Send A Smile 4 Kids blog and join us in this fun challenge. 

Saturday, July 1, 2023

Naughty Or Nice? Send A Smile 4 Kids


This month at Send A Smile 4 Kids we are creating Christmas cards for kids. I recently picked up the Sweet N Sassy Christmas Blocks stamp set on sale and had to use this adorable stamp set for this challenge. I started by stamping the adorable Santa image and sentiment from the stamp set onto some white Copic-friendly cardstock and doing some simple coloring on his hat, beard, and face. I cut the image out using a Spellbinders nesting circle die. I adhered that panel to a scalloped border that I created using a Spellbinders nesting scalloped border die and real red cardstock from Stampin' UP. Then I layered some green cardstock from Hobby Lobby directly onto my white A2 card base. I adhered a piece of striped patterned paper from Doodlebug Design's Home For The Holidays 6x6 paper pad on top. I then cut down a white panel and added a scalloped edge at the top using a Fiskars punch. I layered some more of the green cardstock onto the panel after creating a scalloped border at the bottom. I added more patterned paper from the same Doodlebug Design paper pad on top of the green cardstock, and popped the whole panel up onto the card at an angle. I stamped the other sentiment at the bottom of the panel from the same stamp set, added some white mini brads from my stash to the corners, and adhered the whole panel up off of the card using 3M foam tape. I finished off the card by adhering the Santa panel to the focal panel and adding some fun shimmer and dimension by adding Nuvo glitter drops to the beard, hat, and pom pom. Thank you for visiting my blog today. Be sure to hop over to the Send A Smile 4 Kids blog and see how the other design team members were inspired this month!

Saturday, December 3, 2022

Christmas Hugs-Send A Smile 4 Kids

We are rapidly approaching the end of 2022, and this is our last challenge of the year at Send A Smile 4 Kids. This month we are creating winter cards for kids. I am still in Christmas card-making mode, so I had to make a Christmas card. I created this card by stamping the adorable little images from Mama Elephant's Hot Cocoa stamp set onto white Copic-friendly cardstock and coloring them using my alcohol markers. I fussy cut the images out leaving a small white border around them. I then embossed a plain white piece of cardstock using the Spellbinders plaid embossing folder and mounted the panel directly onto my white A2 card base. I then added a panel of wonky plaid patterned paper from the American Crafts Very Merry 6x6 paper pad onto my card at an angle. Then using a Fiskars scalloped edge punch and some olive cardstock I created a small, scalloped border using some which I attached under the patterned paper to create some interest between it and the white embossed panel. Then using Spellbinders scalloped circle and nesting circle dies I created the focal panel. I popped the adorable little images up using Stampin' UP foam dimensionals. I then stamped the sentiment from the Crate Paper Snow and Cocoa mini stamp set onto more olive cardstock using Versamark ink and heat embossed it using Ranger detail embossing powder in white. I cut that down into a small sentiment strip and mounted it under the focal panel using more foam dimensionals. I die cut the Hugs sentiment using more olive cardstock and My Favorite Things Essential Elements Alphabet dies. I glued the sentiment directly onto the card base, and finished the card with some white gel pen detail and some light green enamel dots from Simple Stories. Now, be sure to head over to Send A Smile 4 Kids and see how the rest of the design team was inspired by this month's challenge. 
 

Saturday, November 5, 2022

Friendship Warms The Heart-Send A Smile 4 Kids


Hello, and a very happy November to you! This month at Send A Smile 4 Kids we are creating Holiday cards for kids. I recently picked up this adorable stamp set on a de-stash from a fellow crafter and couldn't wait to use it. I layered some cherry cobbler cardstock from Stampin' UP onto my white A2 card base. I then added a piece of plain white cardstock as a frame and then added a pretty piece of snowflake patterned paper from the Simple Stories Cozy Christmas 6x6 paper pad. Using a scalloped edge die from Papertrey Ink I created a large scalloped border using more paper from the same paper pad. I stamped the sentiment from My Favorite Things PI Merry Kissmas stamp set using Versafine onyx black ink and trimmed it down into a narrow border. I mounted it on more of the cherry cobbler cardstock and adhered it to the scalloped border. I stamped the adorable image from the same My Favorite Things stamp set with Memento tuxedo black ink directly onto a round circle panel I created using a Spellbinders circle stacking die. I also paper pieced the girl's sweater and hat and the snowman's scarf and hat using more patterned paper from the same paper pad. I adhered them directly onto the images on the focal panel and colored everything using my Copic markers. I adhered the entire panel to another piece of cherry cobbler cardstock using a Spellbinders scalloped edge circle stacking die. I adhered the panel to the card using some 3M foam tape. For a nice finishing touch, I covered the pom poms on the girl's hat and the snowbank with liquid glue and poured over some Wow! glitter in white for some sparkle and shine and added some white gel pen to the characters. Be sure to stop over at the SendASmile4Kids blog and see what the rest of the design team created this month. 

Saturday, October 1, 2022

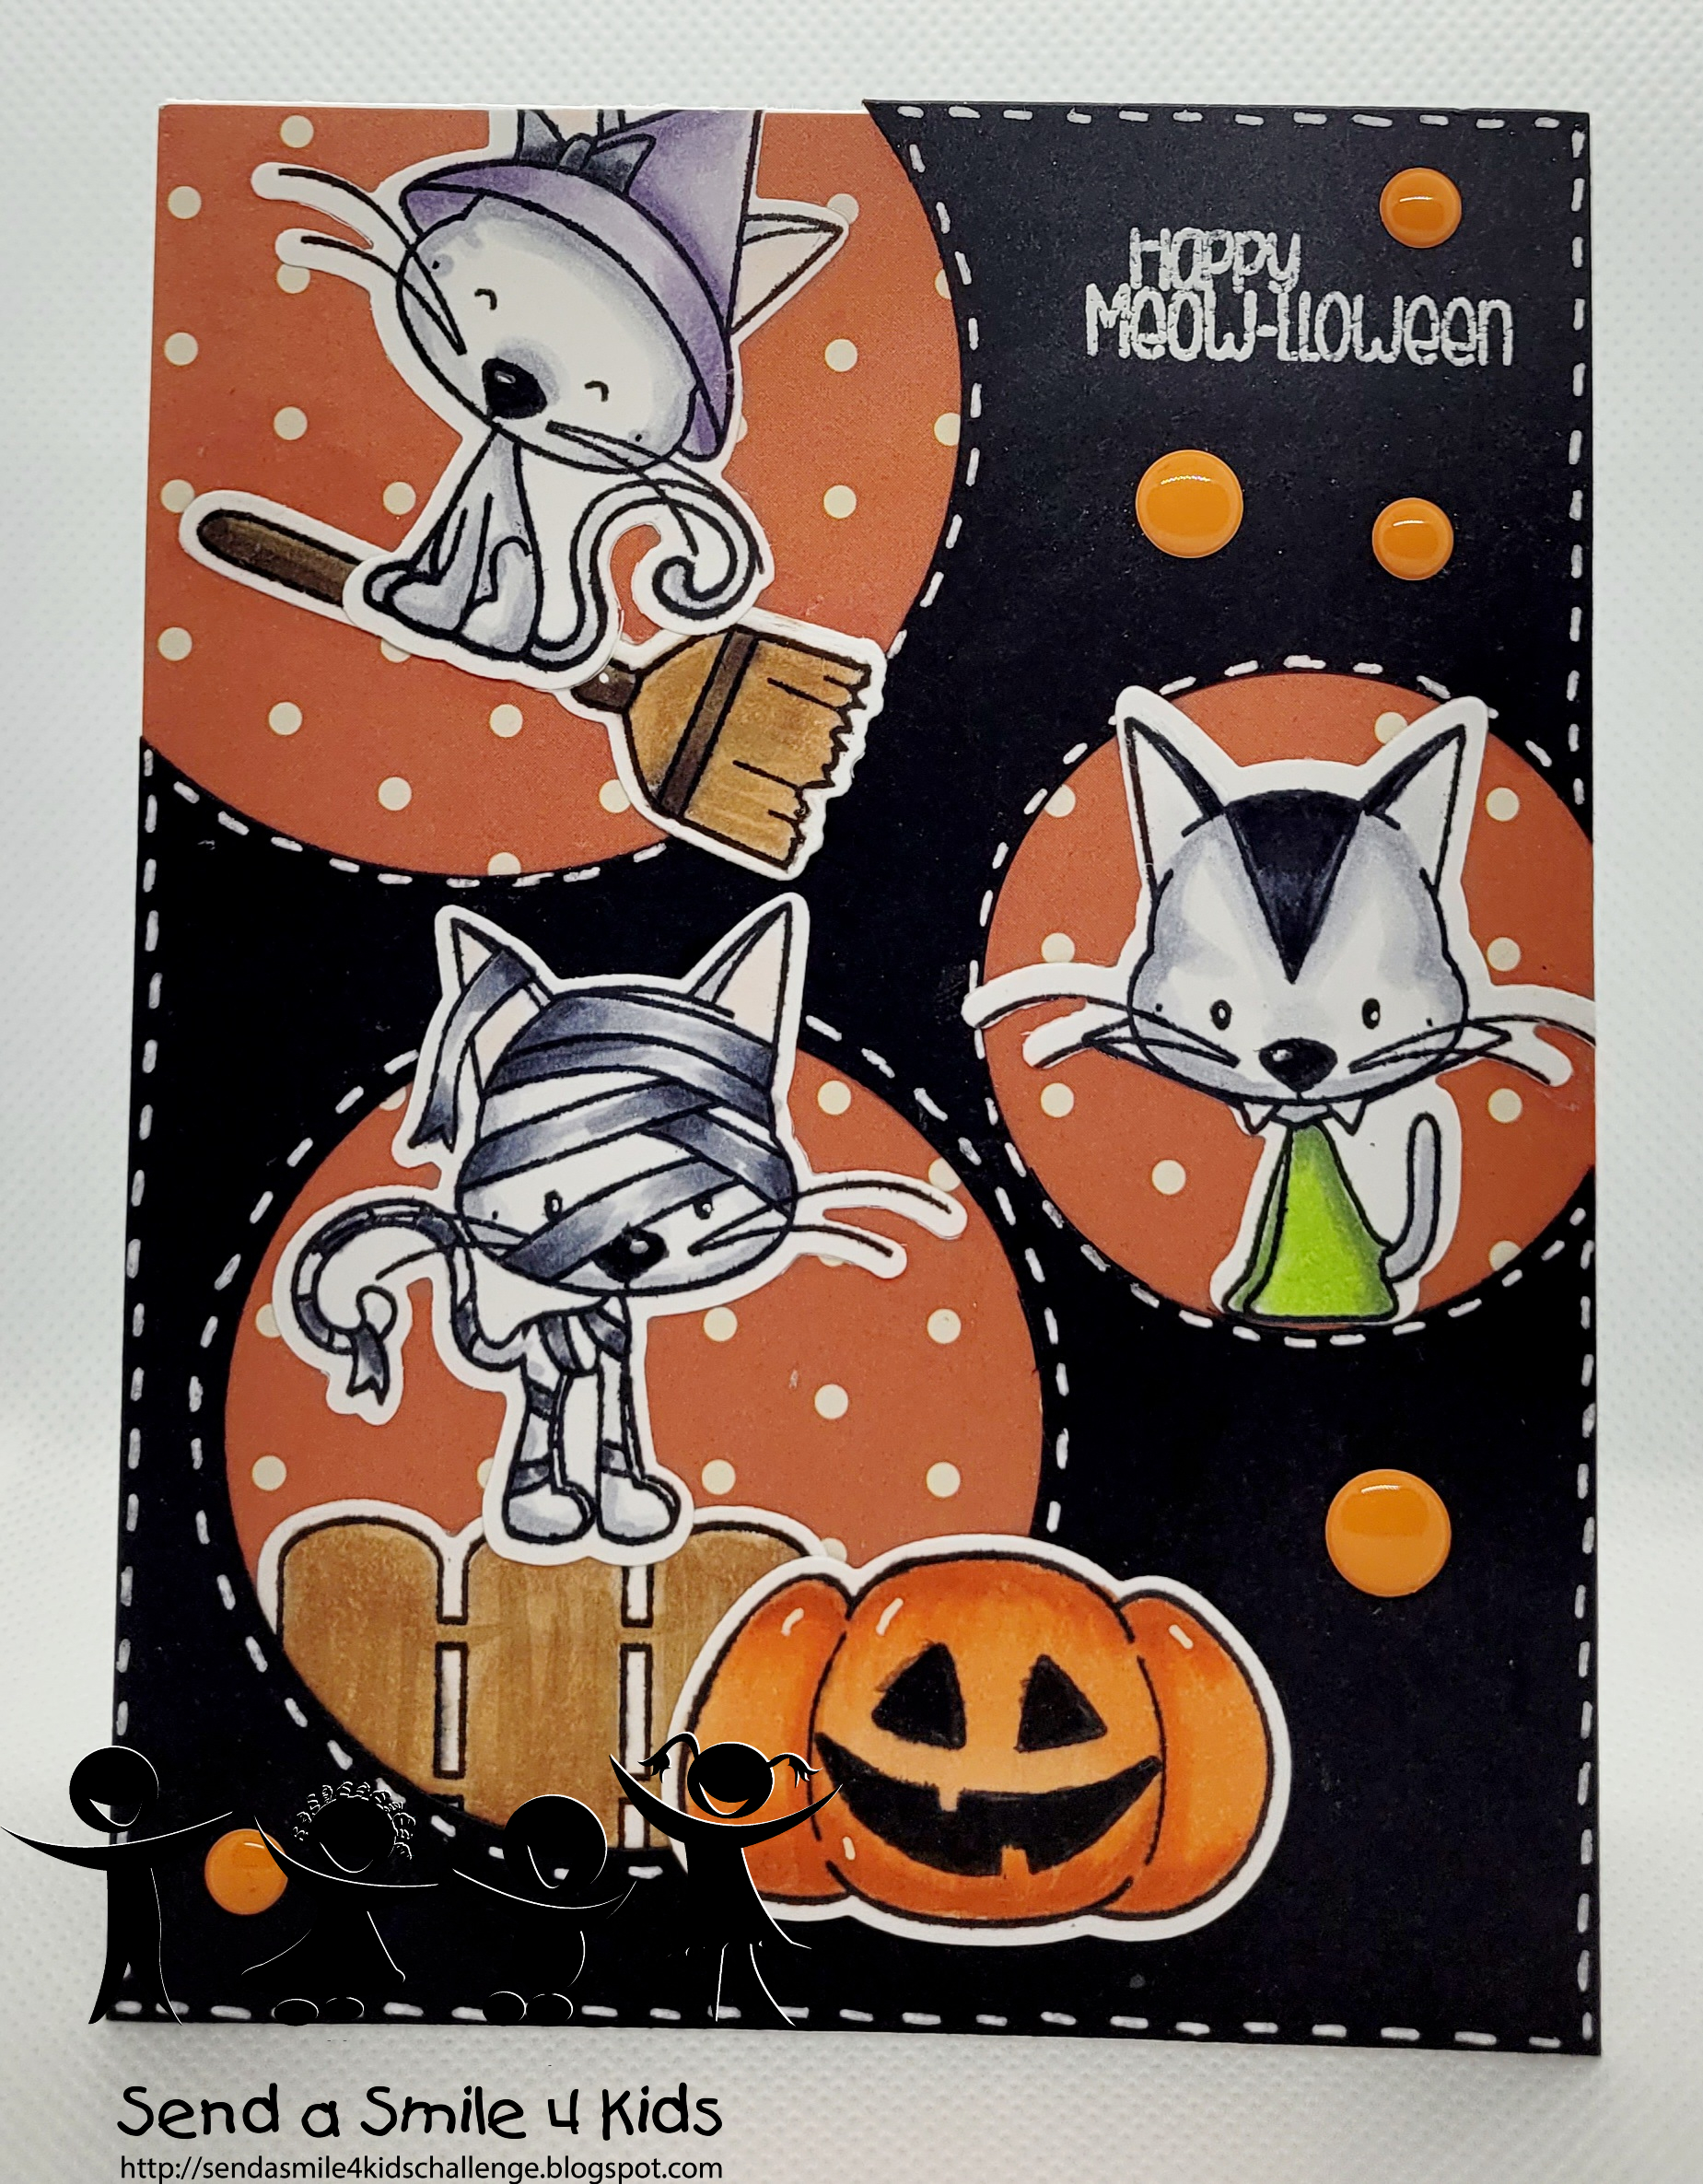
Happy Meow-lloween-SAS4Kids October 2022

Hello, and happy October! Fall is here and I am so very happy. This month at Send A Smile 4 Kids we are creating Holiday cards, and I just couldn't help myself. With Halloween coming up later this month I had to create another Halloween card. I created my card by layering a piece of orange and white polka-dot paper from the American Crafts Haunted 6x6 paper pad onto my A2 card base. I then took a piece of basic black cardstock from Stampin' UP and die cut 3 circles using my Spellbinders stacking circle dies. I adhered that panel on top of the patterned paper and added white dashed lines around the outer edges and around each circle for added contrast. I stamped the sentiment from C.C. Designs Meow-lloween stamp set using Versamark ink and white detail embossing powder from Ranger. I stamped the images from the same stamp set onto white Copic-friendly cardstock and colored them using my alcohol markers. I used the coordinating dies to cut them out and placed them around my card panel to create a pleasing Halloween scene. I finished my card by adding some orange enamel dots from Hobby Lobby around the card for some added interest. Now, be sure to pop over to the SAS4Kids blog and see what the rest of the design team  created for us this month!
 

Saturday, June 4, 2022

You Rock!-Send A Smile 4 Kids


I cannot believe it's June already! Where is this year going? This month Send A Smile 4 Kids is focusing on cards for teens. I dug into my stash and found a scrap of old patterned paper that is so old I cannot recall who made it. I cut it down using a stitched rectangle die from Gina Marie Designs and cut it into two parts. I adhered it to a panel of dusty pink cardstock I picked up at Hobby Lobby. Using a Spellbinders decorative edge circle die I die cut a focal panel and stamped the sentiment from the My Favorite Things Essential Sentiments stamp set using Memento tuxedo black ink. I added some faux stitched lines using my dual tip Memento marker in black and adhered it to the card. I then die cut a lace border using a My Favorite Things border die and white cardstock. I adhered that where I cut the patterned paper to separate the two patterns. I then stamped, colored, fussy cut, and popped up the adorable focal image from the All Dressed Up Girl's Night Out stamp set using Memento tuxedo black ink and my alcohol markers. To finish the card off I added some white gel pen details to the girl and a few berry colored gems from Simon Says Stamp. I can't wait to see how everyone is inspired by this month's challenge!