Welcome to my blog and thank you for visiting! I'm a Surgical Scheduler who loves exercise, coffee (sometimes too much coffee), and creating fun things in my spare time. I'm a single mom to two wonderful grown children and grandma to two beautiful granddaughters! I love sharing my card creations with my friends and the crafting world. To subscribe to my blog please click the "follow" button below or enter your email address in the "follow by email" box to the right.
Showing posts with label Paper Rose stitched rectangles dies. Show all posts
Wednesday, September 25, 2024
Coffee Everyday
Sunday, September 22, 2024
Have Yourself A Merry Little Christmas
Today's card was created for the latest Freshly Made Sketches challenge. First, I embossed a piece of white cardstock using a Spellbinders plaid embossing folder. I stamped the sentiment from Ellen Hutson's Christmas Scribbles stamp set onto some kraft cardstock using Memento tuxedo black ink. I cut the sentiment down into a thin strip. I die cut a piece of red cardstock into a scalloped border using a Papertrey Ink border die, adhered the sentiment strip to the top of that border. I then adhered the entire thing to a piece of patterned paper from The Paper Studio Vintage Christmas 6x6 paper pad. I attached the patterned paper strip to my embossed panel and die cut the entire thing into a smaller panel using a stitched rectangle die from Paper Rose. I adhered the focal panel to my white A2 card base. I then stamped the gingerbread house and the gingerbread man from the now retired Avocado Arts Gingerbread Goodness stamp set onto more kraft cardstock. I fussy cut the images out. I then pattern-pieced the body of the house, the door, and the roof and adhered all of the images to the card using liquid glue. I finished the card off my adding a bow tie to the gingerbread man and a few clear rhinestones from Recollections for a finishing card. Thank you for stopping by my blog today. If you like my card, be sure to leave a comment. I read and appreciate all of them!
Sunday, December 17, 2023
Ho Ho Ho-Coffee And Cards With Celeste And Deb
HelloI cannot believe we are rapidly approaching the end of 2023. Deb and I decided to create Christmas cards again this month. I found this adorable ornament image to use as our inspiration this month. To create my card I started by die cutting letters from patterned paper from Heidi Swapp's Noel 6x6 paper pad using Honey Bee Stamps Bee Bold Alphabet dies. I then die cut the holly leaves and berries using Memory Box's Stitched Holly Leaves die set and more paper from the same Heidi Swapp paper pad. I die cut a white rectangle panel using Paper Rose stacking stitched rectangle dies. I matted that onto a panel of real red cardstock that I die cut using a Gina Marie postage edge rectangle die. I put the card together and arranged the letters on the card by popping them up with foam tape. I adhered the holly leaves and berries directly to the panel. I finished this card off by adding some white gel pen details to the berries. This card was so easy to make that I may have to mass produce a few of them next year.
For my coffee I opted for a hot chocolate peppermint latte. Now be sure to pop on over to Deb's blog and see how she was inspired this month. Thank you for stopping by my blog. I wish you and yours a beautiful holiday season and a safe and Happy New Year!
Friday, November 3, 2023
Let's Celebrate!
Today's card was created for the latest Color Throwdown card challenge. I layered some rust-colored cardstock that I had my stash onto my A2 white card base. I then stamped, colored, and fussy cut the adorable gnome, butterfly, and mushroom from the Inkadinkado Garden Gnome stamp set onto white Copic-friendly cardstock. I created a focal panel using white cardstock, pink ink from Gina K Designs, and the mini cloud stencil from My Favorite Things. I attached a piece of green cardstock from my stash with snail adhesive, and die cut the panel using a stitched stacking rectangle die from Paper Rose. I stamped the sentiment from the Momenta Birthday wooden block stamp set at the bottom of the panel. I popped the panel up off of the card for a little dimension. I finished the card off by adding some white gel pen details the images. Thank you for visiting my blog today!
Sunday, July 16, 2023
Merry Christmas-Coffee And Cards With Celeste And Deb
This month Deb and I decided to do Christmas in July for our theme. I usually send out about 50-60 Christmas cards each year, and July is when I start prepping for that. I was recently gifted a few gently used stamp sets from my buddy Cristina. One of the stamp sets she gave me is the now retired Close To My Heart Snow Friends. The second I saw this set I knew I had to use the adorable little row of snowmen. To create my card I started by layering some gingerbread cardstock from Hobby Lobby onto my white A2 card. I then stamped a white panel with Gina K Designs ocean mist ink using the Recollections Christmas/Noel background stamp. I cut the panel down using a Paper Roses stitched edge rectangle die, and edged the panel with a foam blender and more of the same ink. I adhered that directly to my card panel. I then stamped the row of snowmen onto some white Copic-friendly cardstock, colored them with my alcohol markers, and cut the panel down to a narrow strip. I mounted it onto some crumbcake cardstock from Stampin' UP, and then attached a scalloped border at the bottom using more gingerbread cardstock and a Fiskars scalloped edge punch. I popped that panel up off of my card using 3M foam tape, and finished the card off with some clear Nuvo glitter drops on the snow and the snowflakes for some extra shimmer and shine. I love this adorable little card!
Even though we are celebrating Christmas in July it has been quite hot (rude, one could say) here in the Midwest. So, my coffee choice this month is a Scooter's iced Turtle latte with a double shot of espresso! Now, be sure to head on over to Deb's blog to see what she how she was inspired this month!
Sunday, March 26, 2023
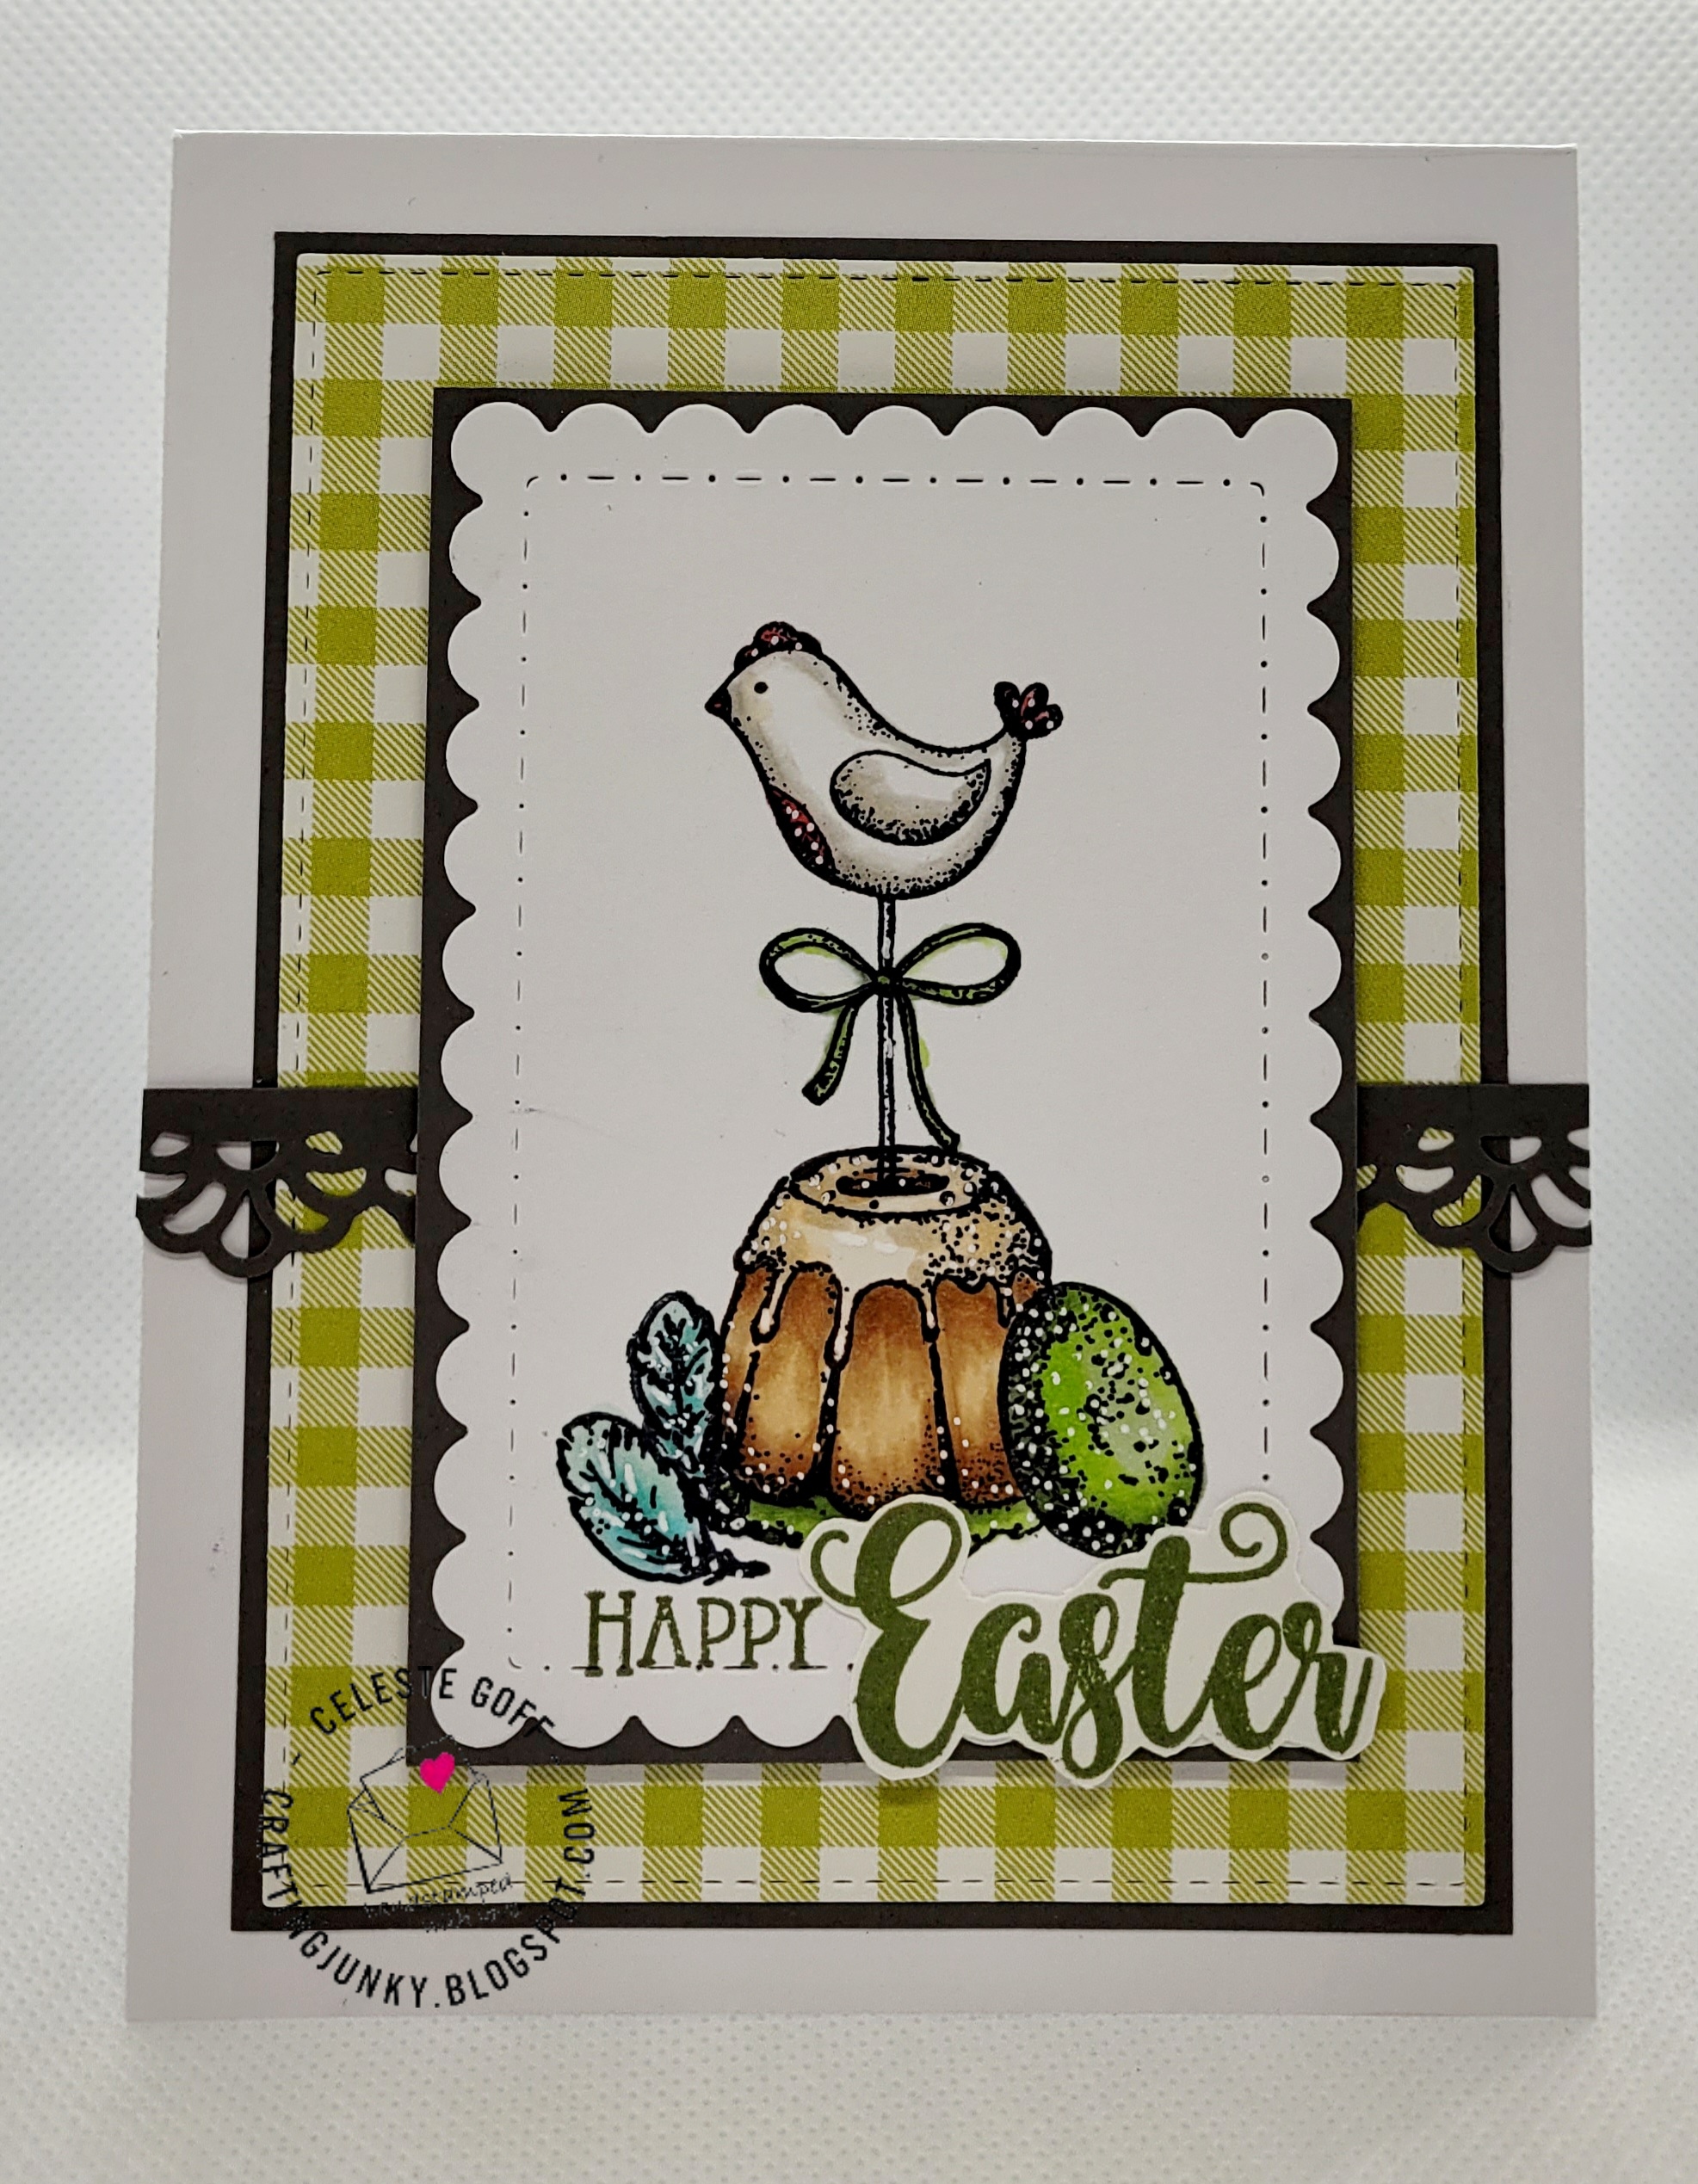
Happy Easter-Coffee And Cards With Celeste And Deb
Hello, and thank you for visiting my blog today! Deb and I are celebrating Spring in our coffee and cards collaboration. I recently picked up a few new stamp sets on clearance from Whimsy Stamps, and thought it would be fun to use one of my new sets for this card. I started by die cutting a panel of pretty green gingham patterned paper from Simple Stories Summer Lovin' 6x8 paper pad using a stitched rectangle die from Paper Rose, and matted it with some olive green cardstock that I had in my stash. I adhered that panel directly onto my white A2 card base. Using a lacy border metal die I cut down more of the olive green cardstock and adhered that onto the card slightly lower than halfway. I stamped out my images from Whimsy Stamps Easter Memories stamp set onto some white Copic-friendly cardstock and colored the images using my alcohol markers. Using a scalloped and pierced edge rectangle die from Gina Marie Designs I created a focal panel. I matted that panel onto another piece of olive cardstock and popped the panel up using 3M foam tape. I stamped Happy directly onto the focal panel using Memento tuxedo black ink. I then stamped the Easter sentiment onto a seperate piece of paper using Gina K Designs ink in Avocado and fussy cut the sentiment out. I adhered it to the card using liquid glue and finished my card off my added some white gel pen detail to all of the images.
For my beverage this month, I opted to create a nice "adult" hot chocolate by using a chocolate bomb with a huge dollop of Whip Shots vodka infused whipped cream in Mocha! Now, be sure to stop by Debra's blog and see how she was inspired by this month's theme!
Monday, March 13, 2023
Thank You For Being A Ray Of Sunshine
Happy Monday! Today's card was created for the latest Color Throwdown card challenge. I just picked up this adorable lemon stamp from Stampabilities at Hobby Lobby on clearance and couldn't resist using it for this challenge. I stamped the image twice, colored it using my alcohol markers, fussy cut them out, adhered them together and added foam dimensionals from Stampin' UP behind them. I stamped the background using an abstract background stamp from Spellbinders and bashful blue ink from Stampin' UP. I cut the panel down using a stitched rectangle die from Paper Roses and adhered it to some light blue cardstock from Paper Crafts. I adhered that panel directly to my white A2 card base. Using the same blue cardstock I cut down a small banner and ran it through the same stitched rectangle die to get the stitched edges. I stamped the sentiment from Stampendous True Friends stamp set using Memento tuxedo black ink. I adhered it to the card and added the lemons to the left of the sentiment. To finish off my card I added some white gel pen detail to the lemons and some pretty light blue sequins from Pretty Pink Posh around the focal panel. Thank you for stopping by my blog today!
Sunday, December 18, 2022
Sending You Love And Joy-Coffee And Cards With Celeste And Deb
Happy Sunday! This adorable image is the inspiration for this month's Coffee and Cards with Celeste and Deb. To create my card I started by layering some cherry cobbler cardstock onto my white A2 card base. Then using some patterned papers from Heidi Swapp's Noel 6x6 paper pad I created a main panel that I cut down using a stitched rectangle die from Paper Roses. I popped that panel up off of the card using 3M foam tape. I stamped the adorable image and sentiment from Penny Black's Cup Of Joy mini stamp set. I colored them using my Copic markers and fussy cut the images and sentiment banner out. Using the steam images from Paper Smooches Need To Venti stamp set I stamped them onto a white stitched rectangle panel using a smaller die from Paper Roses and Versafine onyx black ink. I popped the images up using Stampin' UP's foam dimensionals and centered them on the panel under the steam. For a finishing touch I added some black gems around the panel for a little sparkle.
I was out finishing up the last of my Christmas shopping, so I snagged a Starbucks peppermint mocha latte. Now, be sure to pop on over to Debra's blog and see what fun she created for our collaboration this month! Thank you for stopping by my blog today. I wish all of you and your family's a very merry Christmas and a healthy, happy New Year!
Sunday, October 16, 2022
Always Grateful
This card was created for the latest Color Throwdown card challenge. I stamped the medallion and leaf images from Stampin' UP's Day Of Gratitude stamp set using Memento Dandelion, Gina K Design's charcoal brown, and Stampin' UP's not quite navy inks. I splattered the background panel with the same inks and a small round paint brush. I cut the panel down using a stitched rectangle die from Paper Rose. I layered it on some early espresso cardstock from Stampin' UP and adhered it to my card base. I fussy cut the leaves and attached them the card with foam dimensionals. I stamped the sentiment from Close To My Heart's Always Grateful Trees stamp set and more of the same charcoal ink. I cut it down to a panel and bordered it with more early espresso cardstock. I popped it up with foam dimensional and adhered it to the focal panel to complete my card. Thank you for stopping by my blog today!
Saturday, August 6, 2022
Hey! Thanks Dude-Send A Smile 4 Kids
Hello, happy August! This month at Send A Smile 4 Kids we are creating thank you cards for kids. To create my card I started by stamping the sentiment from Simon Says Stamp's All Boy stamp set at an angle on a cardstock panel using various colored inks. I stamped the thanks Dude from the same stamp set and used my Copic markers to color it to match the inks I used to stamp the rest of the card. I stamped the gaming controllers onto a separate piece of white Copic-friendly cardstock, colored them using my alcohol markers, and then fussy cut them out. I adhered them to the panel using my snail adhesive and then die cut the panel using a rectangle stitched die from The Paper Rose. I matted that panel onto some basic black cardstock and then popped the panel up using some 3M foam tape. My camera didn't pick it up on the photo, but I added some Glossy Accents to the buttons on the controllers for some gloss and shine. Thank you for stopping by my blog and be sure to head over to the Send A Smile 4 Kids blog to see how the other design team members were inspired this month.
Subscribe to:
Posts (Atom)


.jpg)