Showing posts with label My Mind's Eye. Show all posts

Sunday, March 31, 2019

Happy Birthday-Coffee And Cards With Celeste And Deb

Hello, and welcome to the March Coffee and Cards with Celeste and Deb collaboration. We decided in honor of Spring we would create a floral card in honor all of the beautiful things that are blooming right now. To create my pretty little springtime card I started by layering some pretty yellow patterned paper onto my white card base. I'm not sure who made the paper since it was sent to me by a craft friend in a destash sale she had. But I loved the buttery color and decided to let that dictate my color palette. I die cut a wonky edge panel from white cardstock using a Gina Marie Designs rectangle die and then stamped the birthday sentiment from the Verve Stamps Poppy Birthday stamp set at the bottom using Versafine onyx black ink. I then stamped the floral images using fresh lemon and citrus burst Altenew crisp dye inks and then stamped the outlines on top and cut them out using the coordinating dies from the same set. I then die cut the stems and the leaves and stamped the outline image for them and colored them in using a Copic alcohol marker in YG61. I glued the stems directly onto the focal panel using my Zig two-way glue pen and then popped the flowers and leaves up using some scrapbook adhesives foam squares. I added some white enamel dots to the center of the flowers using Ranger enamel accents and then popped the whole thing up off of the card using some foam tape. I added a few buttery yellow enamel dots from My Mind's Eye Now and Then collection and added some beautiful shimmer to the leaves and flowers using my Spectrum Noir clear shimmer pen. I love this clean and simple look. 
For my coffee choice this month I opted for Barissimo Seasonal Blend Pumpkin Spice iced coffee! It really hit the spot after my run this morning! 
Be sure to pop on over to Deb's blog and see what she created for us this month. And if you like my card be sure to leave a comment. I read and appreciate them all!

Wednesday, February 13, 2019

Love Ewe-February Words 2 Craft By

Hello and welcome to the February Words 2 Craft By challenge. This month's word challenge is based on a quote from an A. A. Milne Pooh book "Piglet sidled up to Pooh from behind. "Pooh" he whispered. "Yes, Piglet?" "Nothing," said Piglet, taking Pooh's paw. "I just wanted to be sure of you." I thought since it was so close to Valentine's Day I would create a sweet card for my granddaughter Maddie. She's 11 months old this month. To create my card I started by layering some black and white heart paper from The Paper Studio onto my white A2 card base. I then added a small strip of pink and cream patterned paper from My Mind's Eye Penelope 6x6 paper pad onto the card panel. I then stamped the adorable sheep images from Unity Stamp Company's Love Ewe onto some white Copic-friendly cardstock and colored it using my alcohol markers. I then die cut it into a panel using a stitched edge oval die from My Favorite Things. I adhered it directly to the card and then added a few die cut hearts using some Paper Smooches dies and colored them with my alcohol markers to match the focal image. I then stamped the sentiment onto a small die cut banner I created using a Jillian Vance banner die and adhered it to the top right of the card. To finish my card off I added some black dashed lines around the focal panel, the fishtail banner, and the focal strip. I added some sparkle and shine with my Spectrum Noir clear glitter pen and a few beautiful soft pink sequins in 4mm and 6mm from The Ton. I can't wait to see how this month's challenge inspires the rest of you!


Sunday, January 6, 2019

Happy Holidays

Hello and happy New Year! I can't believe it's been almost two weeks since I posted on my blog. I work in a doctor's office and we had some shut down time for the holidays and I took that opportunity to go to Texas and visit my children and grandchildren. It was an amazing visit but back to reality. LOL. Today's card was created for the latest Cas(e) This Sketch  card challenge. I am a huge proponent of recycling and every year when I'm discarding the Christmas cards that were sent to me I try to look for ways to recycle them. I will die cut panels from them or fussy cut images out of them so that I can repurpose them onto new cards. It's a fun challenge for me and it also helps prevent more waste filling up our nation's landfills. So, to create my adorable little snowman card I started by fussy cutting those fun little guys from a card that one of my aunt's sent me. Then following the sketch I layered some real red cardstock from Stampin' UP onto my white A2 cardbase. I then die cut a panel of white cardstock using a stitched edge rectangle die from Gina Marie Designs and mounted it onto the red cardstock. I cut down some fun patterned paper from the My Mind's Eye's Oh What Fun 6x6 paper pad and layered it onto the card panel following the sketch. I adhered the fussy cut snowmen onto the circular die cut panel using some foam squares from Scrapbook Adhesives and stamped the sentiment from the My Favorite Things Cheerful Christmas Greetings stamp set to complete my card. I hope you like it and thank you for visiting my blog today!

Friday, October 5, 2018

Thankful For You

Today's card was created for the latest If You Give A Crafter A Cookie card challenge. I was so smitten with their beautiful inspiration photo! To create my card I started with a card base using Stampin' UP's crumb cake cardstock. I then layered some patterned papers from the Echo Park Reflections Fall 12x12 paper collection on top. I stamped the critters and the sentiment from the Stampin' UP Thankful Forest Friends stamp set onto white cardstock from Staples. I die cut the sentiment using a pierced oval die from My Favorite Things and fussy cut the critters using my detail scissors. Using a Zig dual tip marker in chocolate I added some dashed lines around the outer edge of the card and the sentiment panel. I popped the sentiment up off of the card using foam squares from Scrapbook Adhesives and did the same with the critters, placing them onto the card around the sentiment. To finish my card I added some glittery gold enamel dots by My Mind's Eye Now & Then collection. Love how adorably sweet this card turned out. Thank you for visiting my blog today and if you like my card be sure to leave a comment. I appreciate them all!


Sunday, July 29, 2018

Merry Christmas


Today's card was created for the latest Jingle Belles and Watercooler Wednesday card challenges. To create my card I started by adding some glittery gold washi tape from the American Crafts Make It Happen collection onto some white cardstock. I then cut down a piece of patterned paper from the My Mind's Eye Signature Christmas 6x6 paper pad and die cut a snowflake out it. I adhered the gold washi tape panel to the back of the patterned paper using my Ranger multi-matte medium glue and then mounted it to a piece of early espresso cardstock from Stampin' UP. I stamped the sentiment from Stampabilities Merry Christmas onto the patterned paper using Gina K Design charcoal brown ink. I then wrapped some gold glittery Lawn Fawn lawn trimmings to the card and tied a bow. I added a simple blue button to the center of the snowflake and popped the entire panel up off of my white card base using some inexpensive fun foam from Hobby Lobby. To finish this glittery, fun card off I added some gold Stickles around some of the printed snowflakes on the patterned paper. I hope you like my card. Be sure to subscribe and leave a comment. I appreciate them all!


Thursday, February 8, 2018

Valentine Zombies

I am a huge The Walking Dead fan and love all things zombies. So, I couldn't pass up the opportunity to create a love themed card using a zombie them. I know...I have a sick sense of humor! To create my fun love-themed card I started by layering on some pretty ombre chevron striped patterned paper from the My Mind's Eye's Filled With Love 6x6 patterned paper pad onto my white card base. I die cut a heart using paper from the same paper pad and the largest die from the Essentials By Ellen Folk Heart die set and layered it directly onto my card. I then stamped the zombies from the SugarPea Designs Undying Love stamp set onto some white Copic-friendly cardstock. I colored them using my Copic markers in colors to coordinate with the patterned paper. I fussy cut the images out, edged them using my Memento tuxedo black dual tip marker and popped them up off of the card using Stampin' UP foam dimensionals. To finish my card I stamped the sentiment from the Technique Tuesday You Aren't Normal sentiment stamp set using Versafine onyx black ink and added some black dashed lines around the outer edges of the card and the heart. I absolutely love this card!!! I will be entering this card into the latest Paper Players 
 and AAA Cards card challenges. Thanks for visiting my blog today!


Sunday, December 17, 2017

Hello Love-Coffee And Cards With Celeste And Deb

Hello and welcome back to another installment of Coffee And Cards With Celeste And Deb! We have yet another fun guest designer with us this month, Michael Trent. Since Michael is our guest this month we let him select a theme that would unify our projects and he chose LOVE. Since I'm still in winter/Christmas card making mode I knew immediately I would have to break out my Unity Stamp Company Hello Love stamp set and create something fun and wintery with it. The sentiment is exactly how I feel about my morning coffee! LOL. 
To create my card I started by stamping the focal image onto some Copic-friendly 110lb cardstock and colored her using my Copic markers. I then fussy cut her out and edged the image with my Memento tuxedo black dual tip marker to clean the edges up. I stamped the image again onto some patterned paper from the My Mind's Eye Signature Christmas 6x6 paper pad and then cut it into a small panel. I die cut an oval into some smoky blue grey cardstock from Hampton Art's ki natural cardstock 6x6 paper pad using a Spellbinders die and then adhered the image behind it. I then die cut a scalloped oval using another Spellbinders die into some more of the My Mind's Eye paper and wrapped some sage grey twine from American Crafts around the panel close the bottom and tied it off with a bow. I popped the panel up off of the card using some 3M foam tape and adhered it to the card. I stamped the sentiment from the same Unity Stamp Company stamp set onto more Copic-friendly cardstock and colored it in with my alcohol markers to match the colors on the patterned paper. I fussy cut the heart sentiment down and adhered it to the card. To finish off my card I added some sequins from The Ton around the panel, added some clear Wink of Stella to the mittens and scarf on the focal image, and then some dashed black lines around the outer panel and inside the oval panel. I hope you like it! 
As for my beverage of choice I opted for a nice hot cup of black French roast from Seattle's Best Coffee. 
Now be sure to hop on over to Michael and Deb's blogs and leave them some love in the way of a comment!


Sunday, November 26, 2017

The Happiest Of Holidays

Hello and welcome to my blog! Today's card was created for the latest The Paper Players sketch challenge. My good friend Becky Ledbetter is a Unity Stamp Company KOTM member and is always gracious enough to lend me her kits. This beautiful image came from the October 2017 kit Conspiracy Of Love. I absolutely adore the vintage feel of this old truck and wanted to pair it with masculine papers. So, I stamped the image onto some white Copic-friendly cardstock and colored it in using my alcohol markers. I die cut the image using a My Favorite Things pierced edge oval die. Following the pierced markings I added some black stitched lines for a bit of interest and contrast. I stamped the sentiment from the stamp set onto more white cardstock and then cut the end to a fishtail banner. I chose pretty patterned papers from the My Mind's Eye 'Tis The Season 6x6 paper pad and adhered them onto my white card base in the manner of the sketch. I adhered the focal panel and sentiment banner directly to the card to finish my pretty vintage card. I hope you like it and thank you for stopping by my blog today!


Sunday, November 12, 2017

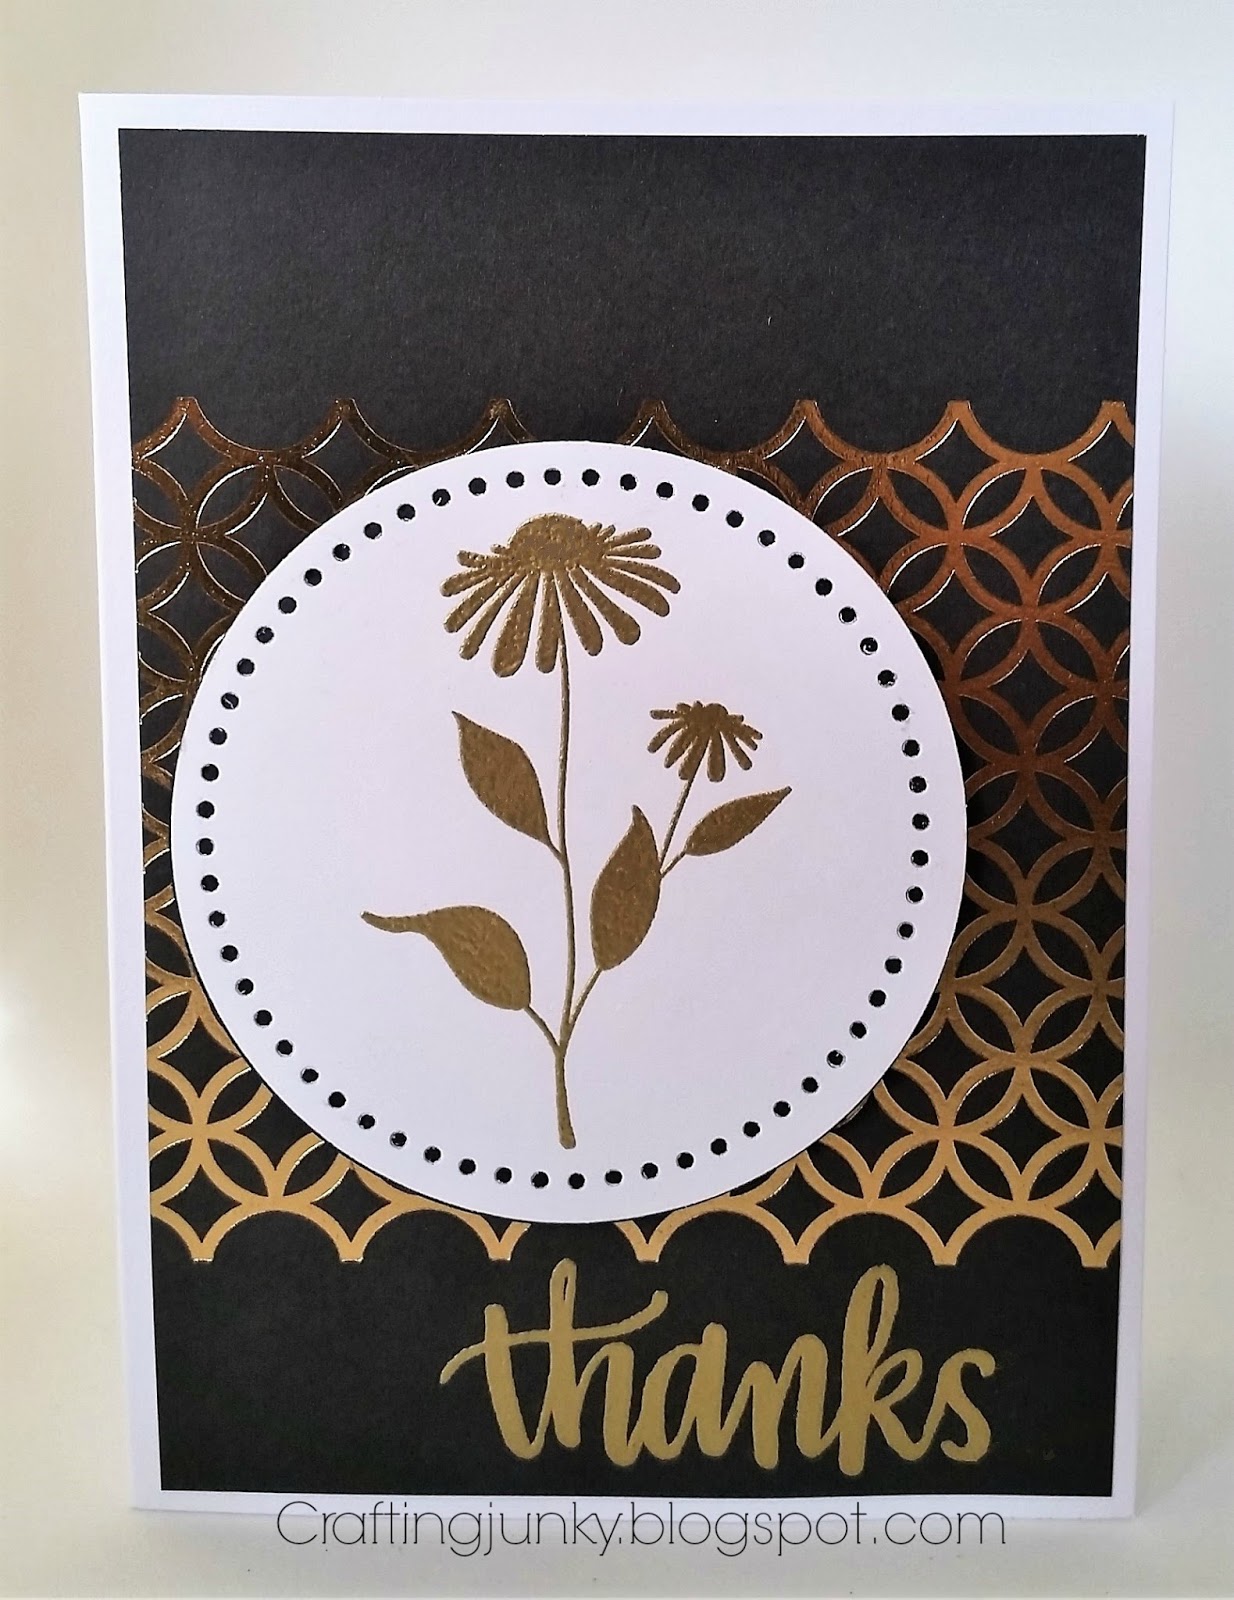
Thanks


Today's card was created for the latest Just Us Girls Challenge. To create my card I started by prepping a pretty piece of foiled patterned paper from the My Mind's Eye Fancy That 6x6 paper pad with my EK Success powder tool. I then stamped the sentiment from the Simon Says Stamp Hand Lettered Winter Wishes stamp set using Versamark ink and heat set it with Ranger gold embossing powder to match the gold foiling on the paper. I then stamped the silhouette flower image from Unity Stamp Company onto some plain white cardstock using the same ink and heat set it using more of the same gold embossing powder. I die cut the panel using dies from Little B and backed it onto some dark grey cardstock. To finish my card I simply popped the focal panel up off of the card using some 3M foam tape and offset on the card for some fun interest. Thank you for visiting my blog today and I hope you like my card!

Sunday, September 17, 2017

Thanks, You Warm My Heart


Today's card was created for the 2017 Fall Coffee Lovers Bloghop. I have a dear friend who receives the monthly KOTM stamps from Unity Stamp Company and she always lets me borrow them. Thank goodness for crafty friends, right? As soon as I saw this image in the May 2017 Free Your Dreams kit I knew I had to ink her up and make a card for the hop. To create my card I started by layering a piece of pumpkin pie orange cardstock from Hobby Lobby onto my white card base. I then layered some patterned papers from the My Mind's Eye Indie Chic 6x6 paper pad on top. I stamped the sentiment from the kit onto some more of the cardstock using Versamark ink and heat embossed it using some Ranger gold embossing powder. I cut the panel into a fishtail banner and set it aside. I then stamped the beautiful image onto some white cardstock and die cut it into a rectangle panel using a Gina Marie Designs stitched edge die. I stamped the image numerous times onto the patterned papers from the same 6x6 paper pad so I could paper piece the images onto the focal panel. Once everything was shaded and colored to my liking I went around all of the edges with my Memento dual tip onyx black marker and adhered them all to the focal image.  To finish my card I popped the focal panel and the sentiment banner up off of the card using 3M foam tape. I hope you like it!


Friday, February 10, 2017

Merry Christmas

Today's card was created for the latest Merry Monday Christmas Card Challenge. I started with a kraft card base and layered a panel of plain white cardstock onto top cut slightly smaller than my card. I added 1/2" strips of patterned paper from the My Mind's Eye Holly Jolly 6x6 paper pad in a tapering line to mimic a Christmas Tree. I topped it with a punched star from the same paper collection and a strip of brown cardstock. I stamped the sentiment from Amy R Stamps Big Christmas Wishes stamp set using chocolate chip ink from Stampin' UP. To finish my card I added a small clear rhinestone from Recollections to the star and some brown dashed lines around the outer edge of the focal panel. I hope you like this quick and easy card and thank you for visiting my blog!

Saturday, January 21, 2017

Love


Hello and happy Saturday! This adorable little fella was created for the Cards From The Heart Card  and the Send A Smile 4 Kids Valentine card drives. I have donated cards to both of these card drives two years in a row and I love doing it. If you are a card maker reading this blog please consider donating some of your stash to this worthy cause! To create my card I started by layering an adorable piece of patterned paper from the My Mind's Eye's Filled With Love 6x6 paper pad onto some cherry cobbler cardstock from Stampin' UP and then adhered the whole thing to my white card base. I printed the adorable little bear (found on Etsy) onto some Copic-friendly cardstock and colored him using my alcohol markers. I die cut him using a pierced edge die from My Favorite Things. I added a strip of coordinating patterned paper from the same paper pad and then layered the die cut panel directly onto the card base. I printed the bear image one more time using typing paper and some patterned paper I'd adhered and printed the shirt. I fussy cut the image and edged it with my dual tip Memento marker so it would look like it had been die cut. I added a small 1" strip of white cardstock to the bottom of the card and stamped the sentiment and hearts from Paper Smooches Word Salad stamp set, which I colored using my alcohol markers to have ombre effect. To finish the card I added some dashed black lines around the die cut panel and the sentiment strip. Thank you for visiting my blog today!

Sunday, December 11, 2016

Have Yourself A Merry Little Christmas

                                                   
Today's card was created for the latest The Male Room challenge.  I started by layering some patterned papers from the My Mind's Eye Signature Christmas 6x6 paper pad onto my white card base. I love the rich, vintage, and masculine look of this paper pad. I inked around the outer edges of all of the patterned paper with some Tim Holtz distress ink in tea dye for a nice distressed and vintage look.  I then stamped the fun Stampabilities Merry Little Christmas stamp onto some plain white cardstock using Memento cocoa brown ink at the top of the stamp and some Gina K Designs asparagus ink at the bottom for a nice two-tone look. I die cut the image using a My Favorite Things pierced edge oval die and then went around the outer edges with some more distress ink. I popped the oval panel up off of the card using some Stampin' UP foam dimensionals and then added some Nuvo Crystal Drops in dark walnut to the corners and the oval panel for some additional texture and interest. I hope you like it!


Have A Cozy Holiday-Coffee And Cards With Celeste And Deb

Yes, it's another installment of "Coffee And Cards With Celeste And Deb" and we have another fun guest designer with us this month, the very talented Carly Pool. And since this month's collaboration happened to fall smack in the middle of the 2016 Winter Coffee Lovers Bloghop we thought it would be fun to do a holiday coffee card and link our cards up for the hop too! Fun, right? 
My card was created using a beautiful image from the Power Poppy Cozy Cupfuls stamp set, which I bought specifically with the winter blog hop in mind. It's full of gorgeous images using teacups and mugs combined with sweet little birds, presents, and trees trimmed for the holidays. I suspect I will be using this set for my holiday card needs for many years to come! To create my card I started with a white card base and layered on some pretty patterned paper from the My Mind's Eye The Merry Days Of Christmas 6x6 paper pad, which I pinked around the edges using a pair of pinking scissors. I went around the edges of the paper with some Tim Holtz distress ink in tea dye to give it a nice distressed, vintage look.  I then die cut a stitched rectangle using more of the patterned paper and a die from Gina Marie Designs. I inked around the edges of the panel and stamped the sentiment from the same stamp set using some Versafine onyx black ink for a nice crisp image. I matted the rectangle panel onto some plain white cardstock and popped the panel up using some 3M foam tape after adding some pretty red and white ribbon I found last year in my local Target's dollar bin to each of the opposing corners. I then stamped my pretty cocoa and presents image onto some Copic-friendly cardstock and colored it using my alcohol markers in colors that coordinated with the patterned papers. Once colored, I fussy cut the image, inked around the outer edges with my Memento tuxedo black dual tip marker for a nice clean die cut look and mounted the image up off of the panel using some Stampin' UP foam dimensionals. As a finishing touch I added some sparkle to a few of the details on the image using my At You Spica sparkling clear glitter pen for some shimmer and shine and a few beautiful red enamel dots I created using Nuvo crystal drops in rhubarb crumble. I hope you like it!
As for my coffee selection I opted for a toasty warm Starbucks Skinny Peppermint Mocha Latte because it's gotten quite cold here in southeast Missouri and I needed to warm up after my morning run this morning. And yes, it was as tasty as it sounds!
Don't forget to pop on over to Deb's and Carly's blogs and check out what fun creations they have to share with you. If you like what you see here and on their sites be sure and show a little blog love by leaving a comment and have fun hopping through all of the fun and wonderful coffee/cocoa/tea creations along the hop!
       

Sunday, November 6, 2016

Hello

Today's card was created for the latest Tag You're It challenge. I absolutely love this gorgeous tag that the very talented Rubeena Naz created. If you're not familiar with Ruby's work you owe it to yourself to check out her blog. You can find it here. Anyway, I typically don't make tags but I was so inspired by this one, especially the colors that I chose to give it a go. I started by layering some beautiful patterned papers from the Mind's Eye Fancy That 6x6 paper pad onto my white card base. I added a pretty piece of gold glitter washi tape from the American Crafts Make It Happen tape combo pack to the side to break up the patterned papers. I then die cut my tag using a pierced edge tag die from My Favorite Things out of some Copic-friendly white cardstock. I stamped the beautiful flower from the Tim Holtz Stamper's Anonymous Flower Garden stamp set directly onto the tag. I stamped the flower top again onto a separate piece of cardstock and colored it in using my Copic alcohol markers. I fussy cut the image out and then covered it in Versamark clear sticky ink so I could cover it with some Zing clear embossing powder and heat set it for a nice shiny look. I popped the image up off of the tag using some Stampin' UP foam dimensionals for some great dimension. I then stamped the sentiment from the Winnie & Walter The Big, The Bold, & The Happy stamp set onto the tag using onyx black Versamfine pigment ink and then covered it with clear embossing powder and heat set it. I added a pretty scalloped edge in pink to the bottom of the tag using more of the papers from the paper pack and a bit of glitter washi tape the bottom. I popped the tag up off of the card using some 3M foam tape, added a few sequins from The Ton, and rounded the outer corners using my We R Memory Keepers corner chomper. I love this pretty card and may have to hoard it for a while before sending it off some lucky recipient. I hope you like it too!


Saturday, September 17, 2016

Grateful Greetings

My second card today was created for the latest The Paper Players challenge and was created all with supplies that I do not own and photographed outside of my home. I just love playing with other people's toys and my friend Becky and I got together today in her beautiful and bright craft room (of which I am so envious of) to practice our Copic coloring skills. While I was there I started rifling through her stash of goodies and stumbled across this beautiful image! I knew as soon as I saw it I had to ink it up and play. I started with some autumn color cardstock from Stampin' UP (I apologize that I don't know the name of it) and layered it onto my card base. I then cut down a piece of patterned paper from the My Mind's Eye Out & About 12x12 paper pad and layered it on top. I stamped the gorgeous autumn image from Stampin' UP's Harvest Home stamp set onto some Copic-friendly cardstock and colored the image using my Copic markers. I love pumpkins and had so much fun coloring these! I die cut the images out using a stitched circle die and mounted it directly onto the card. I then stamped the greeting from Stampin' UP's Grateful Greetings stamp set onto another piece of white cardstock, trimmed it down and mounted it onto some more of the same coordinating colored cardstock and mounted it onto the card slightly overlapping the focal die cut. I love how beautifully this card turned out. I left the card with my friend and a list of the Copic colors I used to color the image so she can re-create this card to give out during the upcoming fall months. I hope you like it!


Monday, March 28, 2016

Happy Birthday


Today's card was originally created for a photo inspiration challenge over at The Challenge but I created this card too late to join. Story of my life...LOL. Anyway, the original inspiration photo had a gorgeous ebony vase filled with beautiful peonies and lots of pretty gold elements and bright colors. I have stamp set very similar to the peonies in the photo called As We Go Along by Unity Stamp Company. So, I started with by stamping that image in Memento tuxedo black ink and coloring it using Copic markers. I stamped the image twice and fussy cut just around the blooms so I could pop them up later. Once my image was colored I die cut the piece using a x-stitched circle die from Gina Marie Designs. For my card base, I added a strip of black cardstock from Stampin' Up and a piece of gold and white striped patterned paper from the My Mind's Eye Fancy That 6x6 paper pad. I then adhered my focal die directly onto the cardbase and then popped the blooms up off of the image using some Stampin' UP foam dimensionals. I cut a small strip of the black cardstock and prepped it with my embossing buddy and then stamped and heat embossed the sentiment using Simon Says Stamps Friendship Messages stamp set and some clear Versamark ink. I heat set it using liquid platinum embossing powder from Ranger. I popped the sentiment strip up using some 3M foam tape and then added a few gold sequins from The Ton and a black sequin from Pretty Pink Posh using some Ranger multi medium matte adhesive. I hope you like it! 


Monday, January 25, 2016

I Love You

I am home sick as a dog today with a nasty chest cold and vertigo. As long as I don't move around too much I am okay. Working on Epley maneuvers (without puking) for the vertigo and trying not to move too much for both the coughing and the vertigo. The vertigo definitely seems to be better today than yesterday (thank God) but the coughing is still bad enough that my ribs and gut hurt just from the coughing. Hoping another day of rest will have me back up and running tomorrow. Anyway, I thought I would take advantage of not being able to move around too much to create a sweet card for my granddaughter Journey for Valentine's Day. She loves anything ballerina so I thought the adorable Before I Met You Tiny Dancer stamp set from Unity Stamp Company would be perfect for her card! I started my card with a white card base and layered on some red cardstock from Hobby Lobby. Then using some plain white typing paper I created a layered strip technique called Herrington. There are plenty of videos explaining this technique on YouTube so if you're not familiar with it already check it out. The strips of patterned paper are from the My Minds Eye Filled With Love 6x6 paper pad. I cut them into 1/2" strips and layered them onto the typing paper using the suggested layout. I then mounted that panel onto the red cardstock and then onto the card itself. I stamped the image from the Unity stamp set onto some 110 lb cardstock from Staples using some Memento tuxedo black ink and colored her in using Copic markers. I die cut the image using a decorative pierced edge frame from Gina Marie Designs. I added some tiny hearts from the Lawn Fawn You Float My Boat stamp set using Gina K inks in red hot and innocent pink and then added some clear Wink of Stella glitter pen to the images. I die cut a small panel using more of the red card stock and die cut the I Love You sentiment from some white card stock using a die set from Simon Says Stamp. Love how adorably this turned out!

Sunday, January 17, 2016

Hello Love

Today's card was created for the latest Card Concept Challenge. I just adore this beautiful inspiration image was inspired by the gorgeous red and blue combo and that huge heart in the cocoa. As soon as I saw this image I knew exactly which stamp set I had to use to create my card. I had picked up the Unity Stamp Company Hello Love stamp set, along with a few other of their great stamps, on sale right after Thanksgiving and I just them. If you've not tried their stamps before you have got to check them out. They stamp so beautifully! One of my favorite things to do with this image is to paper piece her. I am only okay at coloring with Copic markers, so paper piecing gives me a bit more depth and dimension and I love the final look. I stamped my focal image out onto some 110 lb white cardstock from Staples and colored her hair and skin using Copic markers. I then stamped her sweater, scarf, and the mittens and mug out onto some patterned paper from the My Mind's Eye The Merry Days of Christmas 6x6 paper pack. I added some shadowing to the images using Copic markers in warm grays. I then fussy cut all of the images out, edged them with a black dual tip Memento marker, and glued them all together. I then stamped the image again onto my focal panel and glued my final fussy cut image down on top. I stamped the sentiment from the same stamp set to make it look like a speech bubble...like she is saying to her coffee "hello love" which is how I feel every morning that I get up and grab for my first cup of the day. LOL. Anyway, I added a few matte sequins in dark red from Craft Medley and some black dashed lines around the outer edge of my focal panel and called this card done. I hope you like it!


Saturday, December 12, 2015

Merry Coffee Wishes

Today's card was created for the Holiday Coffee Lovers Bloghop. I recently picked up a few Unity Stamps on sale during Black Friday and just had to use one of them to create a fun holiday coffee card that I plan on sending to a crafty friend. I started by stamping the darling image from Hello Love onto some 110 lb cardstock from Staples and colored the skin and hair using Copic markers. I then stamped all of the clothing onto patterned papers from My Mind's Eye's The Merry Days of Christmas 6x6 paper pad and paper pieced them onto the image, shading them with Copic markers. I die cut the focal panel using a My Favorite Things pierced oval die and added some black dashed lines with a Memento tuxedo black dual tip marker to really make it pop. I layered some more patterned papers from the same MME paper pack to create my layered card base, popped the main image up using some Stampin' UP foam dimensionals, and added more dashed lines to add more interest. I stamped the Merry and Wishes from Amy R Big Christmas Wishes using Versamark onyx black and cut them out into little panels. I die cut the Coffee sentiment from Verve Stamps coffee die using more patterned paper and popped it up using foam dimensionals. To finish the card off I added a few red sequins that I picked up at my local dollar store and some clear Wink of Stella glitter pen all over the image and the lettering. I hope you like it!