Sunday, April 30, 2023

Celebrate-Coffee And Cards With Celeste And Deb


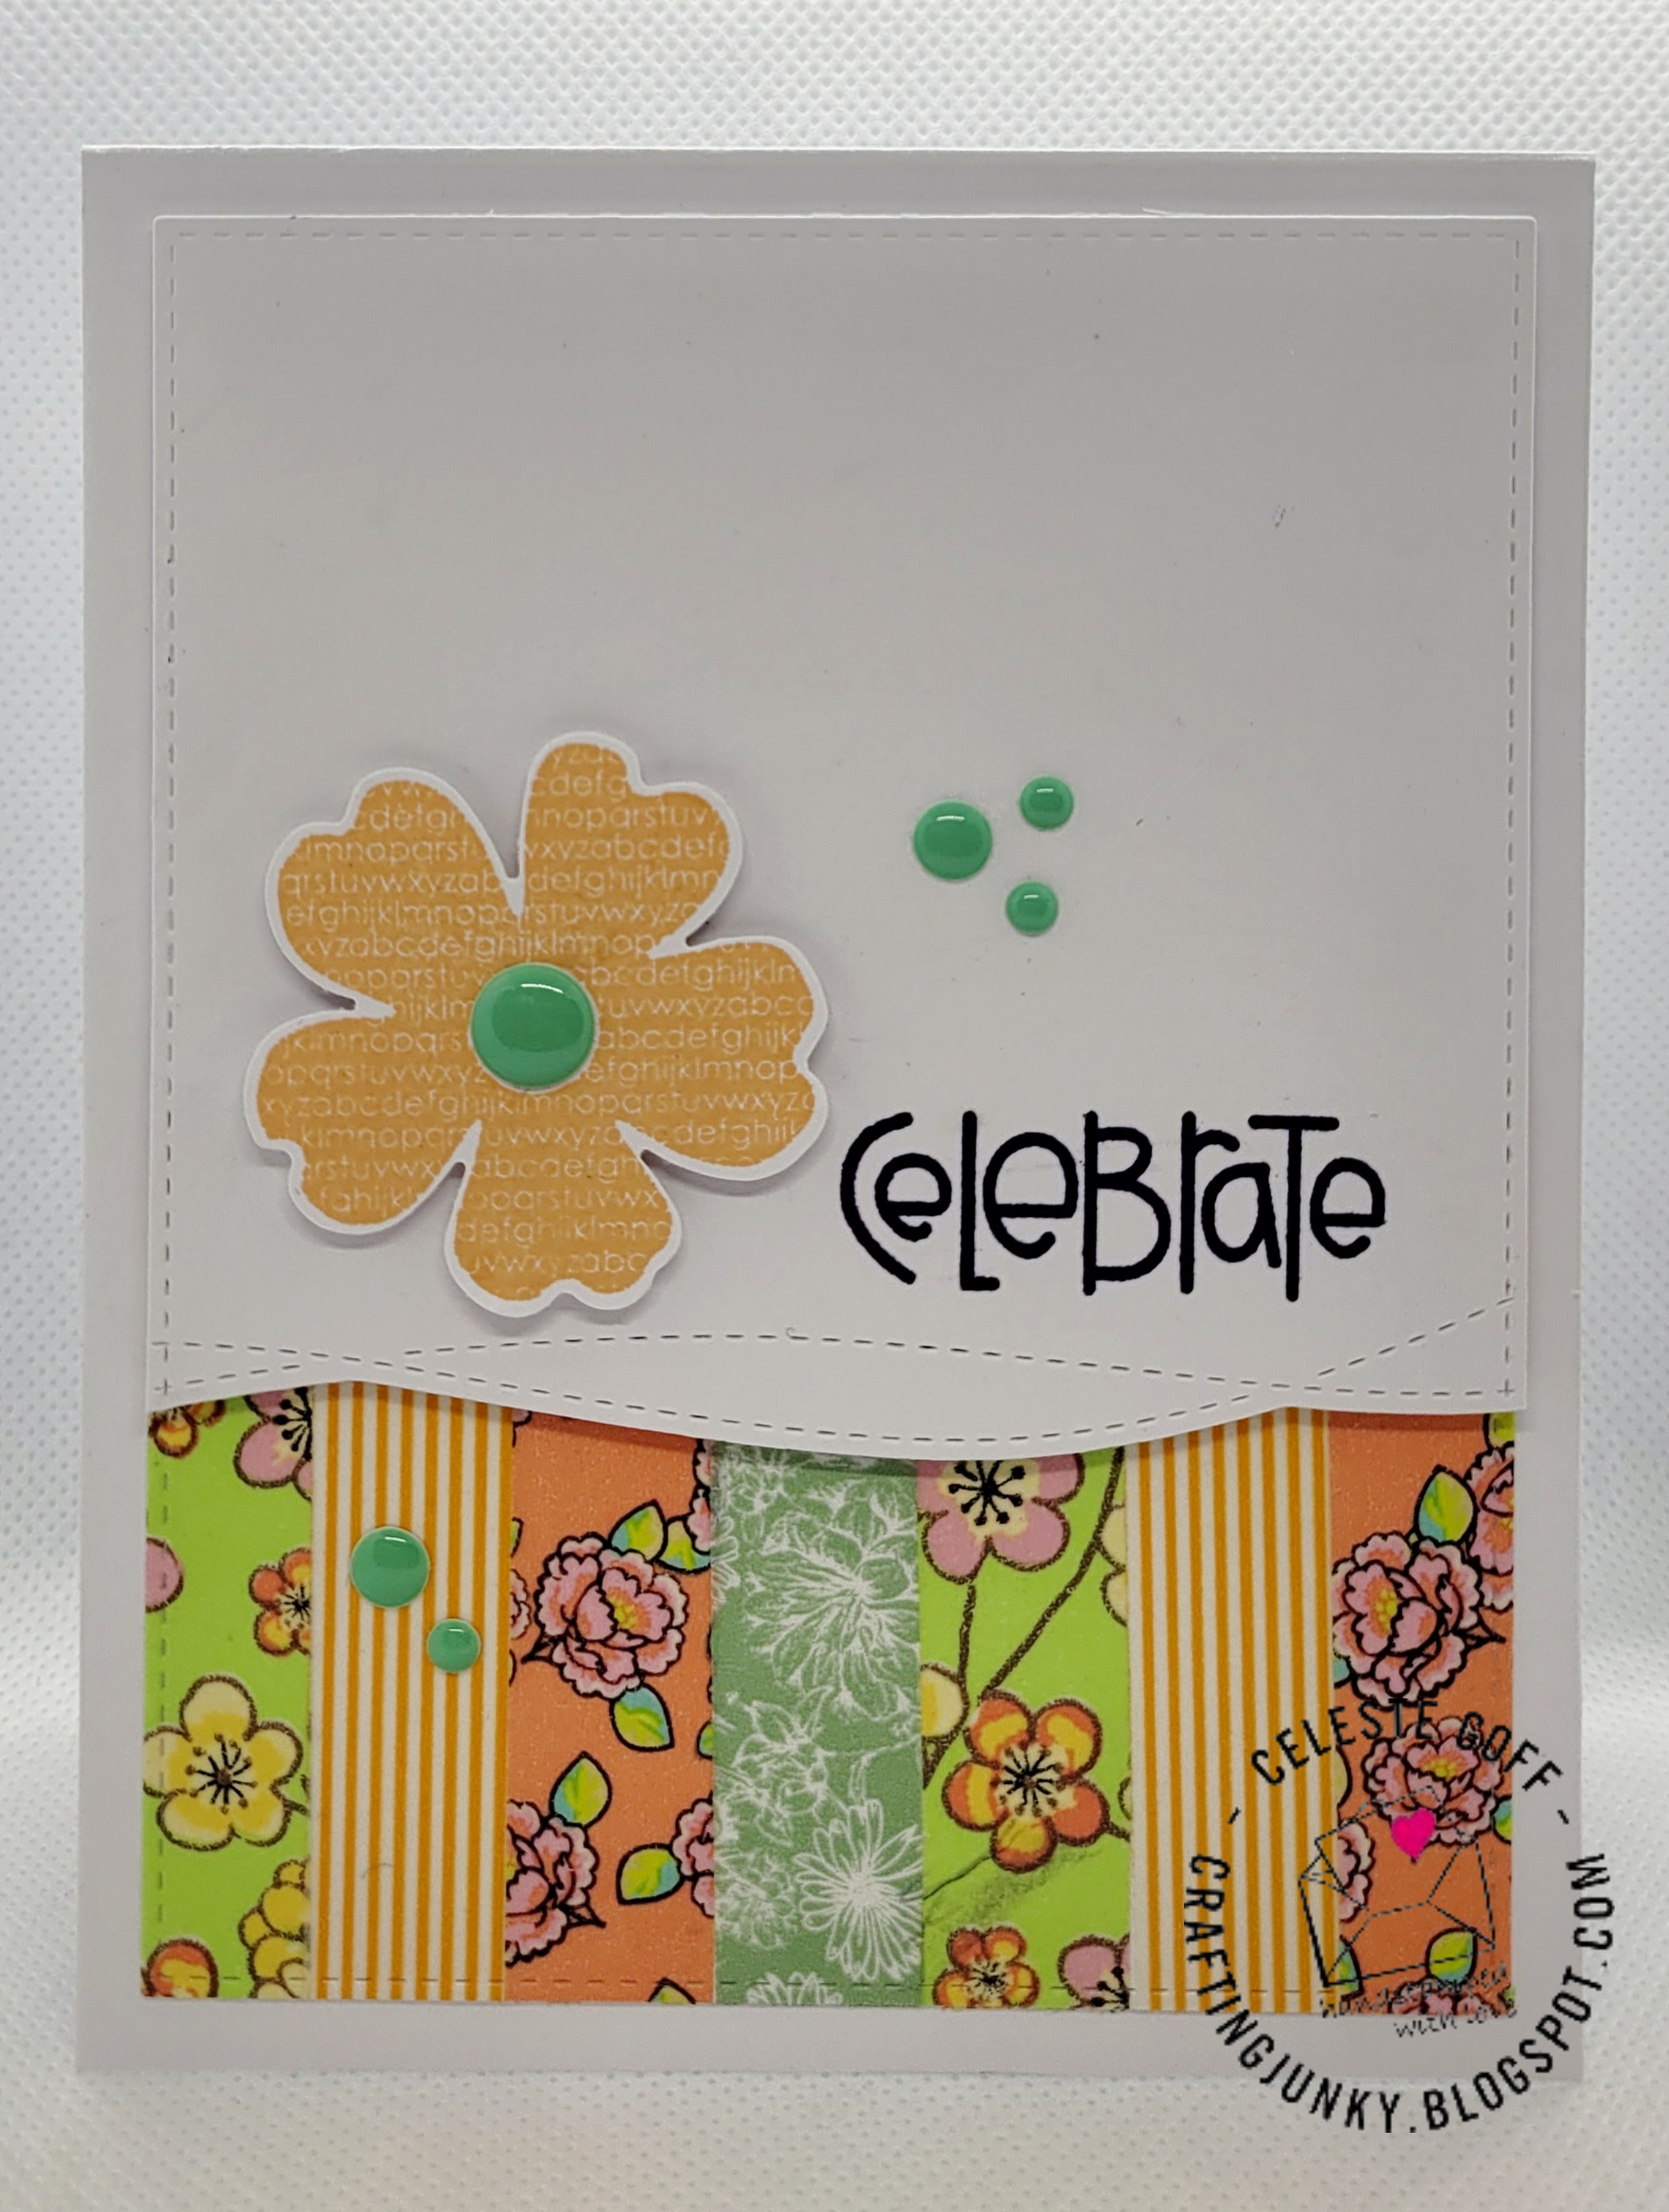
Hello, and welcome to the April Cards and Coffee collaboration between Deb and myself. This month we are using washi tape as our inspiration. I'm sure I'm not alone in the crafting community when I say that I have way more of this stuff than I could ever possibly use. So, given that we thought it would be fun and a clever way to use up some of the stuff we have in our stash. To create my card I started with a small 2"x4" cardstock panel. Using a vertical orientation, I laid my collection of American Crafts washi tapes right up next to each other in a pleasing color arrangement. I then used a stitched rectangle die from Paper Rose Studios to give it some additional detail. I then cut down a white cardstock panel using Simon Says Stamp's Drifting Stitches Border die and the same rectangle border die. I then stamped the sentiment from Paper Smooches Sentiment Sampler stamp set and Versafine onyx black ink. I then stamped the flower from Stampin' UP's Flower Shop stamp set using Gina K Designs Sweet Mango ink and punch the image out using the coordinating punch. I adhered the washi tape panel directly to my white A2 card base. Then I popped up the main focal panel with the sentiment using 3M foam tape. I popped the flower up off of the card using Stampin' Up's foam dimensionals. I adhered it to the left of the sentiment and finished it off with some fun enamel dots from Simple Stories. 
I attended a fun caffeinated event in my town this weekend that consists of a walking tour of our downtown, visiting vendors who serve all things chocolate or caffeinated. On one of my stops, I tried a Vietnamese salted cheese coffee. Now, I know what you're thinking...salted cheese in a coffee? But trust me when I say, this coffee was rich and delicious! I only wish I'd gotten the larger size. I recommend it if you have the opportunity to try it. Thank you for stopping by my blog. Now, be sure to head over to Deb's blog and see how she was inspired by our washi tape challenge this month. 


Friday, April 28, 2023

It's A Brew-tiful Day


Happy Friday! Today's card was created for the latest Color Throwdown Challenge. To create my card I started by die cutting a panel using a piece of crumb cake cardstock from Stampin' UP and a Gina Marie Designs scalloped edge rectangle die. I adhered that directly to my white A2 card base. I then die cut a focal panel using white cardstock and a stitched rectangle die from Paper Rose. I stamped the sentiment from Reverse Confetti's Drink More Coffee stamp set using Versafine onyx blank ink. I stamped the mugs, saucers, and a single spoon from the same stamp set onto some white Copic-friendly cardstock and colored the images using alcohol markers. I fussy cut the images out and adhered them onto my focal panel using Stampin' UP foam dimensionals. To finish my card I added some mocha 6mm sequins from Pretty Pink Posh and white gel pen accents on the mugs. I appreciate you stopping by my blog today. I hope you have a wonderful weekend!

Saturday, April 1, 2023

For A Special Day-Send A Smile 4 Kids April 2023

Happy April! This month at Send A Smile 4 Kids we are celebrating moms/special ladies. My card could work for Mother's Day, birthday, or simply any special occasion. To create my card, I started by stamping the blooms from Simon Says Stamp's Like Your Style stamp set onto some crumbcake cardstock from Stampin' UP using Colorbox frost white pigment ink. I then stamped the black lines, the hanger, and the sentiment from the same stamp set using Gina K Designs black pigment ink. On a separate piece of white cardstock I stamped the dress and more of the florals onto the dress using Tim Holtz carved pumpkin distress ink and did a little ink blending at the bottom. I also stamped the mini hearts in the same color. I fussy cut all of the images out. I adhered the hearts directly to the card using liquid glue. I added some peach twine from Stampin' UP directly to the card and tied a bow and popped the image up off of the card using Stampin' UP foam dimensionals. To add a little interest to the card I added a strip of patterned paper by My Mind's Eye from the Follow Your Heart 12x12 paper pad directly to the bottom of the card panel and then added a tiny strip of cardstock I had colored with the same carved pumpkin distress ink to match. I adhered the focal panel to my white A2 card base and then added some white gel pen details for some added interest. Thank you for stopping by my blog today! Be sure to pop over to the Send A Smile 4 Kids blog to see how the rest of the design team was inspired by this month's challenge. 


Sunday, March 26, 2023

Happy Easter-Coffee And Cards With Celeste And Deb


Hello, and thank you for visiting my blog today! Deb and I are celebrating Spring in our coffee and cards collaboration. I recently picked up a few new stamp sets on clearance from Whimsy Stamps, and thought it would be fun to use one of my new sets for this card. I started by die cutting a panel of pretty green gingham patterned paper from Simple Stories  Summer Lovin' 6x8 paper pad using a stitched rectangle die from Paper Rose, and matted it with some olive green cardstock that I had in my stash. I adhered that panel directly onto my white A2 card base. Using a lacy border metal die I cut down more of the olive green cardstock and adhered that onto the card slightly lower than halfway. I stamped out my images from Whimsy Stamps Easter Memories stamp set onto some white Copic-friendly cardstock and colored the images using my alcohol markers. Using a scalloped and pierced edge rectangle die from Gina Marie Designs I created a focal panel. I matted that panel onto another piece of olive cardstock and popped the panel up using 3M foam tape. I stamped Happy directly onto the focal panel using Memento tuxedo black ink. I then stamped the Easter sentiment onto a seperate piece of paper using Gina K Designs ink in Avocado and fussy cut the sentiment out. I adhered it to the card using liquid glue and finished my card off my added some white gel pen detail to all of the images. 
For my beverage this month, I opted to create a nice "adult" hot chocolate by using a chocolate bomb with a huge dollop of Whip Shots vodka infused whipped cream in Mocha! Now, be sure to stop by Debra's blog and see how she was inspired by this month's theme!


Monday, March 13, 2023

It's Your Special Day


Today's card was created for this month's Unity {Show & Tell}sketch challenge. To create my card I started by layering some deep Burgandy cardstock from The Paper Studios onto my white A2 card base. I then layered a gorgeous piece of patterned paper from the Studio Calico Sundrifter 6x6 paper pad on top. I then stamped the beautiful image from the Unity Stamp Company's Rebuild Yourself stamp set onto some white Copic-friendly cardstock, and colored the image using my alcohol markers. I trimmed the panel down and rounded the corners with my We Are Memory Keepers corner chomper. I layered it onto more of the same Burgandy paper and rounded those corners too. I adhered that panel onto the patterned paper following the sketch. I stamped the sentiment from Stamper's Anonymous Crazy Talk stamp set. I cut the sentiment strip down and matted it onto more Burgandy cardstock and adhered it to the card. For a finishing touch, I adhered some gorgeous Burgandy sequins from The Ton around the focal panel. 


Thank You For Being A Ray Of Sunshine


Happy Monday! Today's card was created for the latest Color Throwdown card challenge. I just picked up this adorable lemon stamp from Stampabilities at Hobby Lobby on clearance and couldn't resist using it for this challenge. I stamped the image twice, colored it using my alcohol markers, fussy cut them out, adhered them together and added foam dimensionals from Stampin' UP behind them. I stamped the background using an abstract background stamp from Spellbinders and bashful blue ink from Stampin' UP. I cut the panel down using a stitched rectangle die from Paper Roses and adhered it to some light blue cardstock from Paper Crafts. I adhered that panel directly to my white A2 card base. Using the same blue cardstock I cut down a small banner and ran it through the same stitched rectangle die to get the stitched edges. I stamped the sentiment from Stampendous True Friends stamp set using Memento tuxedo black ink. I adhered it to the card and added the lemons to the left of the sentiment. To finish off my card I added some white gel pen detail to the lemons and some pretty light blue sequins from Pretty Pink Posh around the focal panel. Thank you for stopping by my blog today!


Saturday, March 4, 2023

You're Special-Send A Smile 4 Kids March 2023

This month a Send A Smile 4 Kids our theme is cards for boys. What could be more perfect for a special little boy than a cute little green monster, right? I found the inspiration for this adorable card on Pinterest, and it was so easy to create. I started by layering some basic black cardstock onto my A2 card base. I cut down a piece of patterned paper from the Little Yellow Bicycle Fern & Forest 6x6 paper pack using a Lawn Fawn stitched hill border die and attached the bottom piece directly to my cardstock. I stamped the sentiment from Paper Smooches Sentiment Sampler stamp set onto the card using Gina K Designs black ink. Using My Favorite Things pierced edge nesting circle dies and Spellbinders pennant dies I created the eyes and teeth for my little monster. I glued the eyes together in a wonky pattern and attached them to the top panel and then attached the teeth using to the underside of the panel. Once everything was adhered to the panel, I attached it to the card using 3M foam tape and added some white gel pen detail to the eyes for a little extra interest. Thank you for stopping by my blog today. Be sure to head over to Send a Smile 4 Kids to check out what the rest of the design team created this month!


Sunday, February 19, 2023

Be A Pineapple


Today's card was created for the latest Color Throwdown card challenge. I created my card by layering some light green cardstock from Hobby Lobby directly onto my A2 cardbase. I then took a piece of cream cardstock from Hobby Lobby and did some ink smooshing directly onto it using some acetate and Tim Holtz kitch flamingo distress ink. I then added some embossed detail to the panel using Honey Bee Stamps Spring Leaves pierced detail background plate. I then cut the panel down using a stitched edge rectangle die from Paper Roses and adhered it to my card base using some 3M foam tape. I stamped the pineapples from the Honey Bee Stamps Pineapple mini stamp set onto my cardstock using Gina K Design black ink for the outline and Altenew Inks for the layering portion of the stamps. I enhanced them a bit by adding some detail to the coloring with my Copic markers and a white gel pen and then cut them out with the coordinating dies. I adhered them together in a trio with some liquid glue and then popped them up off of the card with more 3M foam tape. I stamped the sentiments from the same stamp set using Versamark ink and embossed them in gold embossing powder from Ranger and then die cut them using the coordinating dies. I adhered the top sentiment directly to the trio of pineapples and then popped the bottom sentiment up with foam tape. I finished this adorabale card off using some creamy yellow sequins from Pretty Pink Posh. Thank you for visiting my blog. I hope you have a beautiful day! 


Thanks A Latte-Coffee And Cards With Celeste And Deb


Hello, happy February! This month Deb and I decided to use this fun mood board I'd found on Pinterest as our inspiration for this month's collaboration. I love all of the deep reds and pinks and, of course, the cocoa and coffee! I created my card by using the Close To My Heart Starburst background die and some pretty patterned papers from Echo Park's Hello Valentine 6x6 paper pad. I inlaid all of the patterned papers onto the die cut piece that was adhered to my A2 white card base. I then stamped and colored the latte image from Honey Bee's Coffee Break stamp set and fussy cut the image out. I popped it up off of the card using Stampin' UP foam dimensionals. I stamped the sentiment from Fiskars Latte Love stamp set using Gina K charcoal cocoa ink. To finish off my card, I added some white gel pen details to the latte. 
When I heard that Starbucks was bringing back it's pistachio cold brew I couldn't resist popping into my local Barnes & Nobles (which has a Starbucks in it) to pick up a large one and peruse some craft magazines! 
Thank you for visiting my blog. I appreciate all of my followers and love reading all of your comments. They really brighten my day! Now, be sure to pop on over to Deb's blog and see how she was inspired by this month's mood board! 

Saturday, February 4, 2023

Happy Easter-Send A Smile 4 Kids


Hello, and happy February! This month at Send A Smile 4 Kids we are creating Spring/Easter cards. To create my card I started by stamping the adorable bunny from The Alley Way stamps Spring Has Sprung stamp set onto white Copic-friendly cardstock. I colored the image using my alcohol markers, and fussy cut the image out. I chose fun patterned papers from the American Crafts Sunny Side 6x6 paper pad and chose a fun layout to utilize as much of the patterns as I could. I stamped the sentiment from the same stamp set onto more of the patterned paper using Memento tuxedo black ink and punched the image out using a 1.5" Stampin' UP punch. I popped the bunny and the sentiment up off of the card using Stampin' UP foam dimensionals for a little more interest.