Sunday, December 17, 2017

Hello Love-Coffee And Cards With Celeste And Deb

Hello and welcome back to another installment of Coffee And Cards With Celeste And Deb! We have yet another fun guest designer with us this month, Michael Trent. Since Michael is our guest this month we let him select a theme that would unify our projects and he chose LOVE. Since I'm still in winter/Christmas card making mode I knew immediately I would have to break out my Unity Stamp Company Hello Love stamp set and create something fun and wintery with it. The sentiment is exactly how I feel about my morning coffee! LOL. 
To create my card I started by stamping the focal image onto some Copic-friendly 110lb cardstock and colored her using my Copic markers. I then fussy cut her out and edged the image with my Memento tuxedo black dual tip marker to clean the edges up. I stamped the image again onto some patterned paper from the My Mind's Eye Signature Christmas 6x6 paper pad and then cut it into a small panel. I die cut an oval into some smoky blue grey cardstock from Hampton Art's ki natural cardstock 6x6 paper pad using a Spellbinders die and then adhered the image behind it. I then die cut a scalloped oval using another Spellbinders die into some more of the My Mind's Eye paper and wrapped some sage grey twine from American Crafts around the panel close the bottom and tied it off with a bow. I popped the panel up off of the card using some 3M foam tape and adhered it to the card. I stamped the sentiment from the same Unity Stamp Company stamp set onto more Copic-friendly cardstock and colored it in with my alcohol markers to match the colors on the patterned paper. I fussy cut the heart sentiment down and adhered it to the card. To finish off my card I added some sequins from The Ton around the panel, added some clear Wink of Stella to the mittens and scarf on the focal image, and then some dashed black lines around the outer panel and inside the oval panel. I hope you like it! 
As for my beverage of choice I opted for a nice hot cup of black French roast from Seattle's Best Coffee. 
Now be sure to hop on over to Michael and Deb's blogs and leave them some love in the way of a comment!


Tuesday, December 5, 2017

Good Tidings

Today's card was created for the latest Sunday Stamps card challenge. To create my card I started by layering some gorgeous Christmas patterned paper from the Heidi Swapp Noel 6x6 paper pad onto my white card base. For some contrast I chose a grayish green patterned paper from the same paper pad and cut it down to a smaller strip and adhered it down to the card. I then stamped the beautiful cardinal image from the Power Poppy Cozy Cupfuls stamp set onto some Copic-friendly white cardstock and then colored the image using my alcohol markers. I die cut the image into a shaped focal panel using a Spellbinders die. I added some black dashed lines around the focal panel as well as the contrast strip of patterned paper on the card. I popped the panel up off of the card using some Scrapbook Adhesives foam squares for some additional dimension and added some Glossy Accents to the berries and the trim on the bowls for some fun interest. Thank you so much for stopping off at my blog today and be sure to leave a comment!


Wednesday, November 29, 2017

Winter Wonderland


Today's card was created for the latest Watercooler Wednesday challenge. To create my card I started by stamping the beautiful Angie girl image from the Unity Stamp Company's Conspiracy Of Love KOTM stamp set onto some white Copic-friendly cardstock. After coloring the image with my alcohol markers I adhered a small strip of plaid patterned paper from the Carta Bella Warm & Cozy 6x6 paper pad to the left of the panel and then die cut the entire thing using a stitched edge Gina Marie Design rectangle die. I then layered some smoky grey cardstock from Stampin' UP onto my white card base and then popped the focal panel up off of the card using some 3M foam tape. I stamped the sentiment from the Papertrey Ink Winter Snowglobe stamp set onto more of the grey cardstock using Versamark clear embossing ink and then heat set it using some Recollections snow embossing powder. I cut the sentiment down to a small strip and adhered it directly to the focal panel to finish my card off. Thank you for visiting my blog today and please leave a comment if you like my card! 


Sunday, November 26, 2017

The Happiest Of Holidays

Hello and welcome to my blog! Today's card was created for the latest The Paper Players sketch challenge. My good friend Becky Ledbetter is a Unity Stamp Company KOTM member and is always gracious enough to lend me her kits. This beautiful image came from the October 2017 kit Conspiracy Of Love. I absolutely adore the vintage feel of this old truck and wanted to pair it with masculine papers. So, I stamped the image onto some white Copic-friendly cardstock and colored it in using my alcohol markers. I die cut the image using a My Favorite Things pierced edge oval die. Following the pierced markings I added some black stitched lines for a bit of interest and contrast. I stamped the sentiment from the stamp set onto more white cardstock and then cut the end to a fishtail banner. I chose pretty patterned papers from the My Mind's Eye 'Tis The Season 6x6 paper pad and adhered them onto my white card base in the manner of the sketch. I adhered the focal panel and sentiment banner directly to the card to finish my pretty vintage card. I hope you like it and thank you for stopping by my blog today!


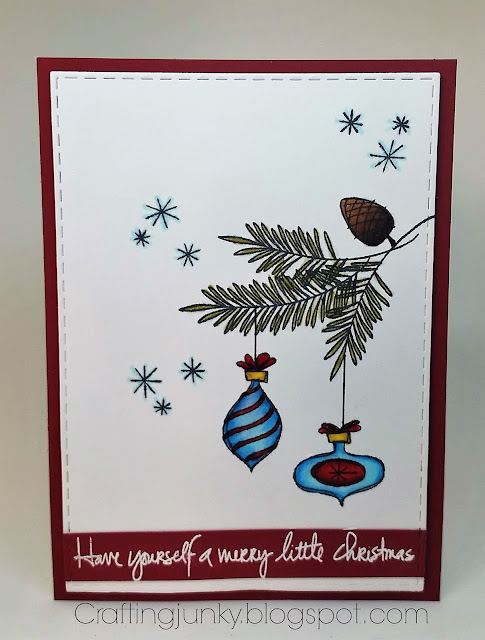
Merry Little Christmas

I just picked up the fabulous Essentials By Ellen Christmas Scribbles stamp set on a Facebook destash and knew as soon as I saw the newest Just Us Girls photo challenge that I would have to use it! I wanted to keep the card pretty clean and simple, which is a difficult task for me. I like layers and lots of embellishments, but this stamp set made it easy. I started by layering some cherry cobbler cardstock from Stampin' UP onto my white card base. Using my mini-Misti stamping tool I stamped the branches, pinecone, snowflakes, and two ornaments from the stamp set onto some Copic-friendly white cardstock. Using the inspiration photo I colored the images trying to stay close to the color palette. I then die cut the colored piece of cardstock down using a Gina Marie Designs stitched rectangle die and mounted it onto the card using some 3M foam tape. I took another strip of the same red cardstock and heat embossed the sentiment from the same stamp set using Recollections snow white detail embossing powder. I ran that strip of paper through my Cuttlebug using the same rectangle die so the edges would match the panel and mounted it directly onto the panel. To finish the card I added some clear Wink of Stella to all of the stamped elements. I only wish I could have captured all of the wonderful shine it added! I think this would be a fun card to mass produce. I hope you like it.


Thankful-Coffee And Cards With Celeste And Deb


Hello, and welcome to the November edition of Coffee and Cards with Celeste and Deb. Deb and I decided to go with a Thankful theme this month since we celebrated Thanksgiving this week in U.S. We also have my good friend Rebecca Ledbetter joining us again this month as our guest designer. To create my card I started by layering some pretty burnt orange cardstock onto my white card base. I then cut down a smaller panel of white cardstock and splattered it with Memento cocoa brown and morocco inks using a small tipped paint brush and some water. Once it was dry I adhered it to the card panel and added some dashed lines around the outer edge using my Memento cocoa brown dual tip marker. I then stamped the medallion from Stampin' UP's Day Of Gratitude stamp set onto some more white cardstock using a combo of both the same Memento inks. I added a pretty bronzed brad from Stampin' UP in the center and popped the image up off of the card using Stampin' UP's foam dimensionals. I heat embossed the sentiment from the Close To My Heart's Always Grateful stamp set onto a strip of the burnt orange cardstock and heat embossed it using Recollections snow white detail embossing powder. I stamped the leaf image from the Stampin' Up stamp set and popped it and the sentiment banner up off of the card using more foam dimensionals. To finish my card off I added a few mocha sequins from The Ton to the card panel and added some dark brown dots to the medallion and leaf for some additional interest. I will also be entering this card into the latest Time Out Challenge
As for my coffee beverage of choice this month, I popped in on Becky and brought us both a McCafe' peppermint mocha latte. She had leftover cookies and cake from Thanksgiving so I dug in and enjoyed way more sugar than I should have. Good thing I ran this morning. LOL. Now, hop on over to Deb and Becky's blogs and leave them some love in the way of a comment.


Friday, November 24, 2017

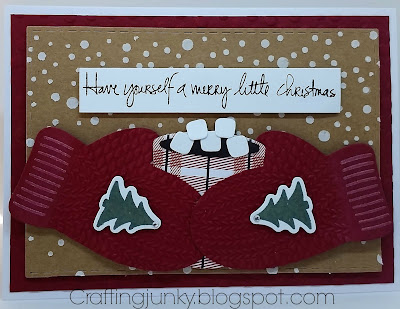
Have Yourself A Merry Little Christmas


Today's card was created for the latest The Paper Players and Watercooler Wednesday Challenges. To create my card I started by embossing a piece of red cardstock with a Stampin' UP embossing folder and layering it onto my white card base. I then die cut a stitched rectangle panel using a Gina Marie Designs die and then wet embossed it using a Simon Says Stamp falling snow stencil and Ranger texture paste in white. I die cut the mittens from red cardstock using the coordinating die from the My Favorite Things Cozy Mittens stamp and die set. Using a Richard Garay sweater embossing folder I partially embossed the mittens and then stamped the details on the cuffs using some white chalk ink by VersaMagic. I stamped the Christmas trees onto some plain white cardstock using the same mittens stamp set and then die cut them using the coordinating dies. I added clear rhinestones to the tops to mimic stars and popped the images up off of the mittens using some 3M foam tape. I then die cut the cocoa mug using a die (maker unknown) and some patterned paper from the American Crafts Hot Cocoa paper pad. I colored in the cocoa portion of the drink using a dark brown Copic Marker and then added the marshmallows using the coordinating die. To finish my card I stamped the sentiment from the Essentials By Ellen Christmas Scribbles stamp set onto white cardstock using Versafine onyx black ink and popped the sentiment strip up using more foam tape. Thank you for visiting my blog today. I hope you like my card!


Sunday, November 12, 2017

Thanks


Today's card was created for the latest Just Us Girls Challenge. To create my card I started by prepping a pretty piece of foiled patterned paper from the My Mind's Eye Fancy That 6x6 paper pad with my EK Success powder tool. I then stamped the sentiment from the Simon Says Stamp Hand Lettered Winter Wishes stamp set using Versamark ink and heat set it with Ranger gold embossing powder to match the gold foiling on the paper. I then stamped the silhouette flower image from Unity Stamp Company onto some plain white cardstock using the same ink and heat set it using more of the same gold embossing powder. I die cut the panel using dies from Little B and backed it onto some dark grey cardstock. To finish my card I simply popped the focal panel up off of the card using some 3M foam tape and offset on the card for some fun interest. Thank you for visiting my blog today and I hope you like my card!

Saturday, November 4, 2017

Your Friendship Means The World To Me


Today's card was created for the latest Watercooler Wednesday card challenge. I love this challenge because I'm much more comfortable creating feminine cards than masculine ones. To create my card I started by layering some early espresso and crumb cake cardstocks onto an ivory card base, all by Stampin' UP. Before adhering the crumb cake panel I glued down a piece of lacy ivory ribbon from Stampin' UP directly in the center of the panel. On a seperate piece of ivory cardstock I stamped the pretty ornate stamp from Stampin' UP's Bliss stamp set using the rock and roll inking method and some Gina K Designs charcoal brown ink. I cut it down to a smaller rectangle panel and matted it onto more early espresso cardstock. I stamped the butterfly from the same stamp set onto a seperate piece of paper and fussy cut the image out. I adhered the butterfly down in the center of the focal panel using a glue dot and some foam dimensionals. I then stamped the sentiment from the Simon Says Stamp Friendship Messages stamp set below the focal panel. To finish this pretty and feminine card I simply added a few small pearls to the center of the butterfly. Thank you for visiting my blog. If you like my card be sure to leave some blog love by leaving a comment. 


Sunday, October 29, 2017

Hope Your Halloween Is Frightfully Sweet!

Hello! I can't believe it's almost the end of October. It seems like summer was just here last week. Honestly, this year is just slipping away from me. I just had to create a fun little card for my granddaughter Journey for Halloween. She (and her mom) love Halloween. They had a fun pumpkin carving party last night and my daughter has been planning their costumes for the past month. To create this fun little card I started by distressing a piece of plain white cardstock using my Tim Holtz distress inks. I created the moon by die cutting a circle out of a piece of masking paper. Using the negative of the die cut I inked the moon using squeezed lemonade ink. After the ink dried I masked the moon itself and then inked the sky using salty ocean, faded jeans, and black soot. Using my MiniMister I sprayed a light spritz of water onto the panel for a nice distressed look and then flicked on some droplets of white using Tim Holtz distress spray stain in picket fence. I then inked a separate strip of white cardstock using mowed lawn and then die cut it using a Paper Smooches lawn die. I adhered the grass onto the panel and then stamped the sentiment from the Darcie's Heart & Home Bootiful Halloween stamp set using Versafine onyx black ink and my Misti tool. I then stamped the bat from an old Stampin' UP stamp set. I adhered the panel onto my white card base. I then stamped the trick or treaters onto some Copic-friendly cardstock, colored them using my alcohol markers, fussy cut them leaving a nice white border, and adhered them onto the card using Scrapbook Adhesive foam squares. To finish my card I added some clear Wink of Stella to the kids and the bat. I know Journey is going to love it! Thank  you for visiting my blog today and if you like my card be sure to leave a comment!

Sunday, October 22, 2017

Life Is Better With Friends-Coffee And Cards Collaboration With Celeste And Deb


Hello and welcome to the October installment of coffee and cards with Celeste and Deb. This month we have the wonderfully talented Chris Franco joining us as our guest designer. We all decided to do a color challenge this month for our collaboration. I won't lie...I struggle with color challenges. My brain just doesn't think of the color scheme first when designing a card. I usually start with a stamp and then select patterned papers and let those factors dictate my color choices. It's just the way my brain works. Since these kind of challenges are tough for me I decided to keep it simple. 
To create my card I started with the bird stamp and sentiment from the Unity Stamp Company's December KOTM, Always Been You. I stamped both the sentiment and the image onto Copic-friendly cardstock and trimmed it down into a small panel. I colored the birds using my alcohol markers, trying my best to stick to the colors in the challenge photo. I selected a pretty paisley patterned paper from the Authentique 6x6 Essentials Collection paper pad and adhered it directly onto my card base. I adhered a small white paper doily that I got in the baking aisle at Hobby Lobby directly on top of the patterned paper and then adhered the focal panel right in the center of the card. To finish off this adorable card I added some black dashed lines on the top and bottom edges of the panel, rounded the corners using my EK Success Corner Chomper, and added a few clear sequins from Pretty Pink Posh in both the 4mm and 6mm sizes. I hope you like it! 
As for my coffee choice this month, I just had to pop into McDonald's for a sweet treat of a spiced pumpkin latte because...you know! It's October and it's "pumpkin spice everything" season! Now be sure to pop on over to Chris and Deb's blogs and leave some love for them in the way of a comment!


Monday, October 9, 2017

Be-You-Tiful

Today's card was created for the latest Addicted To CAS challenge. The challenge is to use a favorite stamp. I always struggle with clean card challenges because I just love layers and patterned paper. But as soon as I saw the challenge was to use a favorite stamp I knew I had to try and create something clean and simple. I'm a bit addicted to the newest planner gal stamps from Unity Stamp Company and the Be A Beauty stamp set is my absolute favorite and I've used it more times than I can count since I bought it two months ago. I started with a simple green layer of cardstock in a bright, primary green color that I embossed using a Cricut swiss dot embossing folder and adhered directly to my white card base. I then stamped the pretty Unity planner gal image onto some white Copic-friendly cardstock using Memento tuxedo black ink. I stamped the sentiment from the same stamp set directly above it and then die cut the image using a Gina Marie Designs decorative edge oval die. I colored the image using my Copic markers and then finished the card off by adding some glitter to the sentiment and the flowers in her hair using a Sakura Gelly Roll clear glitter pen. I love how it turned out! I hope you like it too and thank you for visiting my blog today!

Do More Of What Makes You Awesome

Today's card was created for a friend who is sending care packages to a cousin just recently diagnosed with leukemia. When she told me that he loves to play with Legos I knew I had to make a fun Lego card. I went onto Pinterest and found a fun card that I could CASE. To create this fun card I started with some plain black cardstock from Stampin' UP and then layered on blocks of primary colored cardstock that I got at Hobby Lobby. Using a 1/2" punch from EK Success I punched coordinating circles and popped them up using Stampin' UP foam dimensionals. The sentiment was stamped onto some plain white cardstock and is from Unity Stamp Company. To finish this fun card off I used a white gel pen to add some highlights to the Lego dots. I hope you my friend's cousin likes his card. Thank you for stopping off at my blog today and I hope you like my card too!

Saturday, September 30, 2017

Hope Your Day Is Magical


Today's card was created for my granddaughter Journey's 8th birthday. Her birthday was actually September 11th but she lives 2 hours away from me and between my job and her mom's job we just weren't able to get together until last weekend. As you can see from the photo she is a very girly tomboy! She loves all things blingy, glittery, fluffy, pink, and pretty. But she also loves to play with her horses in the mud and dirt like a true country girl! So, I knew she would love this adorable pegasus card. To create my card I started by stamping the images from The Greeting Farm's Spread Your Wings onto some Copic-friendly white cardstock. I colored them using my alcohol markers and then fussy cut them out. I cut a small rectangle panel and inked the background using my Tim Holtz distress ink in faded jeans. I die cut the clouds using a The Cats Pajamas speech bubble die and adhered them directly to the panel. I punched the clouds using a Fiskars punch and added some Nuvo white blizzard glitter drops to the outline of the clouds. Once they were dry I adhered the clouds and the colored images to the panel using Stampin' UP foam dimensionals. I stamped the sentiment from the same stamp set directly onto the lower clouds using Versafine onyx black ink. I then layered some pink cardstock from Hobby Lobby onto my white cardbase and then added a panel of cardstock from the We R Memory Keepers Chalkboard 6x6 paper pad on top. I matted the focal panel onto more of the pink cardstock and mounted it to the card using some 3M foam tape. I hope you like my card...I know Journey did!


Hello Friend


Today's card was created for both the AAA Cards and Addicted To Stamps And More challenges. To create my card I started by stamping the beautiful Angie girl image from the Unity Stamp Company's It's Going To Be Beautiful kit of the month stamp set onto white Copic-friendly cardstock. I then stamped the image again numerous times onto some beautiful autumn themed patterned paper I found last fall in the dollar bin at Target. I fussy cut the papers out and glued them onto the image using my Zig two way glue pen after edging them all with my Memento tuxedo black dual tip pen for a nice clean look. I stamped the sentiment from the Unity Stamp Company's Free Your Dreams kit of the month stamp set onto more of the patterned paper and cut it down to a banner. I adhered some of the beautiful autumn papers onto my white card base and then layered the focal panel and the banner on top. I love how beautifully this paper pieced card turned out. I hope you like it too! 


Saturday, September 23, 2017

Hello My Friend-Coffee And Cards With Celeste And Deb Collaboration

Hello, and welcome to the October installment of Coffee and Cards with Celeste and Deb. We have another fabulous guest designer with us this month as well as a fun and as well as a fun twist to our collaboration. Our wonderful guest designer this month is Jennifer Loftfield. We also have an additional surprise for our dear crafty friend Terri Burson. We all decided to create our cards using the brand new wreath stamp she created for So Suzy Stamps courtesy of Deb, who purchased them for all three of us! Thank you Deb!
To create my card I started with some gorgeous patterned papers from the Authentique Remembrance 6x6 paper pad and layered them onto my white card base. I then stamped the wreath onto a piece of distressed patterned paper from the same paper pack using Copic-friendly ink. I colored the image using my alcohol markers in coordinating colors to match the paper. I stamped the sentiment from the Winnie & Walter The Big, The Bold, and The Happy stamp set in the center of the wreath. I felt that the focal panel looked a bit empty so I went through my stamps and used the beautiful decorative scroll from the Simon Says Stamp Inside Holiday Greetings stamp set at the top and bottom. To finish my card off I added some Recollections clear rhinestones to the scroll and the berries on the wreath and popped the whole focal panel up off of the card using some 3M foam tape. I hope you like it!
As for my coffee choice I opted for a nice maple pecan iced coffee from Dunkin' Donuts. The calendar may state that fall is here but mother nature apparently didn't get the memo. It was 98 degrees here in southeast Missouri today and I was out running around in shorts and flip flops. I'm hoping it will cool off soon and we can start to enjoy fall. Anyway, be sure and pop on over to Deb and Jennifer's blogs and show them some love by leaving a comment on their posts! 

Monday, September 18, 2017

No Rain...No Flowers


Today's card was created for the latest Addicted to CAS card challenge. To create my card I started by layering some bright yellow cardstock from Hobby Lobby onto my white card base. I then stamped the pretty floral image from the Unity Stamp Company Free Your Dreams kit of the month onto some white Copic-friendly cardstock. I created a pretty scalloped edge panel by die cutting the cardstock with a Gina Marie Design die. I colored the image using my alcohol markers in soft, pretty colors and then stamped the sentiment using some Versafine onyx black ink for a nice crisp look. Once the ink was dried I popped the image up off of the card using 3M foam tape for a nice dimensional look. To finish my card I added some yellow Stickles to the centers of the flowers and some Nuvo Crystal Drops in ebony to the card. I hope you like it and thank you for visiting my blog!


Sunday, September 17, 2017

Thanks, You Warm My Heart


Today's card was created for the 2017 Fall Coffee Lovers Bloghop. I have a dear friend who receives the monthly KOTM stamps from Unity Stamp Company and she always lets me borrow them. Thank goodness for crafty friends, right? As soon as I saw this image in the May 2017 Free Your Dreams kit I knew I had to ink her up and make a card for the hop. To create my card I started by layering a piece of pumpkin pie orange cardstock from Hobby Lobby onto my white card base. I then layered some patterned papers from the My Mind's Eye Indie Chic 6x6 paper pad on top. I stamped the sentiment from the kit onto some more of the cardstock using Versamark ink and heat embossed it using some Ranger gold embossing powder. I cut the panel into a fishtail banner and set it aside. I then stamped the beautiful image onto some white cardstock and die cut it into a rectangle panel using a Gina Marie Designs stitched edge die. I stamped the image numerous times onto the patterned papers from the same 6x6 paper pad so I could paper piece the images onto the focal panel. Once everything was shaded and colored to my liking I went around all of the edges with my Memento dual tip onyx black marker and adhered them all to the focal image.  To finish my card I popped the focal panel and the sentiment banner up off of the card using 3M foam tape. I hope you like it!


Wednesday, September 13, 2017

Happy Birthday


Today's card was created for the latest The Card Concept Challenge. I absolutely love everything about this gorgeous inspiration photo and wanted to create a card using as many of the elements as I could in the photo. To create my card I started by stamping a piece of kraft cardstock using a Heidi Swapp woodgrain background stamp and ColorBox chalk ink in charcoal. I dried the cardstock with my heat tool and then went over the paper with more Colorbox charcoal ink in unicorn to give it a nice whitewashed look. I set that aside and then stamped several of the floral images from the Tim Holtz Stampers Anonymous Flower Garden stamp set onto some Copic-friendly cardstock. I colored the flowers to match the photo using my alcohol markers. I then stamped the sentiment from the Winnie & Walter The Big,the  Bold, and the Happy stamp set using Versafine onyx black ink for a nice crisp look. I die cut the panel using a Gina Marie Designs stitched rectangle die and popped it up off of the card using some 3M foam tape. I hope you like my card and I thank you for visiting my blog!

I Pick You


Today's card was created for both the Sunday Stamps and AAA Cards Challenges. To create my card I started by layering a beautiful piece of plaid paper from the Basic Grey 12x12 Olivia Collection paper pad onto my white card base. I then layered on a large strip of turquoise cardstock from Hobby Lobby directly to the center of the patterned paper panel. I added some faux stitched lines using a Memento tuxedo black dual edge marker. I die cut a circle of plain white cardstock using a pierced edge die from My Favorite Things and went around the edge with the marker again to create faux stitch lines. I then stamped the mouse, pumpkin, and leaves from the My Favorite Things Harvest Mouse stamp set onto some Copic-friendly cardstock and die cut the images using the coordinating dies. I colored them using my alcohol markers and adhered them onto my card using Stampin' UP foam dimensionals. I prepped a piece of black cardstock from Stampin' UP with my EK Success powder tool and stamped the sentiment from the same stamp set using Versamark ink. I heat embossed the image using Recollections snow white embossing powder. I cut the sentiment down into a small strip and adhered it directly to the focal panel. To finish this adorable little card off I added some clear Wink of Stella to the leaves, pumpkins, the sweater and boots. I hope you like it and I thank you for visiting my blog!


Monday, September 11, 2017

Happy Birthday To My Bestie


My bestie Alana had a birthday this past week and I wanted to create something beautiful to celebrate her day.  I created this card by stamping the gorgeous image from the Unity Stamp Company's Planner Gal Be A Beauty stamp set onto some Copic-friendly cardstock. I colored the image using my alcohol markers and did a bit of paper piecing on her shirt by using some patterned paper from the We R Memory Keepers Chalkboard 6x6 paper pad. I die cut the image out using a My Favorite Things pierced edge oval die. I layered a piece of patterned paper from the same We R Memory Keepers paper pad onto my white card base using 3M foam tape for some great dimension. I then adhered the oval focal panel down directly onto the card and added some clear Wink of Stella glitter brush and some Stickles to the flowers and leaves in her hair. I die cut the sentiment using some Stampin' UP black cardstock and a die from Blitsy. I adhered the sentiment directly to the card using some Zig glue and that finished up this pretty card. I hope you like it, and thank you for visiting my blog today!

Thursday, August 31, 2017

Hey There My Friend


Today's card was created for the latest Freshly Made Sketches. I love to make cards for Send A Smile 4 Kids and am long overdue shipping some out, so thought I'd get busy making a few more. This sketch inspired me to break out some fun kids stamps. I started by inking up the Your Next Stamp Happy Meal images onto some Copic-friendly cardstock and fussy cutting them out after they were colored. I adhered some patterned papers from the We R Memory Keepers Hall Pass 6x6 paper pad onto my white card base. I adhered my images directly down onto the card base and then stamped the sentiment from the Paper Smooches Sentiment Sampler stamp set using some Versafine onyx black ink. As a finishing touch I added some glossy accents to the eyes and the soda bottle. Thank you for visiting my blog and I hope you like my card! 


Tuesday, August 29, 2017

Sending Christmas Cheer


Today's card was created for both the 52 {Christmas} Card Throwdown and The Paper Players challenges. To create my card I started by embossing a piece of white cardstock using a random dot Stampin' UP embossing folder. I adhered that panel directly onto my white card base. I then stamped the adorable little snowman from the My Favorite Things Happy Heart Snowman stamp set onto some Copic-friendly cardstock, colored him using my alcohol markers, and then fussy cut him out. I die cut a snow bank using some more white cardstock and the stitched edge die from the Simon Says Stamp Drifting Stitches Border die set. I stamped the sentiment from the My Favorite Things Cheerful Christmas Greetings stamp set directly onto the snow bank using some Versafine onyx black ink for a nice crisp look. I went all around the edges of my snowman image with my dual edge Memento tuxedo black marker and adhered him to the snow drift using some snail adhesive. Once attached I popped the entire panel up off of the card using some 3M foam tape for some nice dimension. Some clear Wink of Stella on the heart, hat, and scarf finished this card off nicely. I hope you like it and thank you for visiting my blog today!

Sunday, August 27, 2017

If Friends Were Flowers


Today's card was created for the latest Addicted To CAS Challenge. To create my card I started by layering some pretty yellow cardstock from Hobby Lobby onto my white card base. I then took another sliver of that same cardstock and some white Copic-friendly cardstock and die cut a small stitched rectangle panel using a Gina Marie Designs die. I stamped the image and sentiment from the Stampendous Hands Of Friendship stamp set and colored a few parts of the image in using my alcohol markers. To finish my card I added a bit of yellow Stickles to colored areas and popped the panel up off of the card using some 3M foam tape for some added dimension. I hope you like it and thank you for visiting my blog!


Sending Hugs


Today's card was created for the latest Less Is More Challenge. I created my card by layering some pretty patterned paper from the American Crafts Neopolitan 12x12 paper pad onto my card base. I cut down a piece of Canson cold press watercolor paper and added some dashed lines to the edges by using a Paper Smooches edge die. I wet the paper and added a light circular wash of Tim Holtz distress ink in worn lipstick to the paper and dried it with my heat tool. I inked up the edges of one of the cute little jars I fussy cut from the same American Crafts paper pad using Versa Magic chalk ink in pink grapefruit and added some pretty crinkle ribbon from Diana Larson's shop. I glued an adorable wood veneer butterfly from American Crafts in the center for a nice touch of interest. To finish my card I stamped the sentiment from the Simon Says Stamp Friendship Messages stamp set directly onto the jar and then popped the whole thing up with some 3M foam tape. I plan on sending this to my daughter who is in need of some encouragement right now.  I hope you like it and thank you for visiting my blog today!