Sunday, December 16, 2018

Merry & Bright-Coffee And Cards With Celeste And Deb

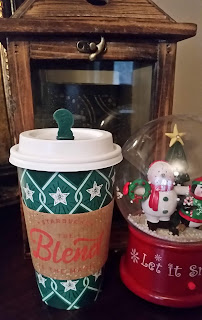
Hello and welcome to our final Coffee and Cards with Celeste and Deb for the year! This month we have Shanna of Caffeinated Craftiness joining us as a guest designer. She makes the loveliest coffee cards! Debra chose our inspiration photo this month and I think it's absolutely perfect for a December/holiday card! To create my card I started by layering some red cardstock from Stampin' UP onto my white A2 card base. I then layered on some fun coffee, Christmasy patterned papers from the American Crafts Hot Cocoa 6x6 paper pad. I then stamped the coffee cup image from the Unity Stamp Company's KOTM We Can Rise stamp set onto some Copic-friendly white cardstock using Memento tuxedo black ink and colored it to match the inspiration photo. I masked the image and then stamped some small snowflakes around it using a stamp from the Inkadinkado Christmas Characters stamp set. I die cut the image into a circular focal panel using a pierced edge circle die from My Favorite Things and then matted it onto more red cardstock using a Spellbinders die. I stamped the sentiment and the hearts from the Simon Says Stamp Christmas mini stamp set using both Versafine onyx black ink and Memento lady bug red ink. I cut it down into a think sentiment strip, matted it onto some more red cardstock and adhered it directly to the card. To finish this card off I added some clear shimmer to the colored image using my Spectrum Noir clear glitter pen and scattered a few red sequins from Craft Medley for some additional pops of color and interest. 
For my coffee choice this month I opted for a Starbucks white mocha latte to help warm me up on this rainy, cold day. Now pop on over to Deb and Shanna's blogs and see what fun they created! 


Thursday, December 13, 2018

Freezin' My Snowballs Off-W2CB Dec/Jan

Hello and welcome to the December/January Words 2 Craft By word challenge. This month's quote is "I'm an angel at Christmas time, but the rest of the year I'm the real me. Benjamin, age 11" My card kind of flips that a bit and I decided to create something fun and mischievous! To create my card I started by stamping the bunny from The Cat's Pajamas Snow Days stamp set onto some Copic-friendly white cardstock and colored him in using my alcohol markers. I die cut the image using a pierced edge circle die from My Favorite Things and then framed it out using some dark olive cardstock from Hobby Lobby and a Spellbinders circle die. I layered more of the olive cardstock onto my white A2 cardbase and then layered some pretty patterned papers from the American Crafts Very Merry paper pad onto the card. I stamped the sentiment from Unity Stamp Company onto more white cardstock, cut it down into strip and layered it onto more olive cardstock and mounted it onto the card below the focal panel. To finish this fun card off I added some red 6mm sequins from Craft Medley around the card. I hope can't wait to see how our quote inspires everyone else!


Tuesday, December 4, 2018

Have A Sweet Holiday and winner announcement


Please Grab Our Badge!
Hello and thank you for popping on over to my blog today. I can't believe it's December already! Today's yummy card was created for both The Card Concept and The Sisterhood Of Crafters card challenges. To create my card I started by coloring the edges of piece of white Copic-friendly cardstock green and adhered it to my white A2 card base. I then die cut a pretty stitched and scalloped panel using a Gina Marie Designs die. I stamped the sentiment from the Avocado Arts Gingerbread Goodness stamp set onto the panel using Versafine onyx black ink. I then stamped the gumdrop and the peppermint from the same Avocado Arts stamp set and the holly cluster from the Simon Says Stamp Ugly Sweater stamp set onto white Copic-friendly cardstock. I created masks for the 3 images and then stamped the cupcakes from Hero Arts Cupcakes stamp set onto them. I colored each of the images using my alcohol markers and fussy cut them out. I popped them up using foam squares from Scrapbook Adhesives. To finish this adorable card off I added some clear shimmer and shine using my Spectrum Noir clear glitter pen on the cupcakes frosting, added some sequins from Pretty Pink Posh, and some crystal and red Stickles to the gumdrop, holly, and peppermint. 
I also wanted to announce the winner of the blog candy from last week's Coffee And Cards Collaboration With Celeste and Deb. Congratulations Sue D! I will be shooting you an email to get your mailing address. 

Sunday, November 25, 2018

Let Us Give Thanks-Coffee And Cards With Celeste And Deb

Hello and welcome to the November edition of Coffee and Cards With Celeste and Deb! Can you believe Thanksgiving is past us and we are less than a month away from Christmas? I can't...this year has just slipped on past me. This month Deb and I thought it fitting that our theme should be "gratitude!"  To create my card I started with an A2 card base made out of Stampin' UP crumbcake cardstock. I then cut a panel slightly smaller than the base and stamped the rick rack border from the Hot Off The Press Stamped Stitches stamp set using Memento ink in rich cocoa. I then stamped the floral vines from the Stampin' UP Thankful Forest Friends stamp set onto the card. I stamped the sentiment from WPlus9's Pretty Patches: Pumpkin stamp set onto the card and then stamped the pumpkin onto a separate piece of crumbcake cardstock using memento inks and die cut the image using the coordinating dies. I added it to the card using some foam dimensionals from Stampin' UP for a ittle extra dimension and that completes my card. 
This month we thought it would be fun to do a little giveaway. Here is what I have for one lucky winner! 
How We Roll stamp set from Simon Says Stamp, a "create" die from Taylored Expressions, and a mini cube of Delicata ink in White Shimmer!
As for my coffee choice I opted for a large iced Peppermint Mocha latte from McDonald's. I'm training for a half marathon in April and did a long, tough 11 miles this morning, so this seemed like the perfect way to cap off my run!
Now be sure to pop on over to Deb's blog and check out her fun cards and what fun goodies she is offering for a giveaway!  

Wednesday, November 14, 2018

Blessed-Words 2 Craft By

Hello and happy November to you all! I cannot believe we are one week away from Thanksgiving and a month away from Christmas. Honestly, where has this year gone? Our latest Words 2 Craft By quote is "When I count my blessings, I count you twice.-Irish Proverb." To create my card I started layering some pretty fall plaid patterned paper from the American Crafts Autumn Crisp 6x6 paper pad onto my A2 white card base. I then stamped the sentiment and the pumpkin from the Unity Stamp Company's September KOTM Blessed Fall stamp set onto some white Copic-friendly cardstock. I die cut the image using a postage stamp edge rectangle die from Gina Marie Designs and then colored the pumpkin using my alcohol markers. I matted the panel onto some pumpkin colored cardstock from Hobby Lobby and popped it up off of the card using some inexpensive fun foam from Hobby Lobby. To finish my card off I added some orange 6mm sequins from Pretty Pink Posh and some gorgeous shimmer to the pumpkin and the sentiment using my Spectrum Noir clear glitter pen. I can't wait to see how this month's quote inspires everyone! 


Monday, November 5, 2018

Fall Leaves Thank You

Hello, happy Monday! Fall is here in full effect in Southeast Missouri and the foliage is simply gorgeous, so I was excited to create something reflecting the rich, beautiful colors of the season. I will be submitting this card in both the The Card Concept and The Paper Players card challenges. To create my card I started with an A2 base of crumbcake cardstock from Stampin' UP. I layered on a piece of plaid patterned paper from the Echo Park Reflections Fall 12x12 paper pad that I had die cut using a stitched edge rectangle die from Gina Marie Designs. I then die cut a fishtail banner using more of the patterned paper from the same paper pack and a die from Jillian Vance. I wrapped the bottom of the banner with some brown sugar bakers twine from We R Memory Keepers and adhered it directly to the card. Using a leaf punch from EK Success I punched out more of the patterned paper and heat embossed it with some Recollections brown sugar embossing powder and a sentiment from the WPlus9 Strictly Sentiments stamp set. I popped the leaf up off of the card using Stampin' UP foam dimensionals and finished the card off with some pretty rich bronze sequins from The Ton. I hope you like my card and thank you for visiting my blog today!


Sunday, October 28, 2018

Spooky-Coffee And Cards With Celeste And Deb

Hello and welcome to the October Coffee and Cards with Celeste and Deb collaboration. We are so tickled to have our crafty friend Michael Trent joining us again this month! Since it's late October we thought it might be fun to create a Halloween card. I opted to keep my card fairly clean and simple. There is no stamping on this card...only die cuts and paper with a touch of twine. To create my card I started by layering some orange textured cardstock from the American Crafts Halloween 6x6 paper pad onto my white A2 card base. I then die cut the ghost using the Lil' Inkers Ghost dies and some white cardstock. I then cut the sentiment using another Lil' Inkers die. I cut down a piece of batty patterned paper from the American Crafts Haunted 6x6 paper pad and adhered it to my card base. I adhered some black American Crafts jute twine to the ghost panel and adhered it directly to the card base and finished it off with a bow. Love how clean and simple it is! 
For my coffee choice this month it's turned a little cool here in Southeast Missouri so I opted for a large Dunkin Donuts toasted coconut coffee to warm me up after my run this morning. 
Thank you for visiting my blog today. If you like my card be sure and leave a kind word. I appreciate them all! Now be sure to pop on over to Deb and Michael's blogs and check out what fun and spooky creations they came up with! 

Thursday, October 25, 2018

Wishing You A Harvest Of Blessings

Hello, and welcome to my blog! It's finally fall here in Southeast Missouri and I thought it would be fun to create a card that reflected the season. I will be entering this card in the current The Paper Players card challenge. To create my card I layered a piece of sage cardstock onto my A2 white card base that I had cut a circle out of using a Spellbinders circle die and embossed using a Richard Garay sweater embossing folder. I stamped the adorable images from My Favorite Things Harvest Mouse stamp set onto white Copic-friendly cardstock, colored them, fussy cut them and mounted them onto the card using Stampin' UP foam dimensionals. I stamped the sentiment from the same stamp set onto the card and also onto a piece of black cardstock and heat embossed it using Recollections detail embossing powder in snow. To finish the card off I added some clear Wink of Stella to the leaves, the apples, and the mouse's sweater. Love how cute this turned out. If you like my card be sure and leave a comment. I appreciate them all!


Friday, October 12, 2018

Welcome Baby

Hello and happy Friday! Today's card was created for a co-worker's baby shower and I thought I would enter it into the latest Watercooler Wednesday "all about occasions" card challenge. To create my card I started by ink smooshing some Tim Holtz distress inks onto some Canson watercolor paper and then inking over it using a handmade stencil I created with some plastic packaging and a wave shaped die. I spritzed the panel with my mini Mister and then sprinkled some clear water droplets onto it as well as some Distress Spray Stain in picket fence. Once it was dry I stamped the sentiment from the Simon Says Stamp Baby stamp set onto the panel using Versafine onyx black ink. I die cut the panel using a Gina Marie Design stitched edge rectangle die and popped it up off of my white A2 card base using fun foam from Hobby Lobby . I then stamped the whales from The Alley Way Stamps Little Fellas and Something's Fishy stamp sets onto white Copic-friendly cardstock. I colored them using my alcohol markers, fussy cut them out, edged them using my dual tip Memento marker, and popped them up off of the card using Scrapbook Adhesives foam squares. My co-worker loved the card and I hope you do too. Thank you for visiting my blog and if you enjoyed my card be sure to leave a comment below. I appreciate them all!


Friday, October 5, 2018

Thankful For You

Today's card was created for the latest If You Give A Crafter A Cookie card challenge. I was so smitten with their beautiful inspiration photo! To create my card I started with a card base using Stampin' UP's crumb cake cardstock. I then layered some patterned papers from the Echo Park Reflections Fall 12x12 paper collection on top. I stamped the critters and the sentiment from the Stampin' UP Thankful Forest Friends stamp set onto white cardstock from Staples. I die cut the sentiment using a pierced oval die from My Favorite Things and fussy cut the critters using my detail scissors. Using a Zig dual tip marker in chocolate I added some dashed lines around the outer edge of the card and the sentiment panel. I popped the sentiment up off of the card using foam squares from Scrapbook Adhesives and did the same with the critters, placing them onto the card around the sentiment. To finish my card I added some glittery gold enamel dots by My Mind's Eye Now & Then collection. Love how adorably sweet this card turned out. Thank you for visiting my blog today and if you like my card be sure to leave a comment. I appreciate them all!


Tuesday, October 2, 2018

Zombie Coffee Card


Today's card was created for the latest Cards In Envy card challenge. The challenge is to create a "spooky" card. I can't think of anything spookier or scarier than someone jonesing for their caffeine fix! This is pretty  much me every single morning after my 5 am run...LOL. To create this fun card I started with a base of basic black cardstock by Stampin' UP and layered on a piece of patterned blue paper from the 7 Gypsies Venice 6x6 paper pad on top that I had inked around the edges with black soot distress ink by Tim Holtz. I die cut a circle of more patterned paper from the same paper pad, inked the edges, and adhered it to the card in the upper left hand corner. I stamped the zombie from the Sugar Pea Designs Undying Love stamp set onto some Copic-friendly white cardstock and colored him using my alcohol markers. I die cut the image into a focal panel using a stitched edge rectangle die from Gina Marie Designs. I popped him up off of the card using some 3M foam tape. To create the sentiment I used several different stamp sets...Sugar Pea Designs Undying Love, Honey Bee Stamps Blah, Blah, Blah, Verve Stamps Coffee, and Sweet Stamp Shops Zombies. I die cut the sentiment using a smaller stitched edge rectangle die by Gina Marie Designs and popped it up onto the card. To finish my card off I added some Glossy Accents to the zombie's eyes and added some 6mm black sequins from Pretty Pink Posh around the card for some balance and interest. Thank you for visiting my blog today and if you like my card please be sure to leave a comment. I appreciate them all!

Sunday, September 23, 2018

Happy Birthday-Coffee And Cards With Celeste And Deb

Hello, and welcome to another Coffee and Cards with Celeste and Deb! I can't believe it's September already! Unfortunately we are still experiencing summer weather here in Southeast Missouri so not really fall here yet but I'm sure it will be here before we know it. Deb and I decided to create cards this month using washi tape as our focal point. I am ashamed to admit that I have tons of washi tape that I've accumulated over several years that sit in a container in my craft closet completely unused. I simply forget I have it. So, I thought it would be fun to pull it out and use a large portion of it on a card. I love these gorgeous patterns and colors and thought they  complimented each other nicely. It was fairly easy to pull together. I started by layering a piece of soft pink cardstock from Hobby Lobby onto my white A2 card base. I then cut down a thinner panel of white cardstock from Staples and adhered my washi tapes (all from Recollections) at a diagonal onto the panel. Using my mini-Misti I stamped the sentiment from the Verve Stamps Poppy Birthday stamp set directly onto the panel using Versafine onyx black ink. I adhered the panel directly to the center of the card. I then stamped one of the floral images from the Stampin' UP Flower Shop stamp set onto more of the same pink cardstock using Versamark clear ink and heat embossed it using Recollections detail embossing powder in snow white. I then punched the image out using the coordinating punch. To finish this card off I adhered a bit of pink bakers twine to a blue button I had in my stash and adhered it to the card using a glue dot and some foam squares from Hobby Lobby. Love how beautifully it turned out!
As for my coffee choice I opted for a cool salted caramel iced coffee. So very yummy! Now be sure to pop over to Deb's blog and check out her card creation!

Wednesday, September 12, 2018

Ah, Autumn-Words 2 Craft By September/October

Hello and welcome to the September/October Words 2 Craft By word challenge. Your inspiration this month is Life starts all over again when it gets crisp in the fall-F. Scott Fitzgerald. Anyone who knows me knows it's no secret that autumn is my favorite time of the year. I love the cool, crisp air, the foliage, the warmer clothing...and my birthday is in the fall. So, I was excited to create a card that celebrates my favorite season! To start I layered a piece of chocolate chip cardstock from Stampin' UP onto my standard A2 white card base. I then layered a piece of the Autumn Splendor patterned paper from Best Creation Inc on top. I then stamped the gorgeous tree image from the Hero Arts Color Layering Fall Trees stamp set onto some white cardstock from Staples using Memento dew drop inks in fall colors. For the ground I used one of the images from the Paper Smooches Positive Strokes stamp set and more Memento inks. I then stamped the sentiment from the Close To My Heart Always Grateful Seasons & Nature stamp set and die cut the image using a stitched edge rectangle die from Gina Marie Designs. I matted the panel onto more Stampin' UP chocolate chip cardstock and popped it up off of the card using fun foam from Hobby Lobby. I added some coordinating 3mm sequins from The Ton onto the tree image to mix in with the leaves to finish up my pretty autumn card. I can't wait to see how this month's quote inspires the rest of you!


Friday, August 31, 2018

Butterfly Happy Birthday

Today's card was created for the latest Watercooler Wednesday card challenge. To create my card I started by cutting a piece of Stampin' UP basic black cardstock into a pretty decorative border using a Stamplorations Cutplorations decorative edge die. I adhered it to some pretty patterned paper from the Studio Calico Atlantic 6x6 paper pad and layered it onto my standard white card base. I then stamped the sentiment from the Winnie & Walter The Big, the Bold, and the Happy stamp set directly onto the card base using Versafine onyx black ink and my mini-Misti to ensure nice, crisp lines. I stamped the butterfly image from the Bo Bunny Flutter Stamp stamp set onto some Canson watercolor paper using Versafine onyx black ink and heat set it using some Zing clear embossing powder. I watercolored the image using some Tim Holtz distress ink and attached it to the card using some glue dots and some foam dimensionals. I added a few clear rhinestones from Recollections and some clear Wink of Stella glitter to the butterfly for a nice finishing touch. Thank you for visiting my blog! I hope you have a safe and wonderful holiday weekend!


Sunday, August 26, 2018

Celebrate-Coffee And Cards Collaboration With Celeste And Deb

Hello, and welcome to another Coffee And Cards Collaboration With Celeste And Deb! Debbie chose steampunk as our theme this month. I have to admit, I've never created anything steampunk or even anything multi-media so I struggled a bit with this one. After doing some trolling through Hobby Lobby and Tuesday Morning I finally came up with an idea for my card. I started by purchasing a sheet of self adhesive tin tile vinyl paper in onyx by 7 Gypsies. I already had a cog that had come in a destash box I bought from a crafty friend some months back. So, I started with those two elements. After going through all of my stamps I landed on the Tattered Traveler stamp set from Tattered Angels. These stamps are huge so I don't use them very often, mostly because they don't typically fit on an A2 sized card. So, I decided to create an easel card. I've never made one but it was fairly easy to create. I started by die cutting a panel down and folding it in half. I then die cut the panel leaving a small sliver at the top unexposed to the die so it would remain intact. I die cut a piece of the vinyl tile paper and attached it to the circle panel. I glued the cog to the bottom center of the vinyl tile panel to hold the easel portion in place. I then stamped and die cut each of the pocket watch elements from the Tattered Angels stamp set onto more kraft cardstock and fussy cut them out. I layered them together adding dimension to each element using foam squares from Scrapbook Adhesives. To finish my fun shaped card off I stamped the sentiment from the Tim Holtz Stampers Anonymous Crazy Talk stamp set onto kraft cardstock and trimmed it out with some of the leftover tile paper. I adhered it to the bottom of the card. This is a pretty large card so I'm going to have to create my own envelope for it but I can do that pretty easily with my envelope score board. 
It's been unseasonably cool here in Southeast Missouri...until today. We are starting to warm back up so I opted for a nice icy frozen coffee with a dash of pistachio flavoring. Yes, it's as yummy as it sounds and it cooled me off while I was out running errands too! Now be sure to pop over to Deb's page and leave some blog love in the way of a kind comment. 

Tuesday, August 21, 2018

You're So Sweet. Thank You Berry Much

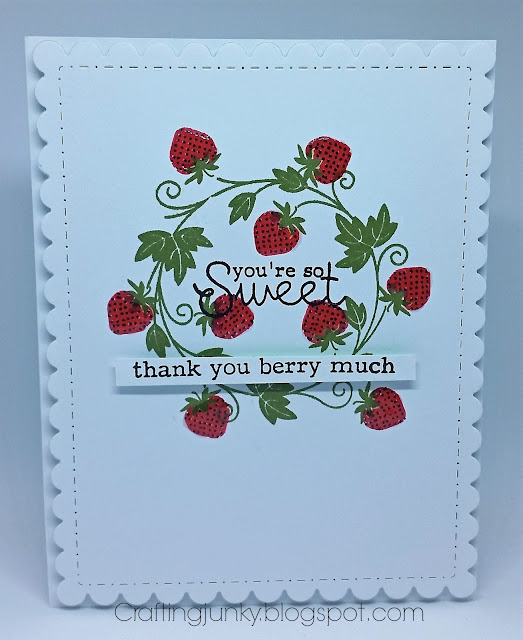
Today's card was created for both The Paper Players and Addicted To CAS card challenges. To create my card I started by stamping the beautiful berry wreath from the Clearly Besotted Simply Scrumptious stamp set onto white card stock using both fresh asparagus and red hot inks from Gina K Designs. I stamped the center sentiment from the same stamp set using Versafine onyx black ink and my mini-Misti for a nice crisp look. Then using a pretty scalloped die cut from Gina Marie Designs I cut the image down into a focal panel and mounted it to my card using some fun foam from Hobby Lobby. I then stamped the second sentiment from the same stamp set using more white cardstock and Versafine ink. I cut it down into a small strip and mounted it up off of the focal panel using a thin strip of fun foam. To finish my card off I added some black dots to the strawberries using my Sakura black gelly roll pen and some Glossy Accents for a nice finishing touch. I hope you like my card and thank you for stopping by my blog today! 


Sunday, August 19, 2018

Thinking Of You

Hello and happy Sunday! Today's card was created for the latest Freshly Made Sketches. To create my card I started by cutting a piece of patterned paper from the Studio Calico Atlantic 6x6 paper pad into a panel using a wonky edge stitched rectangle die from Gina Marie Designs. I mounted it straight to my white card base. I then cut a small strip of basic black cardstock from Stampin' UP and mounted it onto the card. I die cut a white circle using some white cardstock from Staples and a Spellbinders circle die. I mounted it directly to the card panel. I then stamped the flower from Stampendous Fresh Bloom wood mounted stamp using Versafine onyx black ink and heat set it using some clear embossing powder from Zing. I then watercolored the image using some inexpensive watercolors I picked up at Hobby Lobby. Once the image was dry I fussy cut it out and went around the edges using my Memento tuxedo black dual tip marker and added some white gel pen detail to the flower's stamen.  I stamped the sentiment from the Hero Arts OWH Year Round Sentiments stamp set using Versafine and heat set it as well. I cut the sentiment down into a small strip banner and mounted it directly to the flower and then popped it all up using some inexpensive fun foam. Love how pretty this turned out with the ombre of the watercoloring and the ombre of the patterned paper. I thank you for stopping by my blog today!

Wednesday, August 15, 2018

Merry Christmas

Today's card was created for the latest Jingle Belles card challenge. To create my card I started by layering some basic black cardstock from Stampin' UP onto my standard white card base. I then layered a piece of red patterned paper from the American Crafts Very Merry 6x6 paper pad on top and added some white dashed lines around the outer edge for some fun contrast. I then die cut the snow globe images from the Papertrey Ink Winter Snow Globe stamp and die collection. I prepped the die cut images with my EK Success powder tool and stamped the base of the snow globe onto the cardstock using Versamark ink and heat set it using Recollections detail embossing powder in silver. I then stamped the snowflakes using more Versamark ink and heat set them twice, once using Ranger's holographic embossing powder for a fun sparkle and again with Recollections detail embossing powder in snow. I love the little extra glimmer and shine stamping it twice gave the images. I then die cut and stamped the Santa, snowman, and tree images onto some white Copic-friendly cardstock and colored them using my alcohol markers. I then stamped the sentiment onto more of the same black cardstock using the Amy R Stamps Big Christmas Wishes stamp set and heat embossed it using more of the Recollections detail embossing powder in snow. I trimmed the sentiment down to create a fishtail banner. I then mounted the snow globes directly to the card base using the sketch as my guide and popped the focal images up off of them using Stampin' UP's foam dimensionals and the fishtail banner using some 3M foam tape. I love how adorably this card turned out. I hope you like it too!


Friday, August 10, 2018

You're Purrfect

Today's card was created for the latest Less Is More card challenge. To create my card I started by stamping the adorable cat and his little ball of yarn onto some Copic-friendly cardstock. I colored the images using my alcohol markers and fussy cut them out. Using some patterned papers from the Crate Paper Story Teller 6x6 paper pad I die cut a stitched edge rectangle with a Gina Marie Designs die and layered it onto my white card base using fun foam from Hobby Lobby. I then die cut a pierced edge circle using more white cardstock and more patterned paper from the same paper pad with a die from My Favorite Things. I stamped the sentiment using Memento London fog ink and a sentiment stamp from the Paper Smooches Feline Friends stamp set onto the circle panel. I adhered the panel directly to the card, mounted the cat onto the panel using Stampin' UP foam dimensionals and adhered the yarn ball directly to the panel using snail adhesive. To finish my card I added two small clear rhinestones from Recollections on either side of the sentiment. Thank you for visiting my blog today and have a wonderful weekend!


Thursday, August 9, 2018

Art Impressions Birthday

My card today was created for the latest The Paper Players theme challenge. To create my card I started by stamping the fun chicken image from the Art Impressions Bird Brains stamp set onto some white Copic-friendly cardstock and colored it using my alcohol markers. I added some sparkle to the image using my Spectrum Noir clear glitter pen on her beak, legs, and the straw. I then cut the image out using a My Favorite Things pierced edge circle die and matted into onto a scalloped edge circle panel in Stampin' UP's real red cardstock that I cut using a Spellbinders die. I stamped the sentiment from the same stamp set onto more white cardstock and cut it down into a strip that I mounted on more red cardstock. I then layered a fun plaid patterned paper from the American Crafts Heartland Farm 6x6 paper pad onto a panel of the red cardstock and then adhered it to my white card base. I die cut a large fishtail banner using more of the same papers from the paper pad a die from Jillian Vance. The inside of the card reads, " They're both a pain in the rear! Happy Birthday anyway!" This stamp set cracks me up! If you like my card be sure to leave a comment. I appreciate them all. 


Best Fishes

My card today was created for the latest The Male Room card challenge. To create my card I started by stamping the fun images from the Lawn Fawn Fintastic Friends stamp set onto some white Copic-friendly cardstock. I colored the images using my alcohol markers and used the coordinating dies from the set to cut the images out. I took a strip of Gina K Designs patterned paper and layered it onto my white card base to the far left. I added a sliver of basic black cardstock from Stampin' UP next to the strip of patterned paper just to break up the design a bit. I stamped the sentiment from the same stamp set onto more of the same black cardstock using Versamark ink and heat embossed it using Recollections snow white embossing powder and my heat tool. I popped the fish tank up off of the card using fun foam as well as all of the images and the sentiment strip. To finish this the card off I added some coordinating sequins from The Ton and some shimmer to the images using my Spectrum Noir clear glitter pen. Thank you for visiting my blog and be sure to leave a comment. I read and appreciate them all! 


Never Stop Looking Up

My card today was created for the latest Tuesday Throwdown challenge. This week's challenge is "anything goes." I have a dear friend who lets me come raid her craft room and borrow stamps every month and this month I borrowed her Unity Stamp Company KOTM Open Sky, Big Ocean. I stamped that gorgeous moon and the coordinating sentiment onto some Canson cold pressed watercolor paper using Versamark ink and Recollections detail embossing powder in snow white. I heat embossed the image using my heat tool and then colored the image using my Tim Holtz distress inks and a watercolor brush. Once the image was dry I cut it down into a panel using a wonky stitched edge rectangle die from Gina Marie Designs. I popped the panel up off of my white card base using fun foam from Hobby Lobby and then added a sweet little wooden embellishment star from American Crafts and a smattering of silver star sequins from Pretty Pink Posh. I love how this card turned out! Thank you for visiting my blog and if you like my card be sure to leave a kind word. I appreciate them all!


Wednesday, August 8, 2018

Dream-W2CB August/September Challenge

Hello! Welcome to the August/September Words 2 Craft By challenge. This month's challenge is "Will you succeed? Yes! You will, indeed! (98 and 3/4 percent guaranteed.). Kid, you'll move mountains!-Dr. Suess." This made me think of graduation and all of the hope and promise that comes with ending a scholastic chapter of a person's life and the beginning of implementing that education into the next phase of life. So, I created a graduation card. To create this fun gender neutral card I started by layering some textured black cardstock from Hobby Lobby onto my white card base. I then layered some patterned papers from the K&Company's Graduation Designer Mat Pad paper pack onto the card and added a strip of black cardstock that I cut with a dotted edge die from Paper Smooches in between the two papers for some contrast. I then stamped the image from Unity Stamp Company's Diploma Cap & Gown mini stamp set onto some white cardstock from Staples using Versafine and heat embossed it using Zing clear embossing powder and my heat tool. I trimmed the image down and mounted it onto more of the same black cardstock and popped it up off of the card base at an angle using fun foam from Hobby Lobby. I then stamped the same image again onto a small strip of the patterned paper and trimmed it down into a fishtail banner and mounted it up off of the focal image using some Scrapbook Adhesives foam squares. To finish this card off I added some 6mm black sequins from Pretty Pink Posh around the focal panel. I look forward to seeing what the rest of the team comes up with and how it inspires the rest of you create something fun and inspirational!