Showing posts with label Hero Arts. Show all posts

Tuesday, December 4, 2018

Have A Sweet Holiday and winner announcement


Please Grab Our Badge!
Hello and thank you for popping on over to my blog today. I can't believe it's December already! Today's yummy card was created for both The Card Concept and The Sisterhood Of Crafters card challenges. To create my card I started by coloring the edges of piece of white Copic-friendly cardstock green and adhered it to my white A2 card base. I then die cut a pretty stitched and scalloped panel using a Gina Marie Designs die. I stamped the sentiment from the Avocado Arts Gingerbread Goodness stamp set onto the panel using Versafine onyx black ink. I then stamped the gumdrop and the peppermint from the same Avocado Arts stamp set and the holly cluster from the Simon Says Stamp Ugly Sweater stamp set onto white Copic-friendly cardstock. I created masks for the 3 images and then stamped the cupcakes from Hero Arts Cupcakes stamp set onto them. I colored each of the images using my alcohol markers and fussy cut them out. I popped them up using foam squares from Scrapbook Adhesives. To finish this adorable card off I added some clear shimmer and shine using my Spectrum Noir clear glitter pen on the cupcakes frosting, added some sequins from Pretty Pink Posh, and some crystal and red Stickles to the gumdrop, holly, and peppermint. 
I also wanted to announce the winner of the blog candy from last week's Coffee And Cards Collaboration With Celeste and Deb. Congratulations Sue D! I will be shooting you an email to get your mailing address. 

Wednesday, September 12, 2018

Ah, Autumn-Words 2 Craft By September/October

Hello and welcome to the September/October Words 2 Craft By word challenge. Your inspiration this month is Life starts all over again when it gets crisp in the fall-F. Scott Fitzgerald. Anyone who knows me knows it's no secret that autumn is my favorite time of the year. I love the cool, crisp air, the foliage, the warmer clothing...and my birthday is in the fall. So, I was excited to create a card that celebrates my favorite season! To start I layered a piece of chocolate chip cardstock from Stampin' UP onto my standard A2 white card base. I then layered a piece of the Autumn Splendor patterned paper from Best Creation Inc on top. I then stamped the gorgeous tree image from the Hero Arts Color Layering Fall Trees stamp set onto some white cardstock from Staples using Memento dew drop inks in fall colors. For the ground I used one of the images from the Paper Smooches Positive Strokes stamp set and more Memento inks. I then stamped the sentiment from the Close To My Heart Always Grateful Seasons & Nature stamp set and die cut the image using a stitched edge rectangle die from Gina Marie Designs. I matted the panel onto more Stampin' UP chocolate chip cardstock and popped it up off of the card using fun foam from Hobby Lobby. I added some coordinating 3mm sequins from The Ton onto the tree image to mix in with the leaves to finish up my pretty autumn card. I can't wait to see how this month's quote inspires the rest of you!


Sunday, August 19, 2018

Thinking Of You

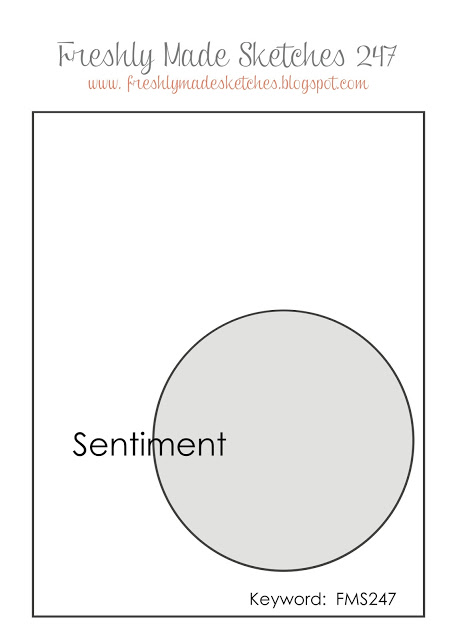
Hello and happy Sunday! Today's card was created for the latest Freshly Made Sketches. To create my card I started by cutting a piece of patterned paper from the Studio Calico Atlantic 6x6 paper pad into a panel using a wonky edge stitched rectangle die from Gina Marie Designs. I mounted it straight to my white card base. I then cut a small strip of basic black cardstock from Stampin' UP and mounted it onto the card. I die cut a white circle using some white cardstock from Staples and a Spellbinders circle die. I mounted it directly to the card panel. I then stamped the flower from Stampendous Fresh Bloom wood mounted stamp using Versafine onyx black ink and heat set it using some clear embossing powder from Zing. I then watercolored the image using some inexpensive watercolors I picked up at Hobby Lobby. Once the image was dry I fussy cut it out and went around the edges using my Memento tuxedo black dual tip marker and added some white gel pen detail to the flower's stamen.  I stamped the sentiment from the Hero Arts OWH Year Round Sentiments stamp set using Versafine and heat set it as well. I cut the sentiment down into a small strip banner and mounted it directly to the flower and then popped it all up using some inexpensive fun foam. Love how pretty this turned out with the ombre of the watercoloring and the ombre of the patterned paper. I thank you for stopping by my blog today!

Sunday, May 6, 2018

Season's Greeting

Today's card was created for the latest Jingle Belles card challenge. The challenge is to create a card with a building on it. To create my card I started by layering a piece of dark blue patterned paper from the Colorbok Watercolor Rainbow 8.5x11 paper pad onto my white card base. To create my winter scene I had to incorporate several different stamp sets. I started by stamping the birch tree from Altenew's Birch Land stamp set onto some Copic-friendly cardstock. I then stamped Altenew's Winter Cottage to make it look like it was in the background. I then selectively stamped two of the little trees from the Memory Box Deer In The Field stamp set next to the fence row to create a nice balanced scene. I then stamped the sentiment from the Hero Arts Merry Christmas Trees onto the top left corner. I die cut the entire scene using a stitched edge rectangle die from Gina Marie Designs and colored the images in using my alcohol markers. I adhered the panel to the card using some inexpensive fun foam from Hobby Lobby and then added some Wow extra fine white glitter to all of the snowy areas on the trees for a fun glittery finish. Love how serene this scene looks! Thank you for visiting my blog and if you like my card please be sure to leave a comment. 


Friday, January 12, 2018

Butterfly Birthday


Today's card was created for the latest Less Is More challenge. I really struggle with clean and simple cards but I do love the color purple, so I had to come up with something pretty but CAS. To create my card I started by layering some dark lavender cardstock from Hobby Lobby onto my white card base. I then layered some white cardstock on top and added a few clear Recollections rhinestones to each corner. I then added a focal panel by die cutting a piece of patterned paper from the Authentique Essentials Collection 6x6 paper pad using a cross stitched edge circle die from Gina Marie Designs. I stamped the butterfly from a Hero Arts stamp set and sentiment from Winnie & Walter's The Big, The Bold, and The Happy stamp set directly onto the patterned paper. I stamped the butterfly again onto some white Copic-friendly cardstock and colored it with my alcohol markers in pretty shades of purple. I fussy cut the image, edged it with my Memento tuxedo black dual tip marker, and adhered it down to the focal panel using a glue dot and some Stampin' UP foam dimensionals. As a finishing touch I added tons of clear Wink of Stella and a few clear rhinestones to the butterfly's body. I love how this card turned out! I only wish my photo had better exposure. Unfortunately, our area got hit with a nasty ice storm last night and the sun has not really showed itself much today. Anyway, I hope you like my card and thank you for visiting my blog!


Wednesday, May 31, 2017

Blah Blah Blah-Send A Smile 4 Kids

It's been a while since I created a card for the Send A Smile 4 Kids Challenge so I decided to jump in and participate. It's been a while since I sent a box of cards to my crafty friend Sybrina and thought it was time to remedy that. I kept this card pretty simple. The challenge is to create something bright and colorful and it doesn't get any brighter or more colorful than neon colors. I took a panel of plain white cardstock and swiped the Hero Arts neon inks in blue, green, pink, and orange directly across the paper in big swiping motions. I went over them several times to get good coverage and saturation of ink. Once the colors dried I stamped the sentiment from the new Honey Bee Blah Blah Blah stamp set. I usually focus my cards that I donate to this cause to younger children but I thought it would be fun to create a teen card. Anyone who has ever had a teenager knows how snarky and sarcastic they can be so when I saw this stamp set I knew it would be perfect for a fun and snarky sentiment. I added some black dashed lines around the outer edge of the card using my Memento dual tip black marker for some visual interest and then popped the whole panel up off of the card front using some 3M foam tape. I hope you like it!


Dad


I decided to try and do a CASE card and I have always been a big fan of Lori Tecler and her fun and creative cards. I decided to do an A2 sized card using some of the same elements she used on her great card. I started with a clean white card base and layered on some kraft cardstock that I picked up at Hobby Lobby. I cut down a navy panel using more Hobby Lobby cardstock and then a plain white panel to go on top. I stamped the Happy Father's Day sentiment over and over using a sentiment from Hero Arts Happy Dad's Day stamp set and some Gina K Designs navy ink and mounted it onto the card panel. I cut a fishtail banner using a Jillian Vance Design banner die and some more kraft cardstock and popped it up off of the card using 3M foam tape for some great dimension. I die cut the pierced edge oval using a My Favorite Things die and more of the same navy cardstock. Finally, I die cut the focal sentiment from kraft three times using a Simon Says Stamp die and adhered them together using my Zig 2 Way glue pen and then adhered it directly onto the oval. A few navy enamel dots from the Simple Stories Life Documented collection finished this fun card off. Thank you Lori for the inspiration!


Wednesday, April 5, 2017

Happy Easter


Today's card was created for the latest The Paper Players and Addicted To Stamps And More challenges. I started by stamping the adorable bunny from the Unity Stamp Company's January Kit of the Month {When You Smile}onto some Copic-friendly cardstock. I created a mask for the image and then stamped the background by using Tim Holtz distress ink in picked raspberry and the Hero Arts Leaf & Floral background stamp. I removed the mask and colored the bunny in using my Copic alcohol markers. I added some pink ice Stickles the flowers and a few small clear rhinestones from Recollections for some additional sparkle. Using an ink pad direct to paper technique I created a small mat to frame out my focal panel that I adhered down to the white card base. I stamped the sentiment from Lawn Fawn's Happy Everything stamp set onto a strip of white cardstock and adhered it to the card panel. I added a few larger clear rhinestones from Recollections as a final touch for this adorably cute Easter card.  I hope you like it!


Saturday, December 10, 2016

Merry Christmas

My first card today was created for the latest Addicted To Stamps And More challenge. To create my holiday themed card I started by layering some red cardstock from Stampin' UP onto my white card base and then layered some pretty patterned paper from the American Crafts Jolly 6x6 paper pad on top. I then die cut a scalloped edge rectangle panel using a Gina Marie die and popped it up off of the card using some 3M foam tape. I stamped the stocking image from Hero Arts K5254 wooden stamp directly onto the panel and colored the ribbon in using my Uni-ball Signo white gel pen for some nice contrast. I then stamped the image again onto some Copic-friendly cardstock, colored the images using my alcohol markers, fussy cut them, and went around the edges of each one using my Memento tuxedo black dual tip marker for a nice clean die cut look. I added a few details using my white gel pen and then popped the stockings up off of the card using some Stampin' UP foam dimensionals. For the final touch I stamped the sentiment from the Papertrey Ink Winter Snow Globe stamp set at the top of the panel. I hope you like this whimsical and fun little card!


Tuesday, September 13, 2016

Anniversary Joy

Today's card was created for my aunt and uncle's upcoming anniversary at the end of this month. I started with some pretty patterned paper from the Chickaniddy Scrumptious 6x6 paper pad and die cut an oval in the center using an MFT pierced oval die.  I adhered the patterned paper directly onto my white card base and then added some black stitched lines around the outer edge of the patterned paper and the inner edge of the oval panel. I then die cut the word Joy using some black cardstock from Hobby Lobby and  the coordinating die from Papertrey Ink's Phrase Play #8 stamp and die set. I fussy cut around the panel cutting the word "joy" from the frame because I just wanted the word itself. I adhered the die cut sentiment directly onto the card using my Zig 2 way glue pen. I then stamped the word anniversary above the die cut using a Studio Calico-Hero Arts stamp set. I apologize for not knowing the name of this stamp set but I bought it used on a destash and it has no name on it. Using some mini Stampin' UP dies I die cut the flower petals using some more patterned paper from the Chickaniddy paper pad and layered them together. I punched some more of the same black cardstock using an EK Success 1/2" circle punch and adhered them directly on top of the flowers and then adhered those directly onto the card on either side of the oval. Once adhered I added a few clear rhinestones from The Paper Studios and called this card done. I hope you like it!

Monday, September 5, 2016

Happy Fall


My second card today was created for both Cards In Envy and The Challenge challenges. I will also be donating this card to the Send A Smile 4 Kids card donation program. Yes Sybrina, I have cards coming your way this week! I started my card by layering some chocolate chip cardstock from Stampin' UP onto my white cardbase. I then layered some pretty, glittery paper Autumn Splendor patterned 12x12 paper from Best Creation onto my card. The photo doesn't do this adorable paper justice. It really sparkles and shines and the best part is it's permanent, which is perfect for donating cards to children in hospitals because it won't flake off and become airborne. Anyway, I did some masking and stamping using the adorable images from My Favorite Things Harvest Mouse stamp set and die cut the image using a pierced edge circle die, also from My Favorite Things. I colored the adorable image using Copic markers and added some pretty clear Wink of Stella to help mimic the glitter of the paper. Using Hero Arts Layering Tree stamp set I stamped the sentiment above the scene using Gina K charcoal brown ink. I cut a small strip of the same chocolate chip cardstock and added it to the card and then adhered the focal die directly on top. I love how sweet this little card turned out! I have to apologize for the poor quality of my photo. I usually use my smart phone but it died on me yesterday and I'm using my tablet. Unfortunately, the photo quality is not quite as good. I will be fixing that this week so bear with me. 


Saturday, August 13, 2016

Noel


Today's card was created for the latest Jingle Belles challenge. The prompt is Rudolph The Red Nose Reindeer but not the song or the reindeer, but rather the color red.  I started with a white card base and layered on some real red cardstock by Stampin' Up on top. I then took a piece of Stampin' UP crumbcake cardstock and prepped it with my EK Success powder tool and inked it up with Versamark ink using the snow background stamp from Papertrey Ink's Winter Snow Globe stamp set. I covered it with Recollections snow white embossing powder and hit it with heat tool. Using a Gina Marie Designs stitched edge rectangle die I die cut the panel out. I then stamped the houses from the Hero Arts New England Winter stamp onto some white cardstock using more Versamark ink and covered it with Zing rouge embossing powder and hit it with my heat tool. I fussy cut all of the houses out and mounted them up using Stampin' UP foam dimensionals. I die cut some snowy landscape panels using some Paper Smooches dies and adhered one directly onto the focal panel and the other I popped up with foam dimensionals and adhered it onto the panel, as well as the houses I had fussy cut. I then stamped the Santa and his reindeer from the Avery Elle Joy To The World stamp set using more Versamark ink and heat embossed it using black embossing powder from Zing. I adhered the focal panel directly onto my card base and then stamped the sentiment from Hero Arts Merry Christmas Wishes stamp set using Versafine onyx black ink for a nice crisp look. I hope you like it!

Wednesday, July 27, 2016

Sending Warm Thoughts


Today's card was created for both the current Color Q and the latest Freshly Made Sketches challenges. It's been a while since I made a card and I was determined to get creative and break out of my funk. I don't know about you guys out there in the crafting blogosphere but I have about had my fill of summer. I'm not a fan of the heat anyway now that I've hit hot flash age but this has been a pretty hot summer so far. So, I wanted something to remind me that fall will be coming soon. I started with some plain white cardstock and inked around the edges using Memento dandelion ink. I cut a piece of cardstock 1/4" smaller and embossed it using a Lifestyle Crafts embossing folder and mounted it straight onto my inked panel. I liked the look of the debossed side better some I actually flipped it over and used the "wrong" side. I inked up the Hero Arts Color Layering Fall Trees stamp set using Gina K ink in warm cocoa for the trunk and Memento inks in lilac posies, love letter, tangelo, and dandelion for the leaves. I stamped the hillside under the tree using Rubberneck's French Script background stamp and then inked the memento dandelion ink directly onto the paper. I cut it down using a stitched edge die from Paper Smooches and then adhered it straight onto the paper under the tree. Once adhered I die cut a circle panel using an MFT pierced edge die. I stamped the sentiment from the same Hero Arts stamp set and added ink directly to the paper using the same Memento ink. I lightly inked the edges of the circle panel and the sentiment strip using Tim Holtz distress ink in tea dye and then popped them up off of the card using some Stampin' UP foam dimensionals for some added interest and dimension. I hope you like it!


Sunday, April 3, 2016

Happy Mom's Day

Today's card was created for the current Less Is More challenge. I started with some simple kraft cardstock and treated it with my embossing buddy powder bag. I stamped the sentiment from the Hero Arts Mother's Day stamp set using Versamark ink and heat embossed it with white detail embossing powder from Recollections. Using a ruler and a Versamark dual tip pen I drew the lines on either side of the sentiment and heat embossed those. Using some large post-it notes I blocked of the sentiment and stamped the Deco Chalk flowers from Impress Cards and Crafts as well as some of the leaves and heat set those too. I added a few dots here and there for some additional balance and visual interest using my white gel pen. It was a pretty quick and easy card to do. I hope you like it!


Wednesday, March 9, 2016

Friends Don't Let Friends Drink Alone

Today's card was created for the current Less Is More challenge. This week was a color challenge and the color was citrus. I don't really do a lot of green cards but I thought this color might be a fun one. I started by stamping the margarita glasses from the My Favorite Things Girls Night Out stamp set onto some white cardstock using Memento tuxedo black ink. I colored them using Copic markers, fussy cut them, and edged them using a Memento dual tip marker in tuxedo black so they would have nice, clean edges. I took a Tim Holtz blending tool and brushed some Hero Arts neon green ink onto my card base. I cut a smaller panel and stenciled the same color ink using a Tim Holtz dotted stencil. Once that was dry I went around the edge of my panel drawing a free-hand dual scribbled line for some added interest. I popped my margarita glasses up off the card using some Stampin' UP foam dimensionals and then popped the entire focal panel up off of the card using some 3M foam tape. A few sequins in lime green from Pretty Pink Posh and this card is done. Sorry for the poor lighting...it's a pretty bleak day here in Southeast Missouri. 


Saturday, November 21, 2015

Season's Greetings


My second card today was created for the Merry Monday and Inkspirational Christmas card challenges. I have several deer stamps and dies and had a tough time deciding which ones to use. I decided I wanted to create a quiet, serene scene where deer would be found. I cracked out a stamp that I've owned for well over a year but I'm embarrassed to say I've never used. I wiped the dust off of my Hero Arts Winter Trees stamp and stamped it using some clear Versamark ink. I then did some masking and stamped only the deer on the Memory Box Deer In The Field stamp. I used the sentiment from the WPlus9 Pretty Patches stamp set. I heat embossed it all using Ranger liquid platinum embossing powder and seriously love the way it turned out! I popped the whole panel up onto a plain white card base using some foam tape and added a bit of DMC gold cross stitching floss. My only regret was that the floss started unraveling as I was tying the bow. I tried several pieces and all of them did the same thing. I finally gave up and adhered it down with a glue dot but am still not happy with that bow. I guess I'd better find some different twine or floss. But I am happy with the card overall and am sorry it took me so long to break out this beautiful stamp! 
  

Monday, November 2, 2015

A Very Pink Season's Greetings

It's been a while since I've had a chance to post a card. Life has gotten in the way...work, visiting relatives, and making time for friends I've not seen in a while. But when I saw this week's Time Out Challenge I knew I had to make time to participate in this one simply because I knew it would force me outside of my typical comfort zone for holiday card making. The challenge is to create a Christmas card with the optional twist to include pink and/or purple. I stopped and thought about it and I have to say that I don't think I've ever made a holiday card with either pink or purple on it so I thought it might be fun to try. I started with some patterned paper from My Mind's Eye. I apologize that I cannot recall the name of the paper but I only bought a single sheet of it years ago and had thrown the strip with the name of it away right after I bought it. But that pretty paper had all of the right colors in it to launch my focal panel. I decided to try my hand at watercoloring. That's something else that's very much outside of my comfort zone. I'm not very good at it and most of my efforts in the past have failed but I was determined to make this work. I started with a piece of Strathmore cold press watercolor paper and I cut it out using a Gina Marie Design stitched line die. I prepped the paper with a powder tool and stamped the adorable stocking image by Hero Arts using some Versafine onyx black ink and then heat embossed it using some American Crafts clear embossing powder. Using some Tim Holtz distress ink in Spun Sugar and did a nice wash of light pink over the entire background and then added some darker pink splatters using my Simply Art watercolor palette. I stamped the stockings again, embossed them, and then watercolored them using my Simply Art watercolors in pink, purple, and green. I fussy cut them out and popped them up off of the focal panel using some Stampin' UP foam dimensionals. I added some frosted lace Stickles over the stockings for some added sparkle and dimension and then added a few sequins from Pretty Pink Posh in the corners. I stamped the greeting from the Simon Says Stamp Be Joyful stamp set and heat embossed it. I cut the paper out and created a banner by creating fish tails on either end. I love how adorably this turned out and I hope you do too!


Thursday, October 15, 2015

Snowman & Riley

Today's card was created for the Merry Monday Christmas card challenge. The challenge was to use a moose on your card so I knew I had to stamp up this adorable Riley & Co Snowman & Riley stamp! I used Memento tuxedo black ink so I could color the image in using my Copic markers. I layered my colored image panel over some adorable striped paper from Pebbles Welcome Christmas 6x6 paper pad. I used a darker green patterned paper from the same paper pack and cut it into 1/8" strips and adhered it above and below the focal image for a bit more visual interest. I stamped the greeting using Hero Arts green dye ink from the SSS Be Joyful stamp set and adhered a few iridescent sequins from SSS around it. I added some red, green, and crystal Stickles to the snowman and Riley for some extra bling and then went over the sentiment using my clear Wink of Stella glitter pen because you can never have too much shimmer and shine! I hope you like it!


Sunday, September 20, 2015

Wish Big

Today's card was designed for the new challenge over at Retro Sketches. I have to admit, this is a different card for me. I have a few friends who are into darker and grungier themes and this card was created for one of those friends. She loves paintings by Jasmine Becket-Griffith and Toon Hertz and a lot of the stamps from Stampotique have that same style and grunge to them. So, I started with the Karin stamp by Stampotique and colored her using Copic markers in various shades of purple and pink and then fussy cut her out and edged the image using a black Memento dual tip marker to give her a nice clean look. I started my card base with some pretty black and cream floral paper from the Prima Romance Novel 6x6 paper pack. I inked the edges of it with some Tim Holtz black soot distress ink to tone the color down a bit. I then took some beige patterned grid paper from the 7 Gypsies Postale 8x8 paper pack and stamped the Julie Nutting Floral & Script background stamp onto it using some Tim Holtz victorial velvet distress ink. I dabbed a bit of both that and the black soot onto an acrylic block and using a watercolor brush I flicked some splatter onto the paper to grunge it up even more. I then tore a small scrap of the word print from the same Prima paper pack and edged it with the black soot. I stamped one of the balloons from the Hero Arts Wish Big stamp set and colored it using Copic markers in pinks. I popped popped the girl image and the balloon up onto the panel using some Stampin' UP foam dimensionals and ran some black American Crafts twine under the balloon and adhered under the girl's hand using some Ranger Multi Medium Matte so it would stay put. I popped the inner panel up off of the card using some foam tape, adhered some beautiful sequins from The Ton's sweetheart mix, and ran some clear Wink of Stella over her hair, the dress, the stockings, and the balloon for some shimmer. I stamped the sentiment from the same Hero Arts stamp set using some Versafine onyx black ink. I hope you like it...I know my friend will! 


Sunday, July 5, 2015

Happy Thoughts Coming Your Way

Today's card was designed for the Paper Players Theme Challenge: The Great Outdoors. I started by stamping the Hero Arts Leaf and Floral background onto some 110 lb cardstock from Staples using Tim Holtz Faded Jeans distress ink and then re-inked the stamp using Tim Holtz Broken China and shifted the cardstock over by an 1/8th of an inch to create a sort of blurred two-tone effect. I stamped the chevron from A Creative Journey's I Just Love You stamp set continuously on a 1/2" strip of cardstock and anchored it in the center of the card for a bit of visual interest. Then I stamped the Cherry Blossom Bird image from Stampabilities onto some 110 lb cardstock and colored it in using my Copic markers. The sentiment is from the Avocado Arts Perfectly Perfect Day stamp set and I punched it out using The Modern Label Punch from Stampin' UP. I took a scrap piece of cardstock and inked it all over using the Tim Holtz Faded Jeans again and then punched the Modern Label again as well as two pieces of edging from a Fiskars postage stamp punch and affixed it the trimmed down focal panel. Love the way it turned out!